How to make toys on the Christmas tree with your own hands?
With the onset of autumn, many complain about the decline of strength and the impending blues. Bad mood and apathy in inclement rainy weather is far from uncommon. Most people get depressed and want to spend more time alone with themselves. And during this period, many people forget that the most beautiful period of the year is approaching - the New Year holidays.
And if children believe in magic and look forward to the New Year to see the miracle, then adults associate the winter with a period of high financial costs.
Although believe in a fairy tale and create a magical atmosphere under the power of absolutely everyone.

In the fall, you can start preparing for the main event of the year, choose gifts for relatives and loved ones, plan family vacations, and, of course, choose decorations for your home. And the easiest way to choose the right decorations is to do it yourself.In addition, a unique decoration can be created only independently, by investing a piece of your soul.
Making jewelry with your own hands will save a considerable part of the family budget. And the general occupation of creativity is a good opportunity to interest adults and children in one process. In addition, handicraft helps children to develop imagination and imagination, teaches them to perseverance and hard work. In this article we will examine a lot of unique techniques for creating beautiful Christmas-tree toys.


Paper Christmas Decorations
From any waste material, you can create a unique and beautiful Christmas-tree toy, be it a broken plastic pin, an abandoned toy, a blown bulb or fir cones. But the most simple to manufacture toys can be created from plain paper. Toys and paper figures can not only decorate the Christmas tree, they can also be hung on the walls and ceiling.
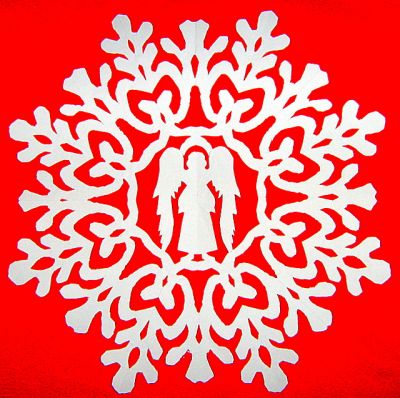
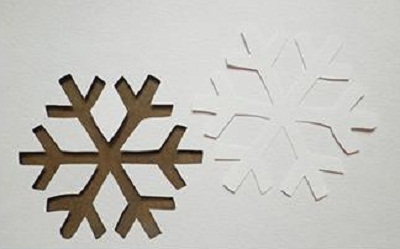
The simplest material from which to make beautiful jewelry with children is plain white stationery. It is moderately dense and is associated with fluffy white snow. A classic decoration of the New Year holiday is a homemade snowflake.For its manufacture will need only paper and scissors. White snowflakes with beautiful unique patterns will be an excellent decoration for windows.
In addition, the openwork snowflake is a snap. And this exciting activity will appeal to both adults and very young family members.
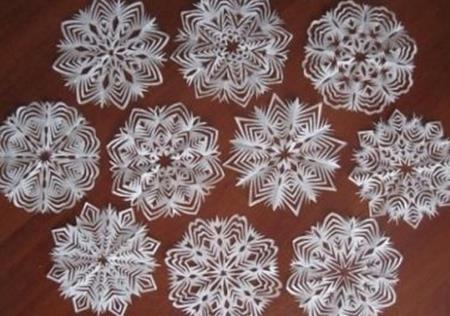

The technology for making snowflakes is very simple.
- Take a white sheet of A4 paper, fold it in half diagonally to make a triangle, and cut the unwanted free strip with scissors.
- After that, fold the triangle once again in half diagonally, connect the corners and draw along the fold line so that the paper holds the shape of a triangle. And then repeat the procedure again.
- With a pencil, draw a pattern on the paper and cut off the excess part. Beautiful picturesque patterns can be copied by the example of the finished pattern or create your own.


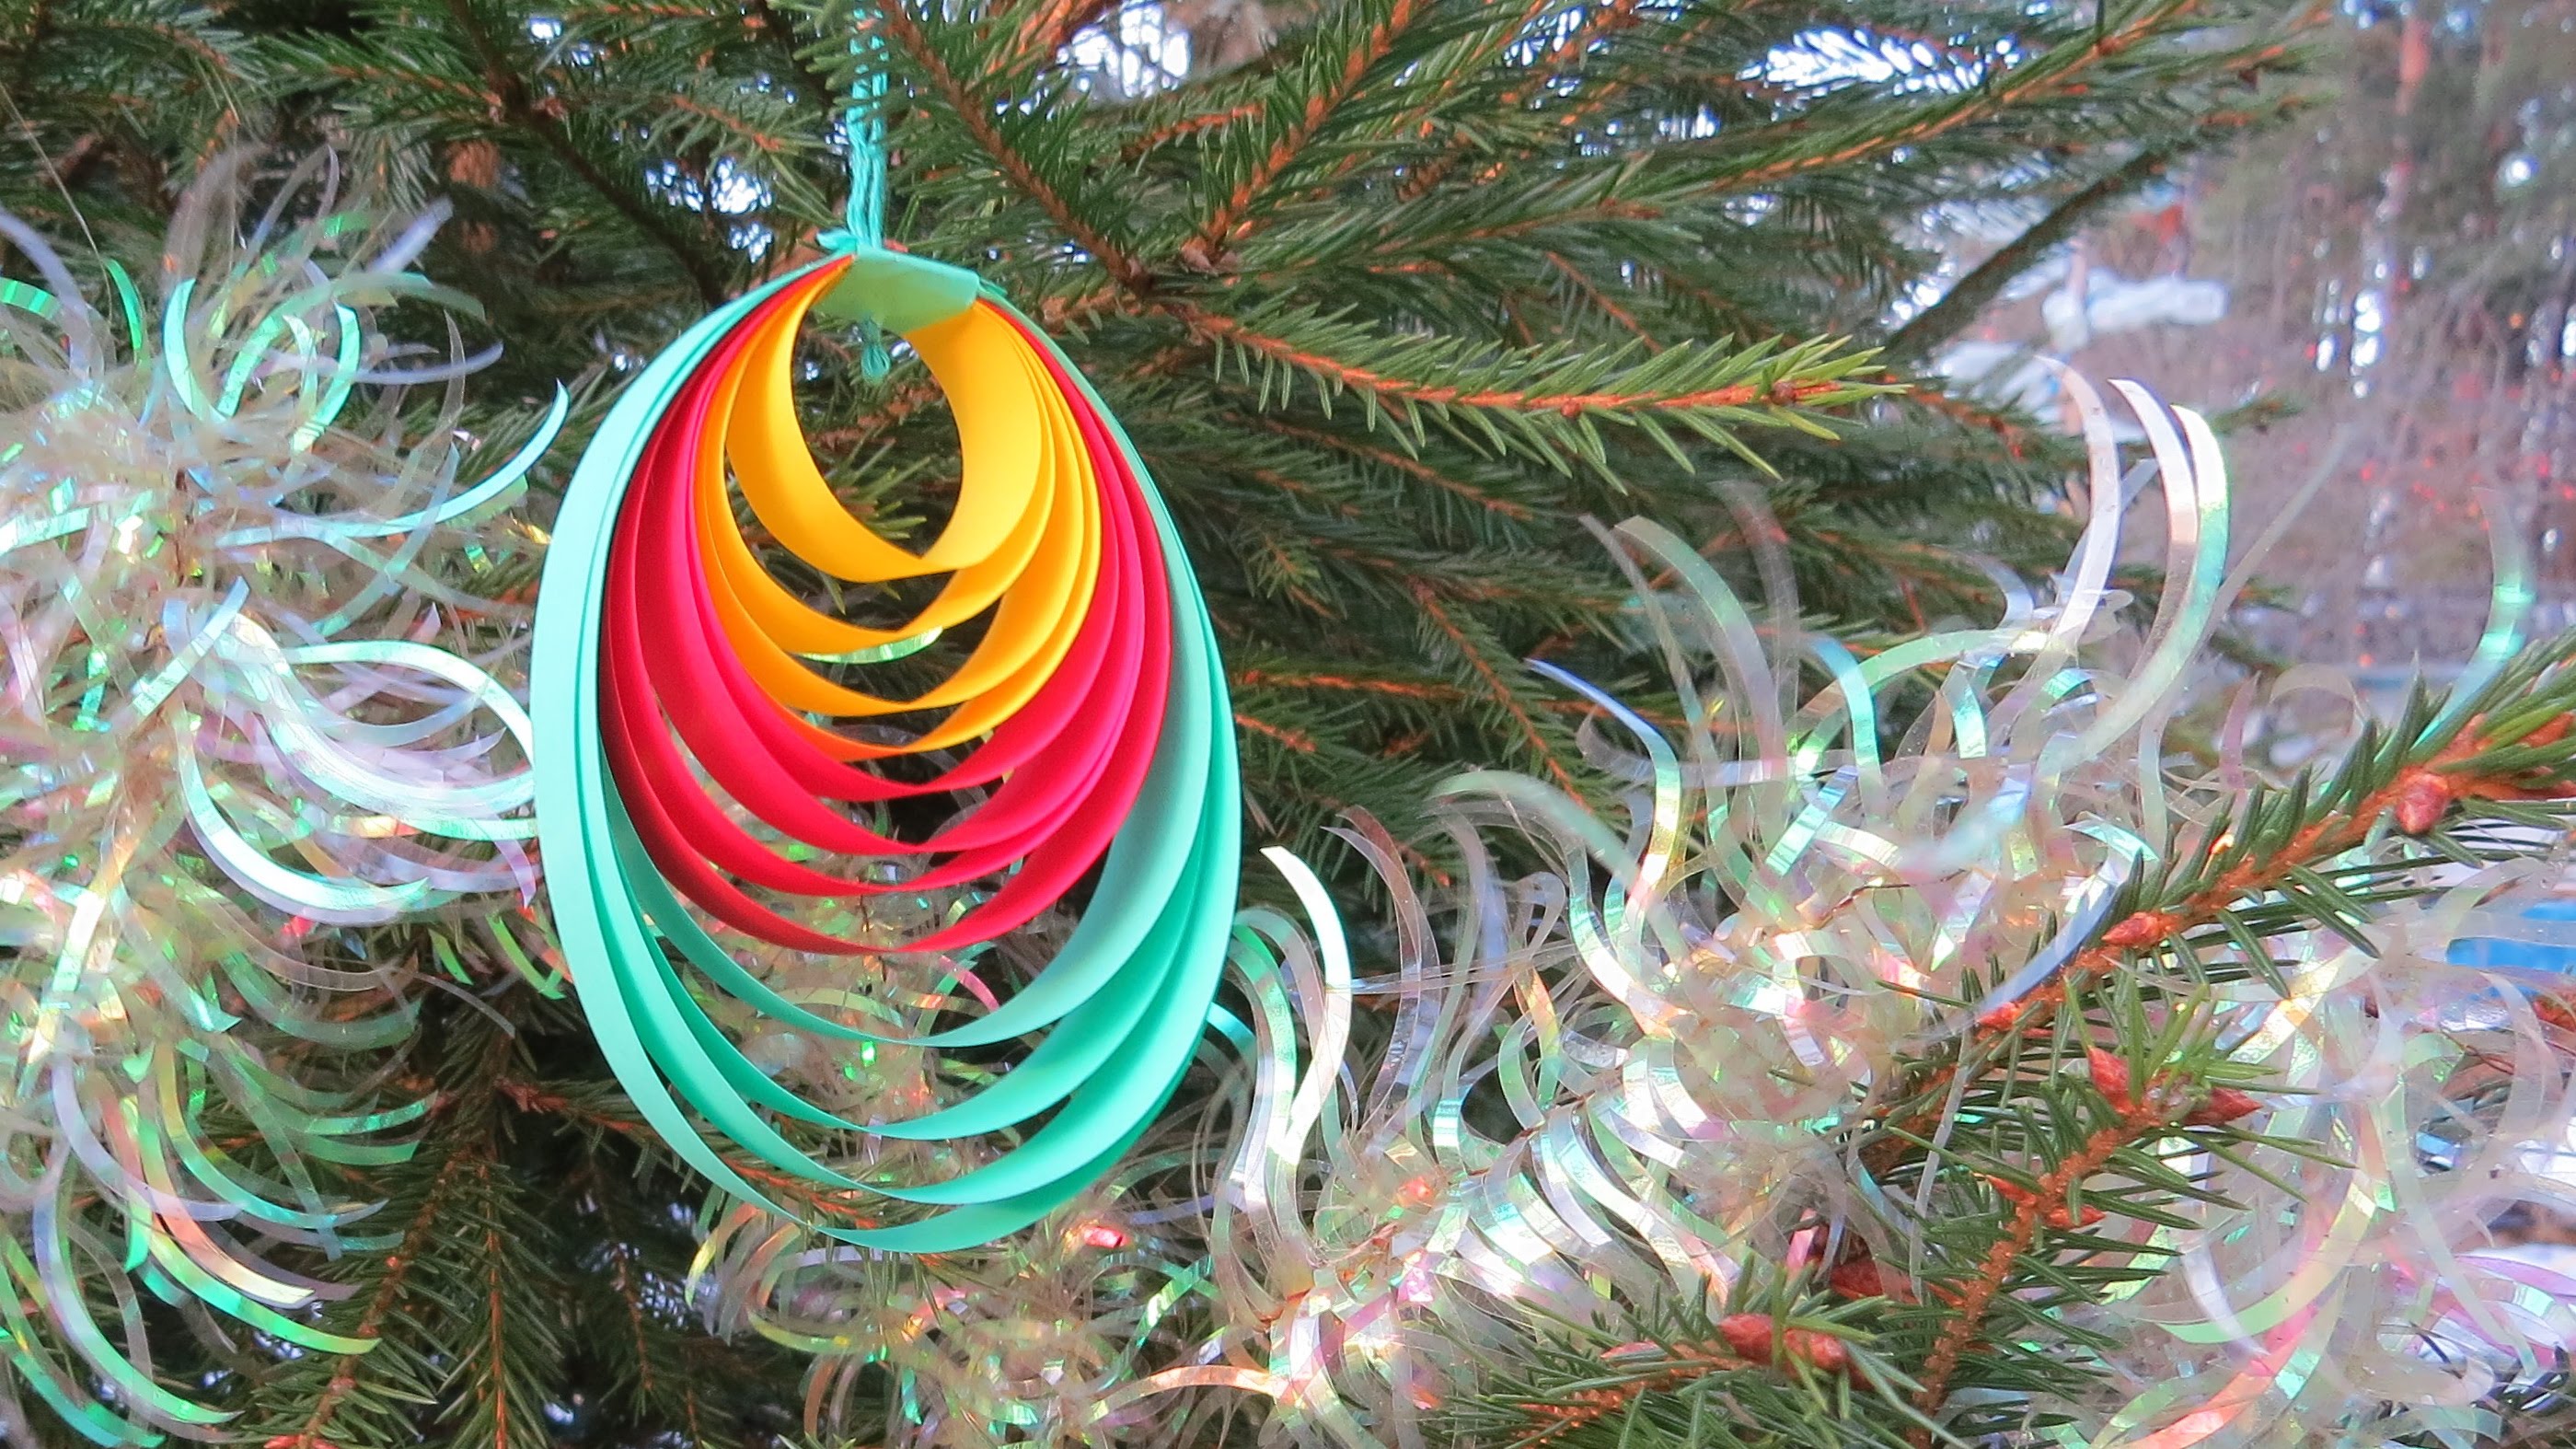
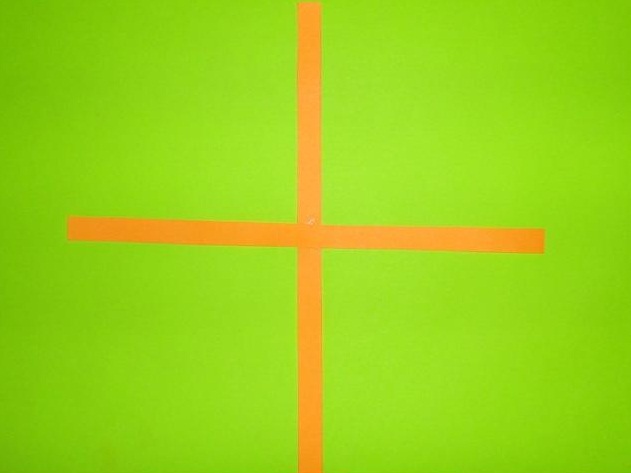
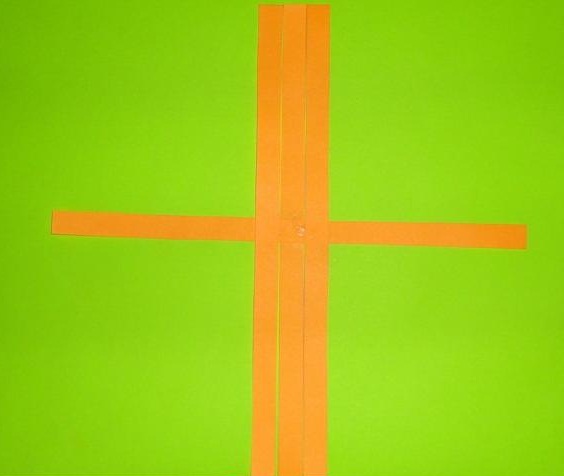
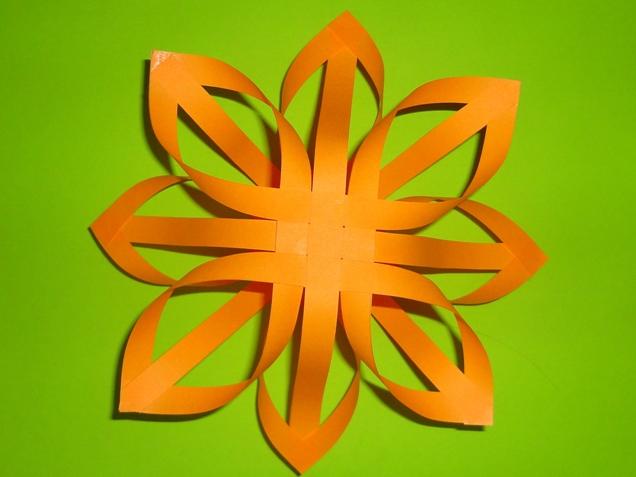
Of the remaining strips of paper, you can also make a beautiful crafts - another version of snowflakes. This will require 12 strips of paper 1.5 cm wide and 30 cm long, glue, scissors. Place the three strips horizontally, and the remaining three vertically in the form of a cross. Secure all 6 strips in the middle with glue.
Then connect the extreme vertical and horizontal stripes so that a volume oval is formed. Repeat the same clip with the remaining three sides. The result will be an original figure in the form of a cross with four ovals. Make the same shape from the remaining 6 strips and fasten both parts together. The result was a voluminous and beautiful snowflake. See a detailed master class in the illustration.

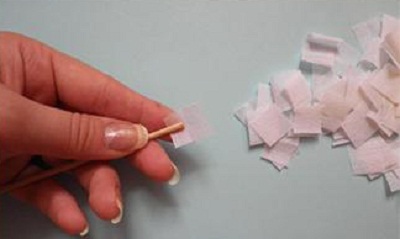
The sweetest fluffy snowflakes can be made from ordinary napkins. For this you will need:
- cardboard;
- napkins;
- scissors;
- PVA glue;
- pencil and wooden skewer.

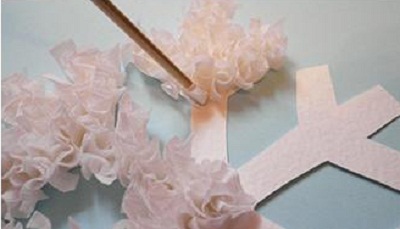
Instead of napkins, you can use special corrugated paper for creativity. The stage of creating a fluffy snowflake is more laborious, but the end result will impress you. Draw snowflakes on the cardboard and cut them out. This will be the basis for decoration. Cut the napkin into 1x1 cm squares, fold each one in half and twist it into a thin tubule with a wooden skewer so that it looks like a small flower bud.
Apply PVC glue on the cardboard and alternately glue small parts of the napkins to the base. All work will require more than one hour of hard work and effort, but the result will be wonderful.
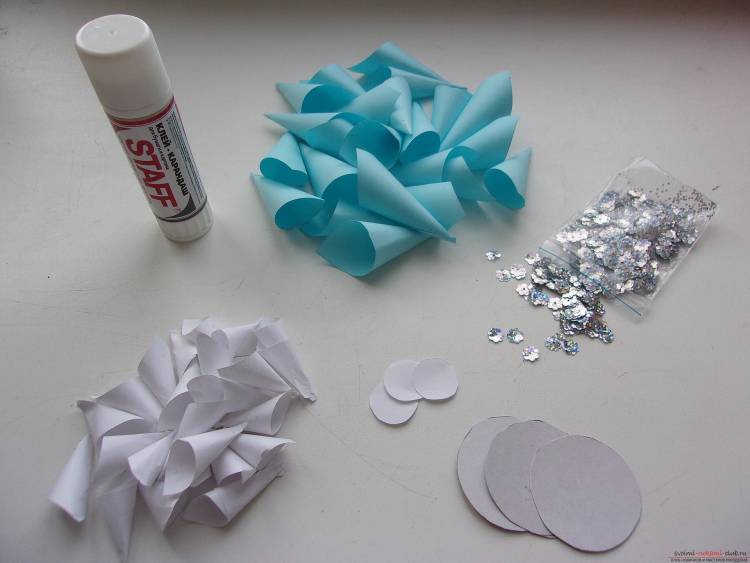
The finished snowflake can be decorated with beads, sequins or beads.
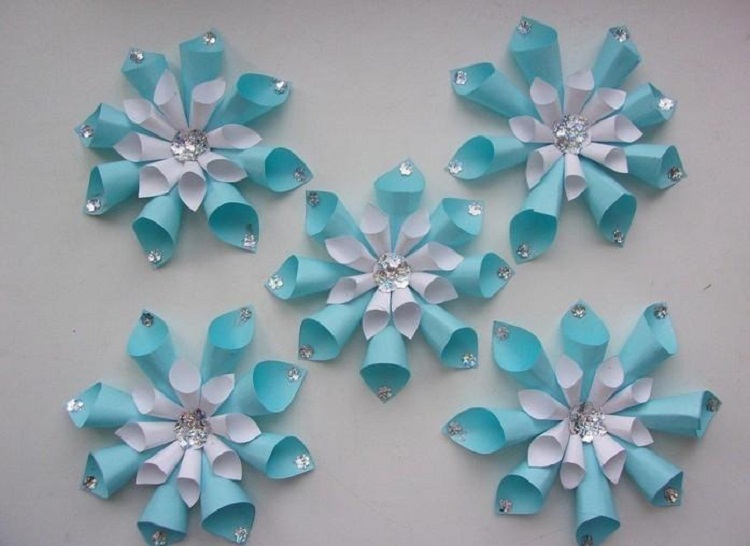
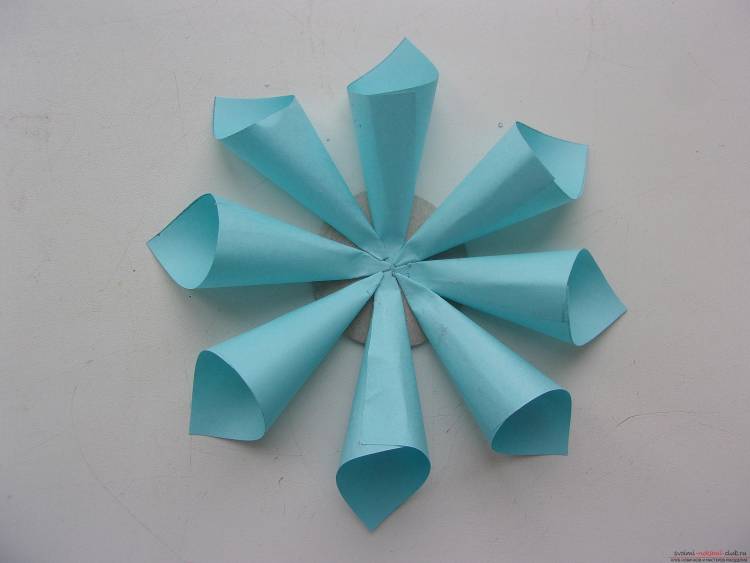
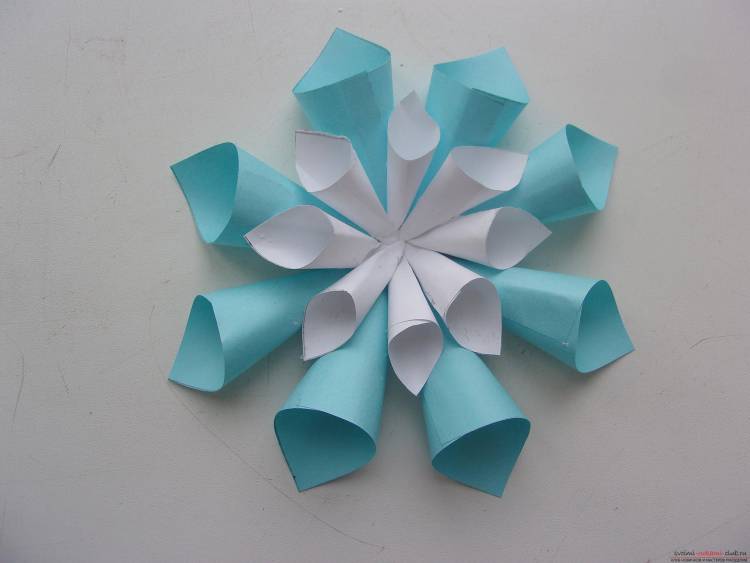
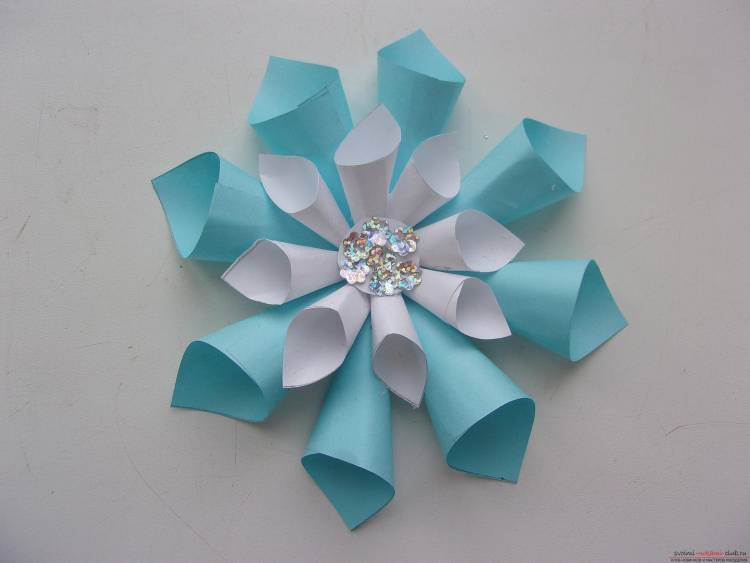
Beautiful paper snowflakes can be made even with the smallest members of the family. Prepare 8 squares of paper measuring 4x4 cm and the same number of squares slightly smaller than 3x3 cm. You can also take paper of different colors.
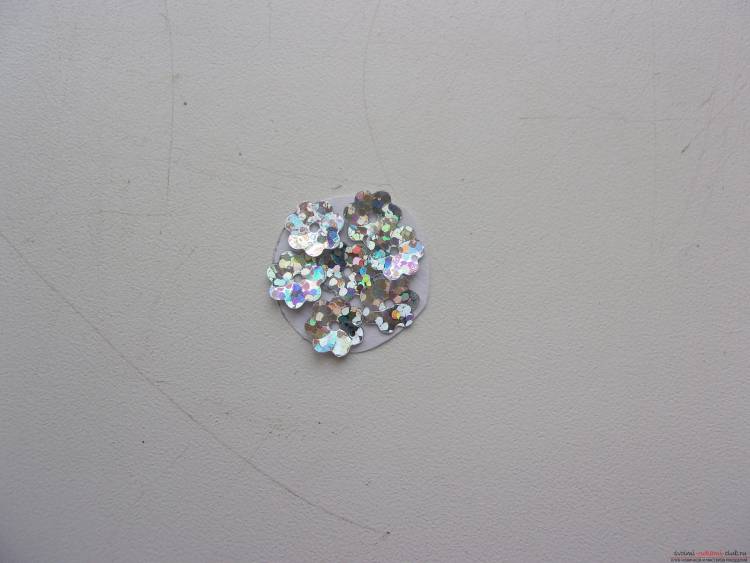
Turn the squares into a cone, securing the base and the place of connection with glue. The resulting tubes horns fasten the corners together in a circle - on the outside lay large cones, and on the inside small. Place the connection with a bead or large sequin.
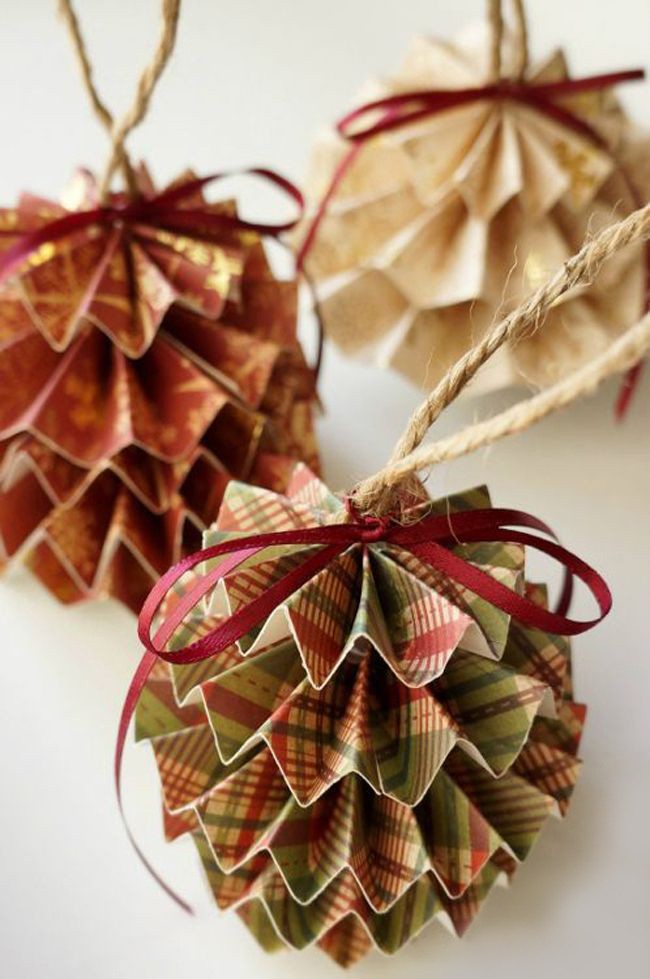
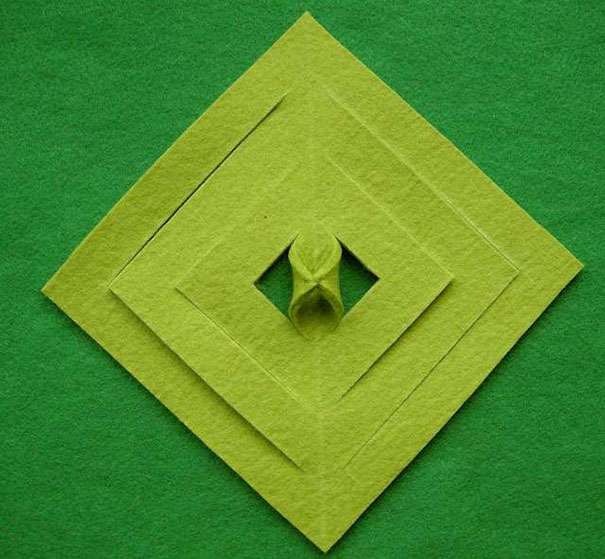
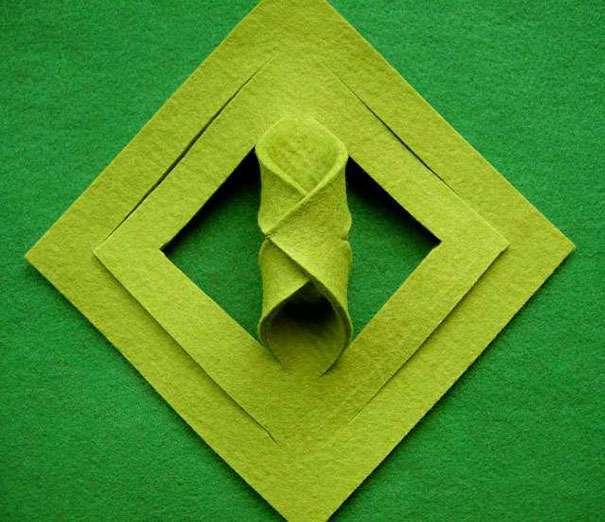
But snowflakes are not all decorations that can be made from paper. Volumetric figures with carved elements look very original and beautiful.
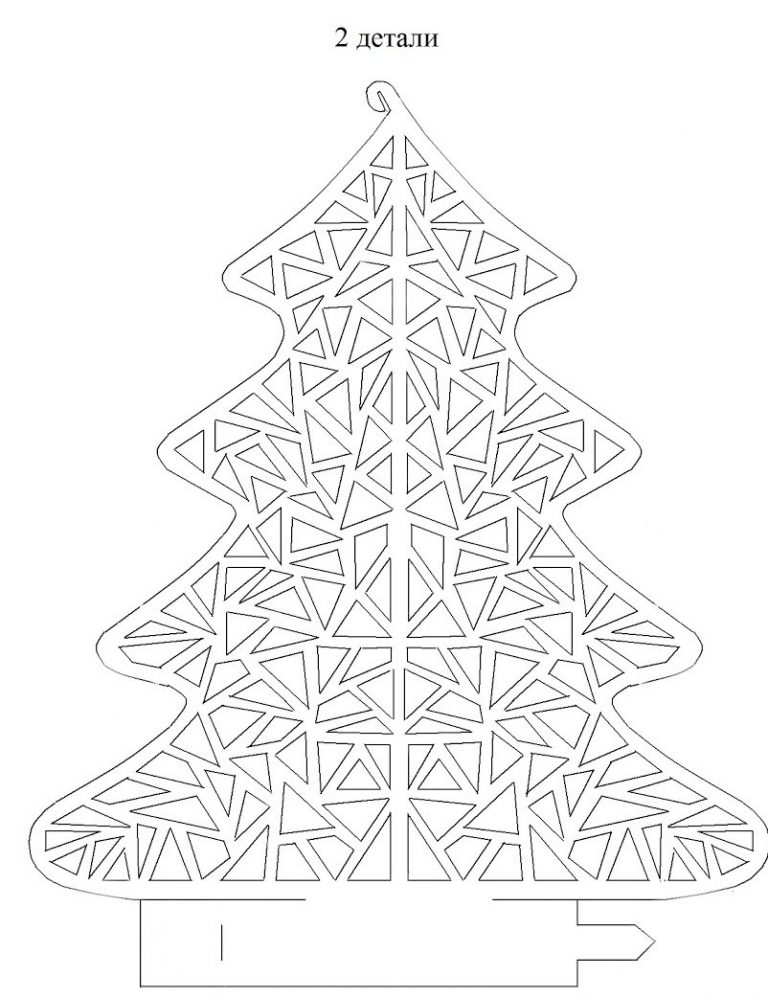
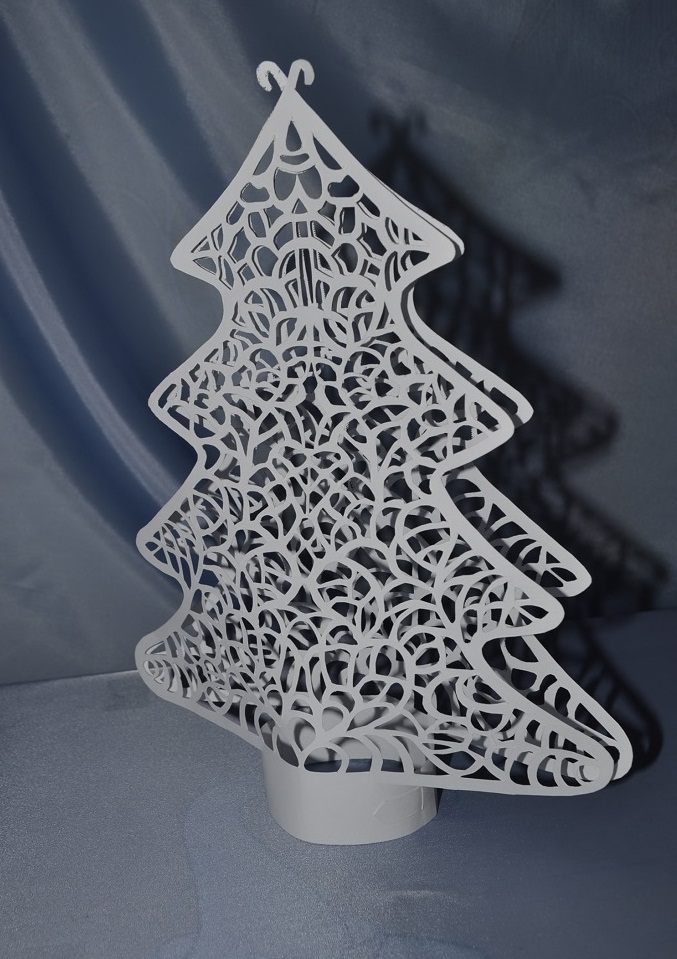
For example, the next figure - herringbone. For work you need a ready-made template with a figure, glue and a stationery knife. This craft can be done with children.
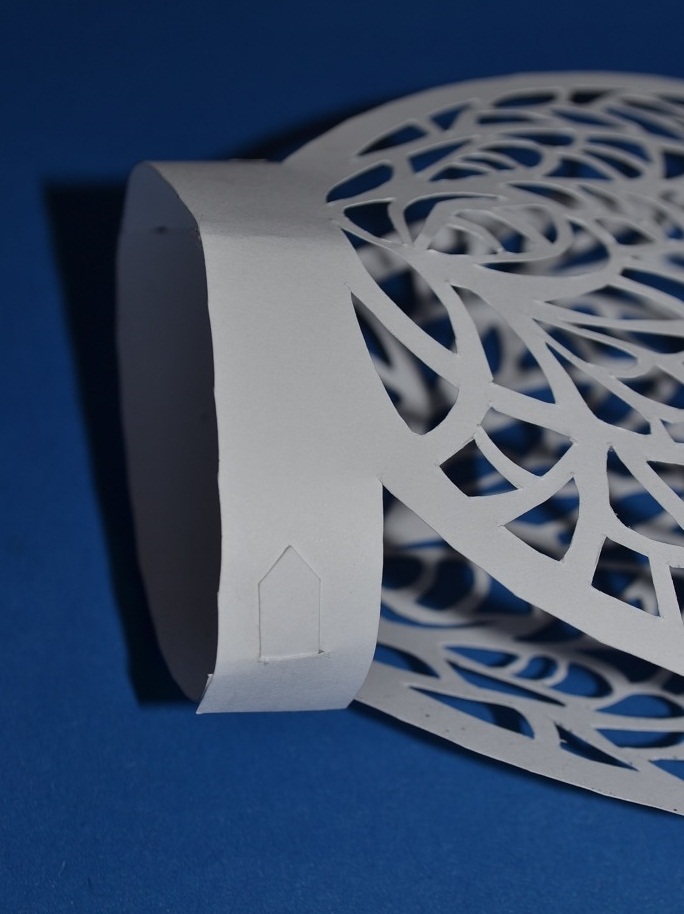
As a basis you can use the ready-made template presented below. Print the image on the printer in two copies, then carefully cut along the contour. After that, lay the future crafts on a wooden board and cut out all the patterns one by one. When both templates are ready, fasten them together on a paper strip for gluing in the form of a ring.The side parts of the crafts, as well as the upper part, are also held together to make the figure look voluminous and stable.
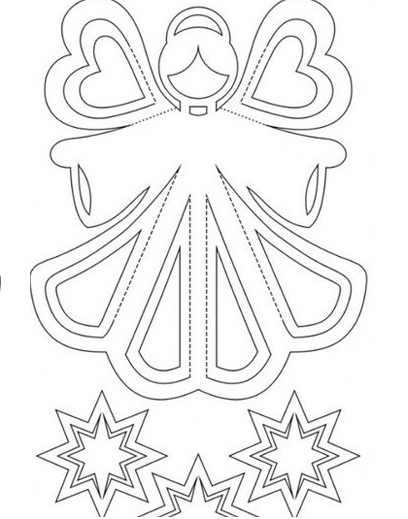
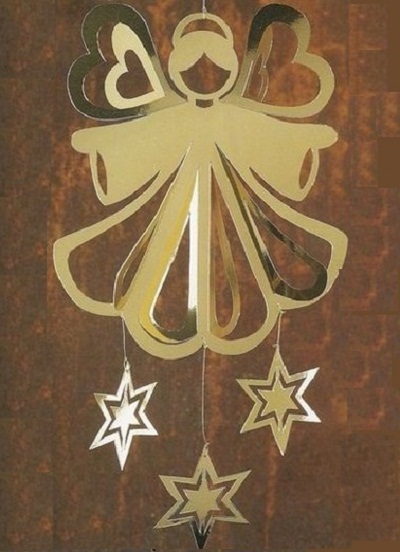
By the New Year and Christmas decorations can also be attributed to the angels. Beautiful and cute figures perfectly decorate the Christmas tree. The easiest way to create an angel for decoration is to use a ready-made template. Print the finished image on the printer, which shows straight internal lines and dotted lines. Cut out the figure on the contour and lay it on a wooden board.
Then, using a stationery knife, carefully cut out all the patterns in straight inner lines. The dotted lines indicate the places of the fold - these straight lines do not need to be cut. Attach the stars to the figure with the help of shiny threads and place the finished angel on the Christmas tree.
The figure can also be decorated with brilliant varnish, rhinestones, sequins or beads.
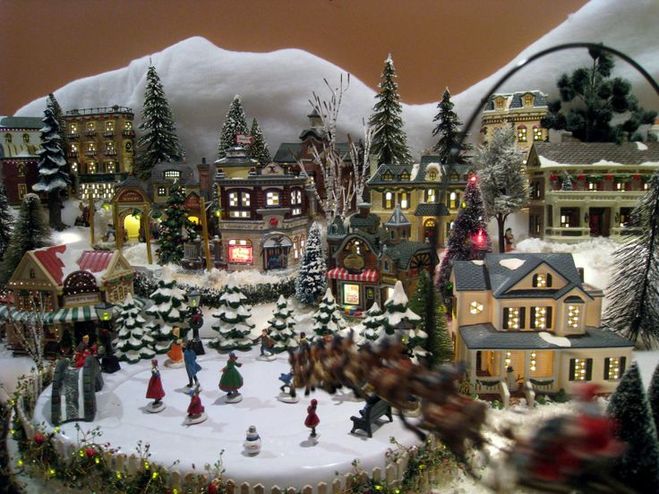
Another great paper decoration idea is a Christmas village. Fairy-tale houses are very easy to make from thick paper or cardboard. As a basis, use a ready-made template. You will only download the picture and print it on the printer.
Then carefully cut all the details along the contour and fasten together with glue. If desired, the finished house can be decorated with sparkles or covered with paint.
Paper houses can be used in a single composition on a windowsill or decorate a Christmas tree.


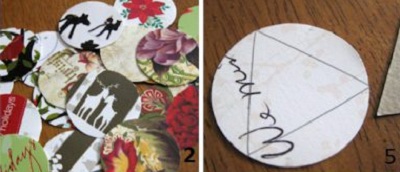
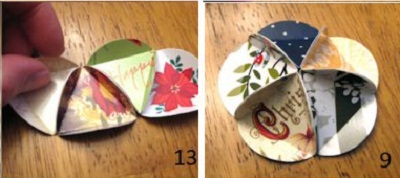
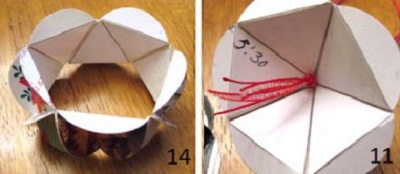
A unique Christmas tree toy can be made even from family photos. To do this, prepare:
- 20 photos or pictures, from them it is necessary to cut circles with a radius of 3.5 cm;
- glue;
- ruler, pencil;
- awl.
On the back of each circle, draw an isosceles triangle. It is important that the central part of the photo or image is exactly in the triangle, since the side parts that extend beyond the limits of the triangle will be bent and used for bonding. Apply glue to the back of the inside of the bends of the two circles and hold both parts together. Thus fasten 5 parts so that they form a hemisphere. For the same technique, fasten another 5 blanks, and in the central part with the help of sewing, make a hole for the strap. The remaining 10 circles connect the same principle, but in a straight line. Two hemispheres are attached to the strip above and below - one with a cord and the other without. Christmas tree toy is ready. It can be used to decorate a Christmas tree or as a gift for relatives.

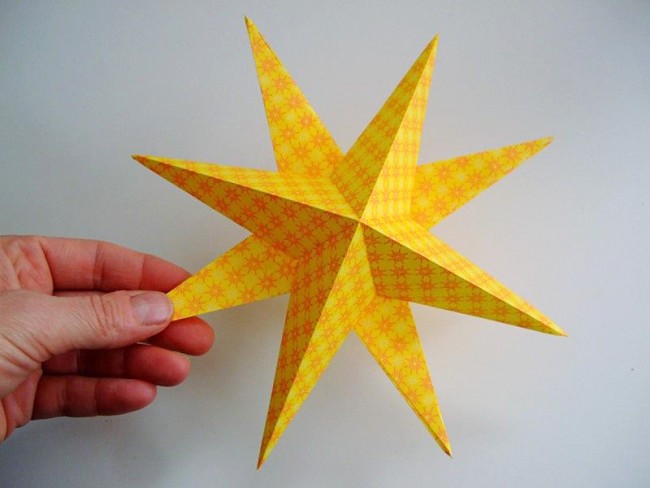
Traditionally, there is a big star on top of the fir tree. It can also be made from thick paper or cardboard with your own hands.
For work you will need:
- beautiful colored paper or white; in the future, the finished star can be painted with paint or shiny varnish;
- ruler;
- scissors;
- glue.
From the paper, prepare two squares measuring 15x15 cm. Fold each sheet in half twice, press the fold line. Then fold the sheet diagonally on both sides. Thus, on the reverse side, using the resulting folds, you divide the square into 8 triangles. Pay attention to the photo instruction. Make small cuts on the sides of the square and fasten the corners in the center so that the inner part remains free - in this case the finished star will look voluminous. Continue this work with the other corners and the second sheet of paper. After that, connect the two four-pointed stars together with glue. A large volumetric star is ready.

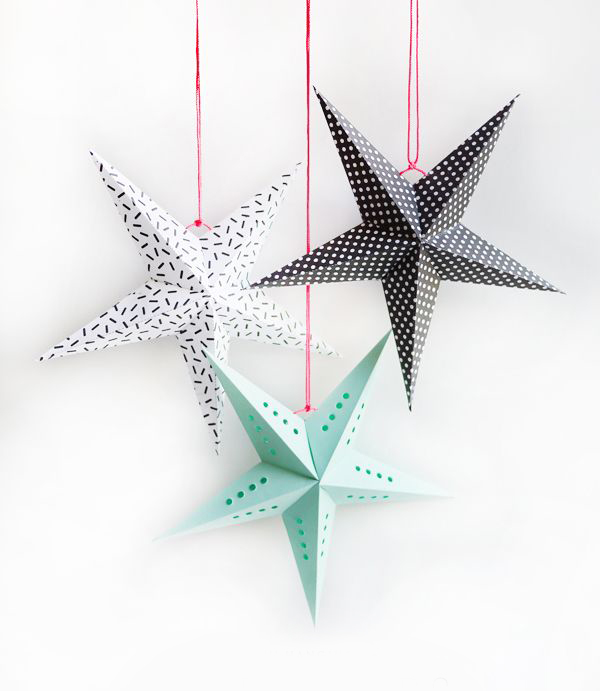
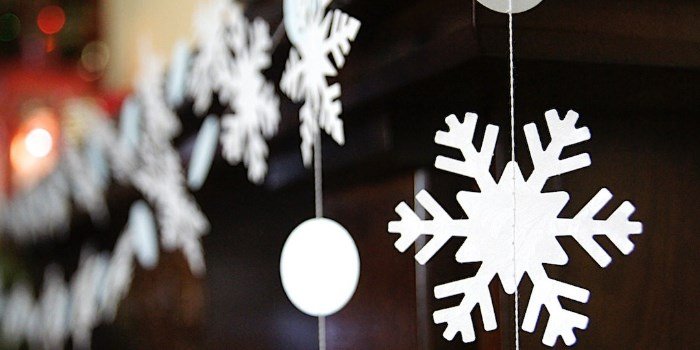
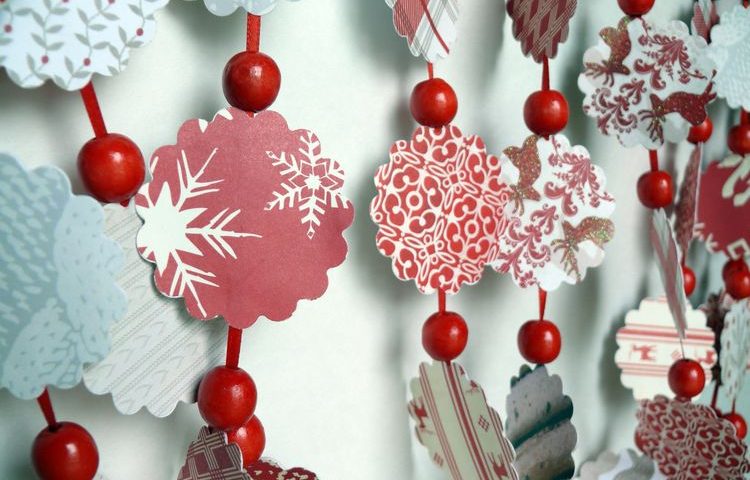
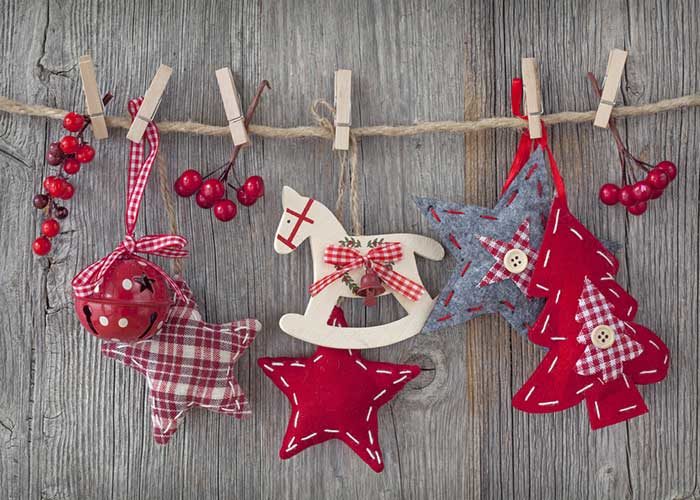
Special attention deserves New Year's garland. When creating it, you can use several crafts at once for one decoration. This unique decoration will harmoniously look both on the Christmas tree and on the window.
Instead of paper for crafts, you can use an inscribed notebook, an old newspaper or a magazine.And then the finished decoration can be covered with paint or shiny varnish. You can also use cardboard or thick foil for creativity.
The main thing when creating jewelry is to invest a piece of soul and enjoy every moment, anticipating the impending holiday.

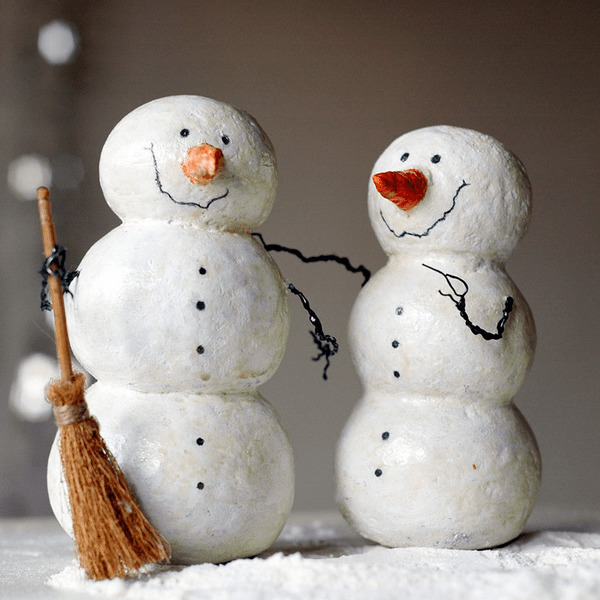
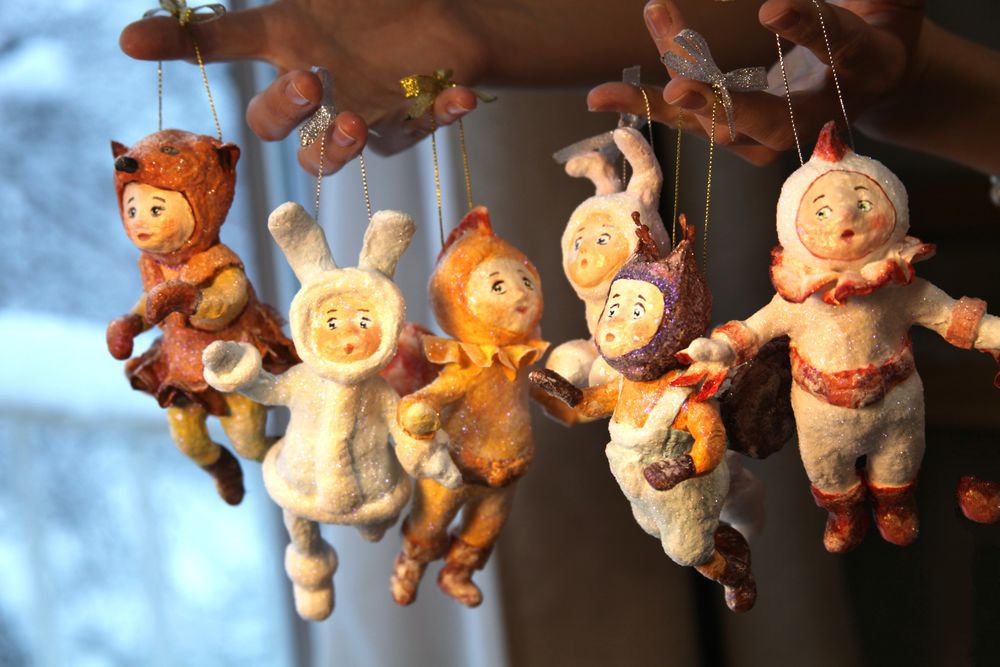
Wadded souvenirs
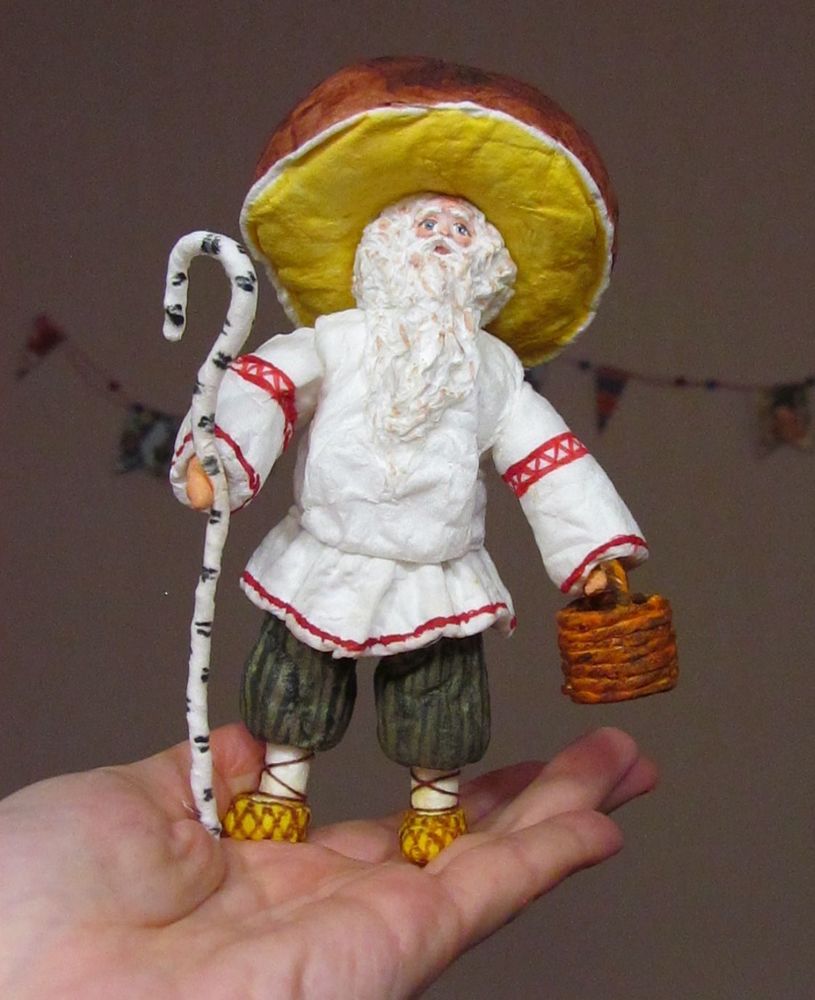
Christmas toys made of wool - another category of jewelry that you can do with your own hands with children. But it is important to immediately understand that the manufacturing process will take more than one day, and the technology itself will require perseverance and diligence. But everyone can make a unique retro toy from improvised means.
Do not worry if the first toy will turn out not absolutely accurate and not so beautiful. Over time, you will be able to create more cute decorations from cotton wool. And to facilitate the creation process, draw a sketch of a future toy to begin with. Paint all the details, decorations and decorative items. In this case, the manufacture of toys from cotton will not cause difficulties.

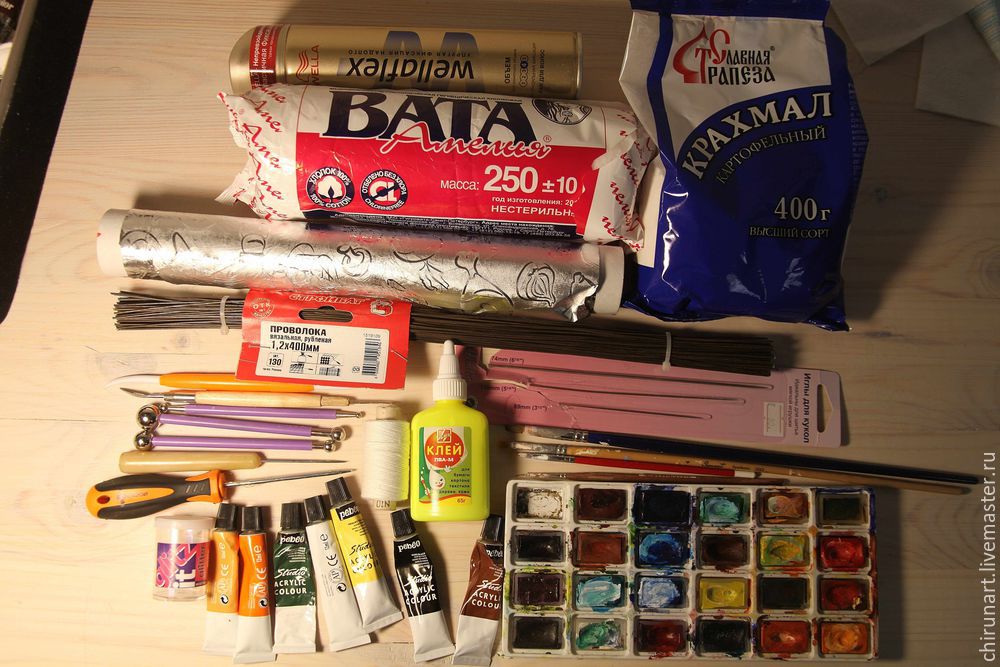
To work prepare:
- wire;
- foil;
- cotton wool;
- threads;
- paste;
- awl;
- paints and brushes;
- spangles for decoration and laces or ribbons for the loop.
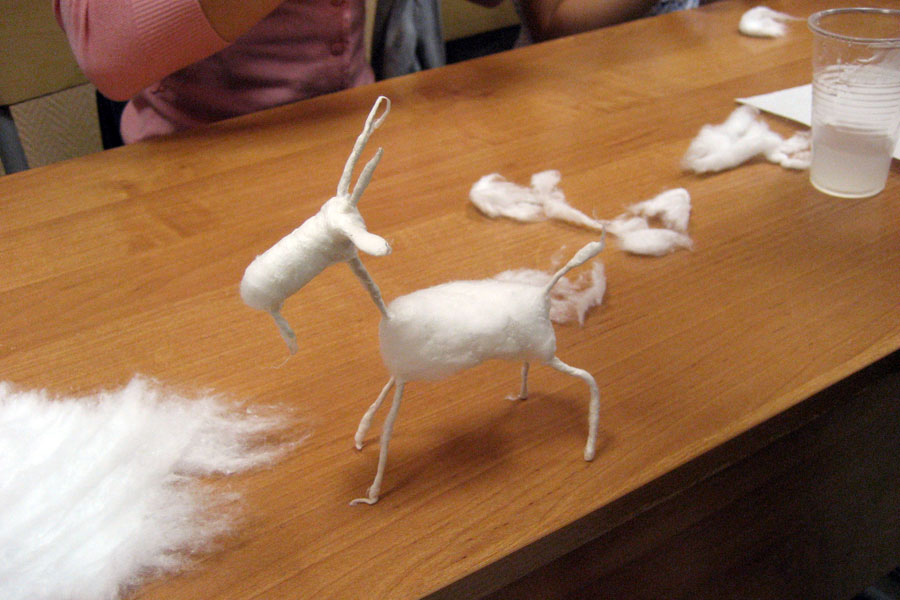
From such a budget set you can make a large company of small animals, snowmen or various figures. First, make a skeleton of wire: torso, legs, head and tail. Wrap the design with foil to give the metal skeleton the desired shape and volume. This stage is very important in the formation of the toy - the form changes, the movements and outlines of future characters are given.
The foil should fit very closely to the wire and form a toy - it denotes ears, tail, head tilt.


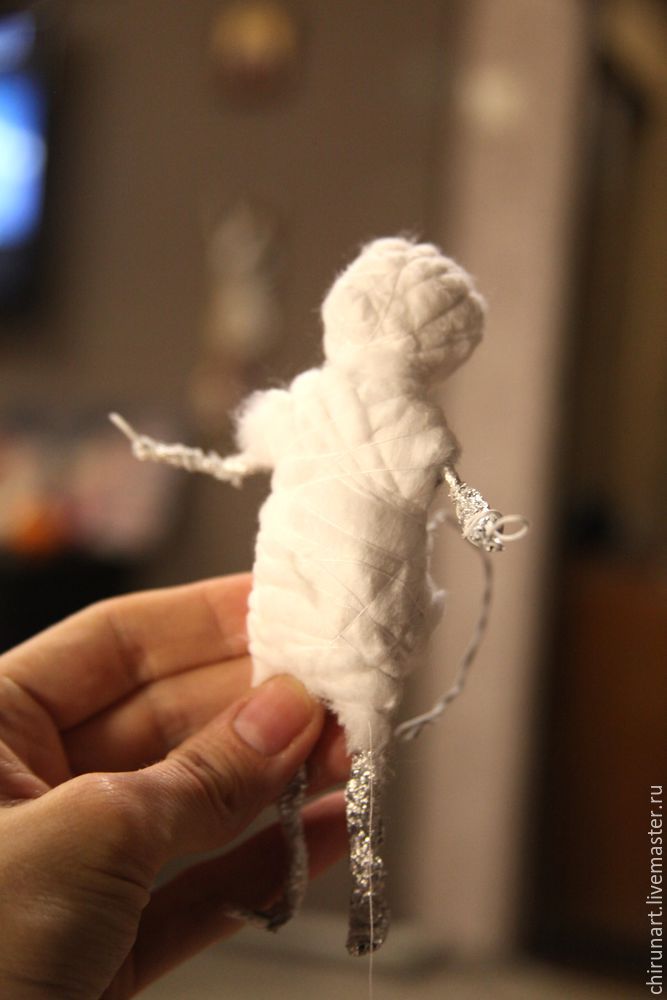
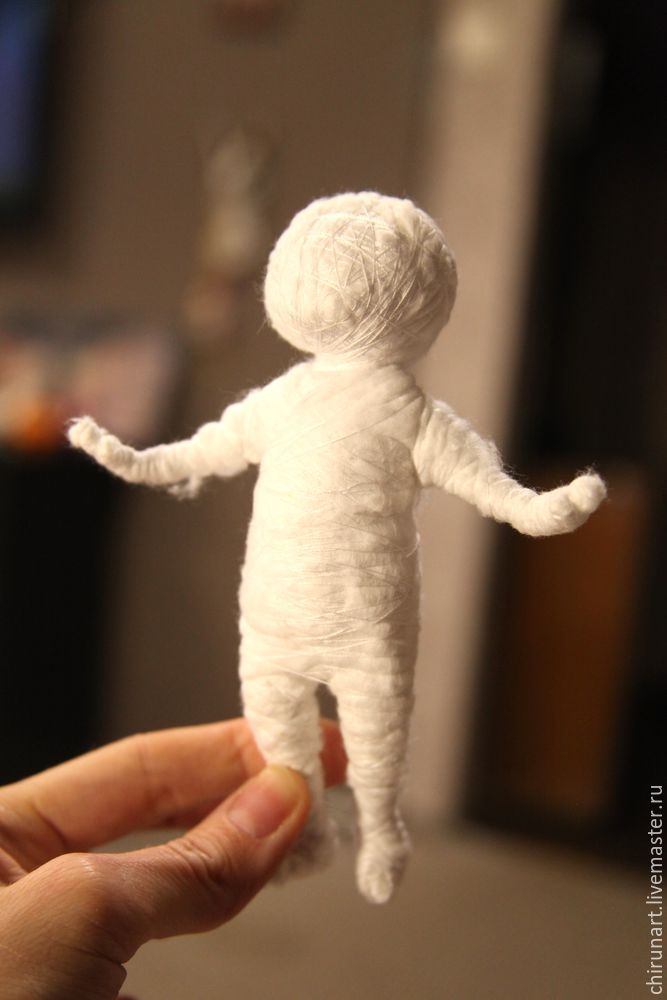
After that, you can start working with cotton. With the help of small pieces of toys added volume and weight. Then the pieces of soft cotton are wrapped in threads to securely hold it in place. At this stage, you can adjust the shape or position of the animal, increase growth and volume. Do not feel sorry for the thread and carefully wrap each section. The denser the wool is attached to the base of the toy, the easier it will continue to work.
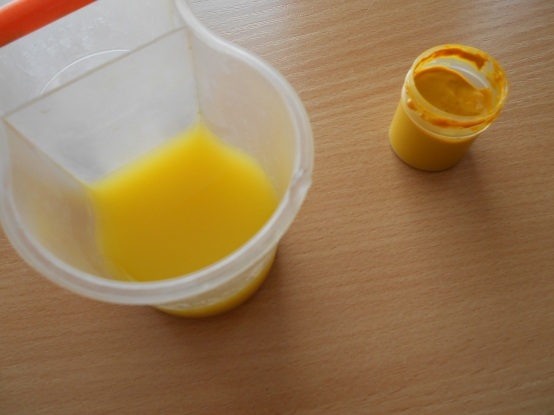
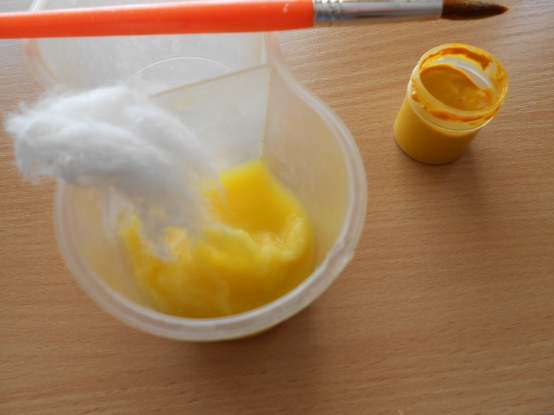
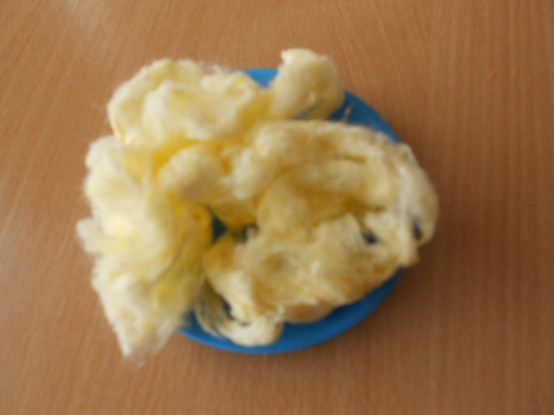
Another life hack from experienced craftsmen - ordinary white cotton can be painted in the desired color before work. This will require a special dye for fabric.Add a few drops of paint to a container of water, dilute the dye, and then add pieces of cotton to the mixture. The material is quickly saturated and takes the desired color. And when the wool is completely dry - you can start creating a toy. Using colored cotton wool, make sure that the threads match the chosen range.
Dip the toys in a container with paste, and that all parts are processed and fully soaked, use a thin brush. Pay special attention to small areas and folds - there should be no untreated places or dry cotton wool on the toy. After that, the toy must be thoroughly dried. You can put it aside for a couple of hours, and better at night. The usual oven will help to speed up this process - bake the billet in the oven for 30-40 minutes at 110 degrees.
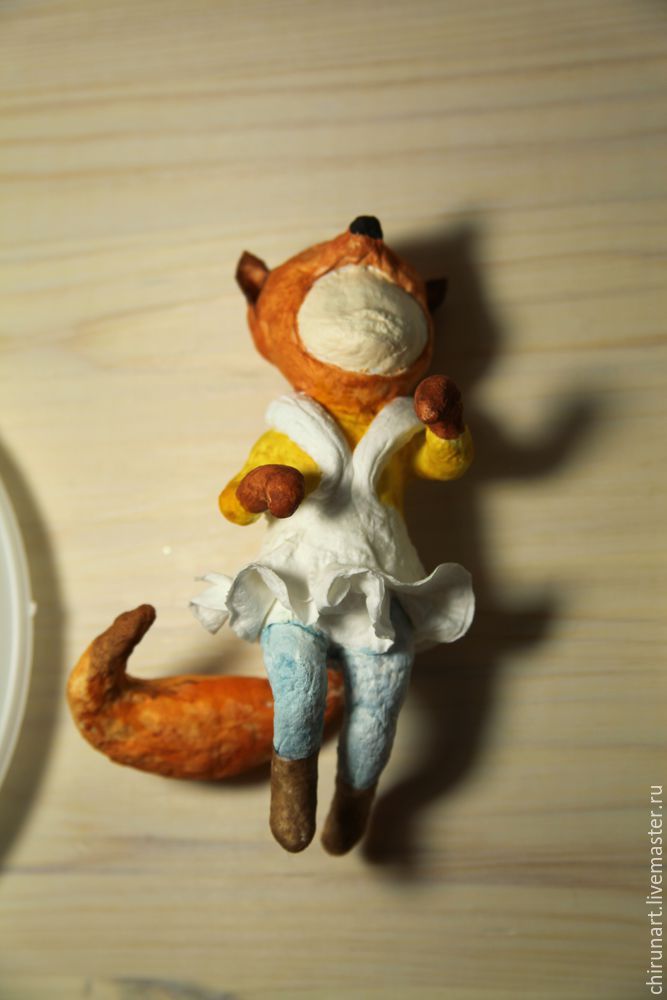
After all the details are completely dry, you can proceed to the design of the toy. If necessary, you can add a few more items of cotton and paste before the finished stage: a collar, fingers, ears, a spout. At registration use usual water-color paints, and acrylic are better suited for the face.
Painting of toys will take a lot of time and effort, despite the fact that the paint dries quickly enough.


To make the face of the blank more smooth and beautiful, it is recommended to prepare a form of puff pastry in advance. To do this you need flour, salt and water. In the 2: 1 ratio, flour and salt are mixed, and then diluted with water to form a dense and sticky substance. To the mixture you can add a few drops of beige paint, so that the faces have a beautiful even color. After that you can start creating a form.
The face is molded small, so that it is an ideal fit for the finished toy. Make small dimples under the eyes, mark eyebrows, cheekbones and nose. Minor bumps can be easily smoothed out with a wet brush. And then the workpiece is sent to dry. There are two ways: in a dry skillet over low heat under a closed lid or in an oven at 120 degrees for 30 minutes. After the finished form dries and cools, you can proceed to sanding and painting and then fixing the face to the toy blank. If irregularities or cracks form during drying, they can be smoothed with sandpaper.
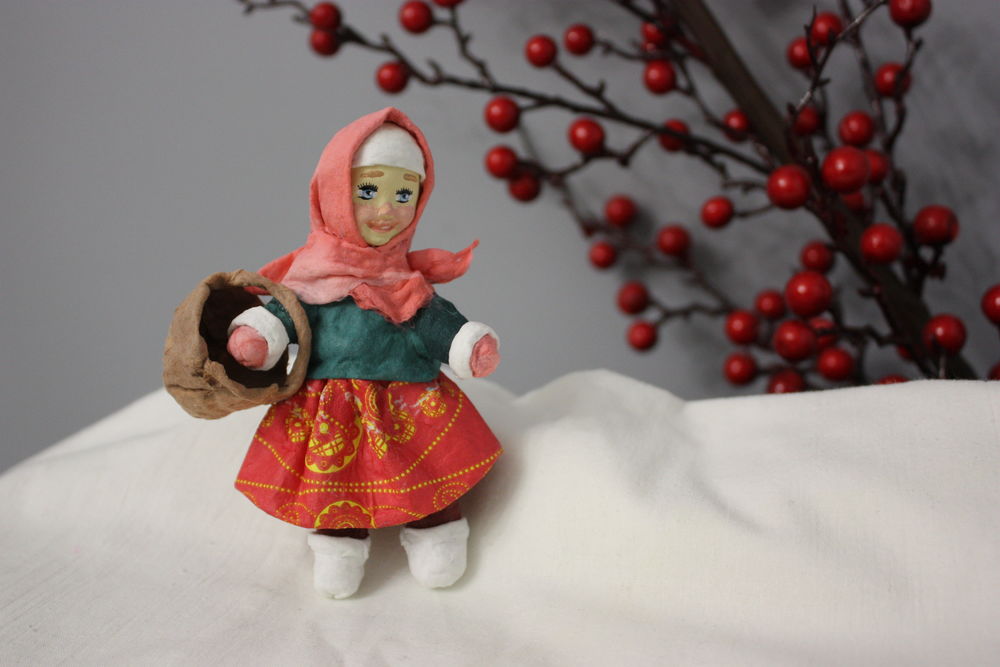
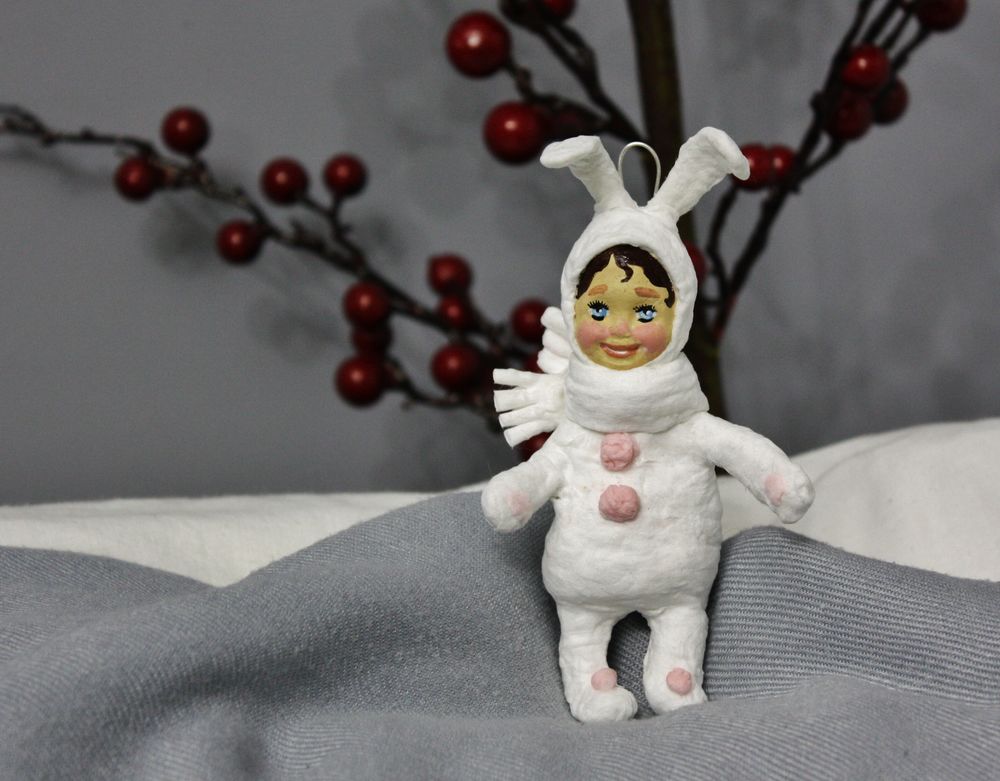
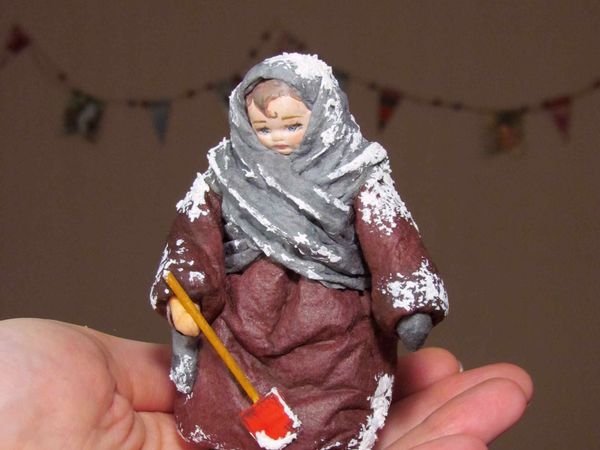
The finished painted bright toy can be covered with sparkles and fixed with varnish to keep the paint longer.You can use ordinary spray hairspray or clear nail polish. Stretch the cord in the toy, and the original decoration of cotton wool for the Christmas tree is ready.
Christmas decorations from conventional wool do not require virtually any financial costs. All the necessary materials can be found even at home.
And such a unique gift in retrostyle from a grandson will surely please grandparents. And besides, the process of creating a unique toy will be very interesting to the child.
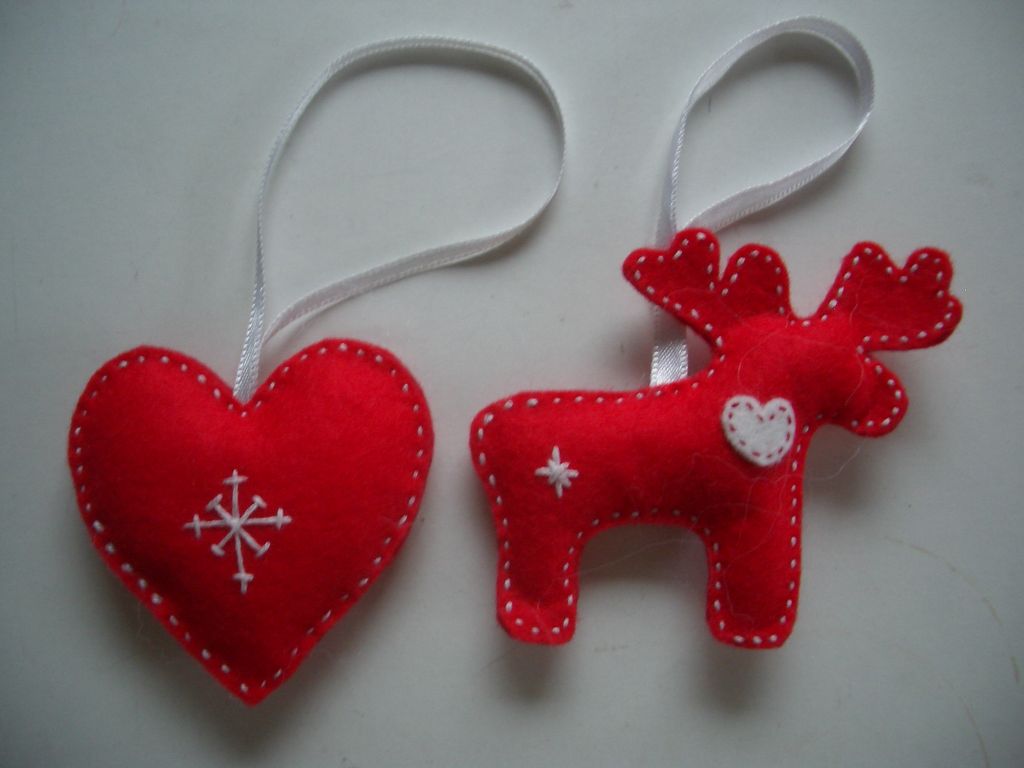
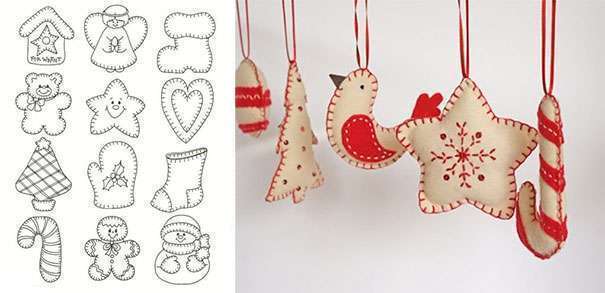
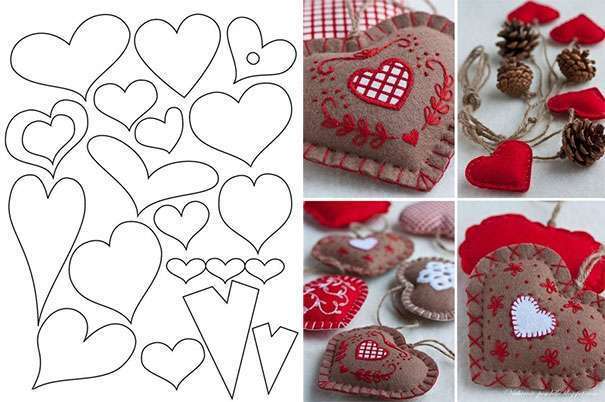
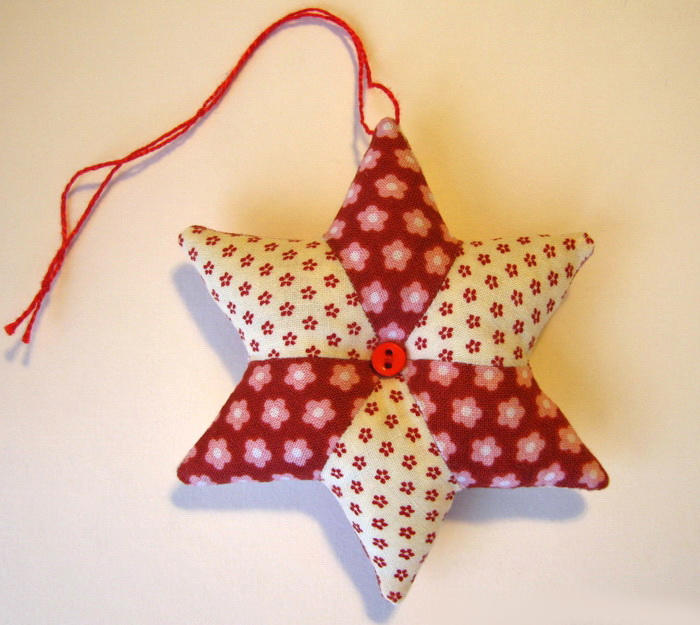
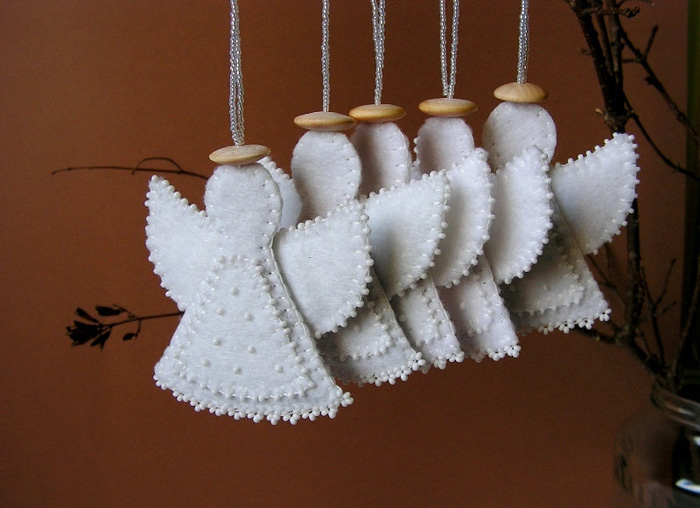
Fabric crafts
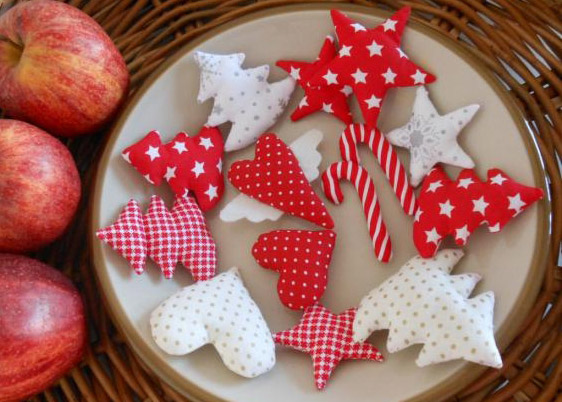
Fabric is great for making bulk Christmas decorations. The simplest toys can be sewn in the form of a ball, a snowman, a star or mittens. The main advantages of soft embroidered toys include strength - they will not break. And also their distinctive feature is safety, you can decorate the Christmas tree together with small children with soft Christmas decorations.
And so that the soft toy retains its appeal, it should be properly looked after. And if the decoration has a lot of decorative elements, wash the toy should be especially neat, in warm water and with a small amount of cleaning liquid.

For work you will need:
- fabric, felt great;
- filler for toys - you can use old patches of fabric, cotton wool or synthetic winterizer;
- pencil, ruler, glue, scissors;
- needles and thread;
- decorative elements: rhinestones, beads, buttons, ribbons, ribbons, etc .;
- Pattern and paper for making a pattern.
Step-by-step instructions for making fabric jewelry is quite simple. The easiest way is to take a ready-made pattern, but if you have a fantasy and a great desire to create a unique designer toy, you can develop your own pattern.
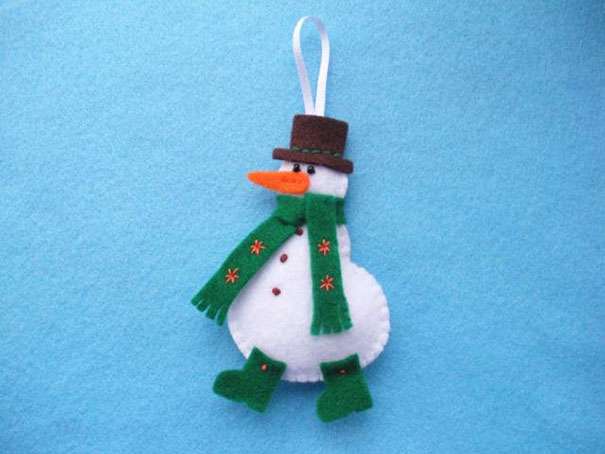
If you only delve into the creative process of making Christmas tree decorations from fabric, then start with simple forms: stars, balls or snowmen.
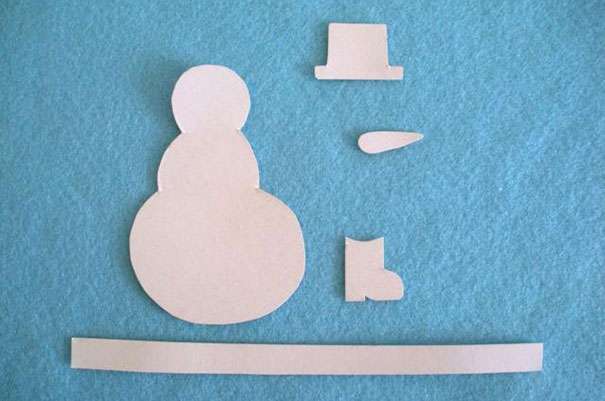
Apply the pattern on the paper and cut the pattern around the contour. Do not forget to leave 5 mm for seam allowance. Transfer the design to the fabric and also cut out all the details in duplicate. Smooth the blanks and prepare the sewing machine, although small toys can be sewn on your hands.
Sew all the elements from the seamy side and leave a small area for the filler. Turn the blank through the unfinished hole on the front side and tamp with a filler, and then close the hole with a secret seam.
Decorate the toy with decorative elements and do not forget to attach a loop to the top of the finished toy.
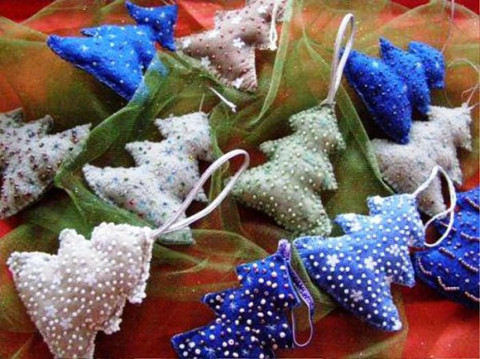
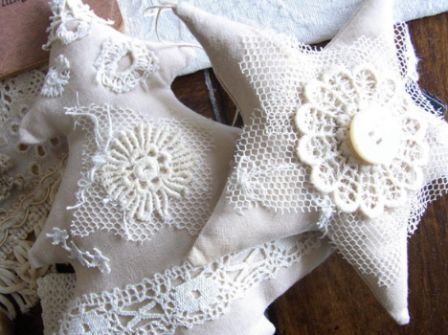
Fabric can pick up any. Such toys can be made with your own hands from thick fabric or burlap. This is a great option for creating snowmen, snowflakes, stars, mittens, various animals and cartoon characters. Fleece does not crumble, keeps its shape well and does not crumble when cutting.
For a Christmas tree decoration small patches of unused fabric will do: calico, chintz, velveteen, jeans, etc. In any case, the manufacture of toys does not end with the assembly of all parts. The last stage is the decoration with appliqués, buttons or beads. It is not necessary to sew decorative sequins and ribbons - it is easier to glue small elements to glue.
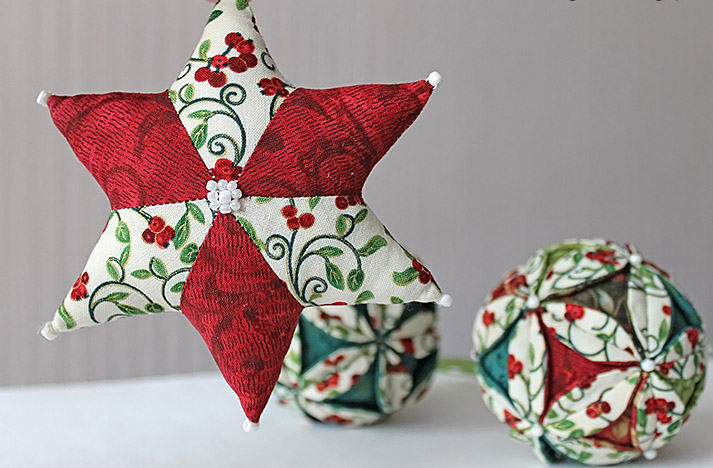
Intricate fabric figurines are also a great decoration for a New Year tree. Such an unusual toy can rightly become an independent decorative element in the interior.
First, prepare all the necessary materials and tools:
- Felt - 2-3 sheets of fabric measuring 20x20 cm;
- chalk or a piece of dry solid soap;
- ruler;
- needles for sewing and thread;
- office knife and scissors.
From the seamy side of the fabric with chalk, draw three squares - the sides of each should be 3 cm less than the previous one. Then draw a straight line from one corner to another, thereby dividing the squares into isosceles triangles. After this, use a sharp blade of a stationery knife to make cuts along the lines of the squares, leaving the diagonal line and the corners near it intact.

It remains only to clean the fabric from the remnants of chalk or soap, and fasten the corners of the square. Fasten the corners of the smallest square together with several ties. Then turn the workpiece upside down and fasten the two corners of the next square overlap with several ties. Repeat the procedure with the remaining free angles, each time unrolling the workpiece.
Do the same job with the remaining pieces of fabric. And then pull the thread through the figures, decorating the junctions with beads. It turned out spectacular and stylish decoration.

Hand-made toys with the symbol of the coming year are a great option for a small presentation for guests, such a cute and original gift will be very useful during the New Year holidays.
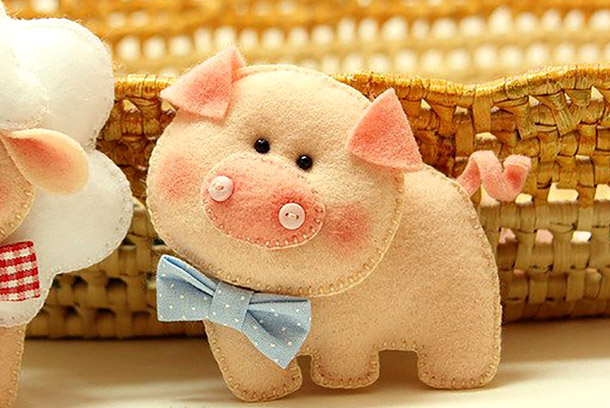
For example, in the Year of the Pig, the most popular children's character is Peppa Pig and Khryusha from the Good Night, Kids program.Funny piglets can be knitted from pink yarn, if the needlewoman had a suitable tangle. Instead of a snout, you can sew a large button, add two black beads for the eyes and complete the toy with a small tail and small ears.
You can create any toy with your own hands - be it a fairytale character, a cartoon animal or a symbol of the coming year. Simple and unpretentious stencils remain actual: fir-trees, stars, lollipops, pupae. For example, you can sew a miniature mitten, decorate it with ribbons, and instead of the filler inside put a small gift for a loved one. And a small decoration made with love with your own hands will not leave you indifferent and will be a nice addition to the New Year's decoration.

Products from tapes and threads
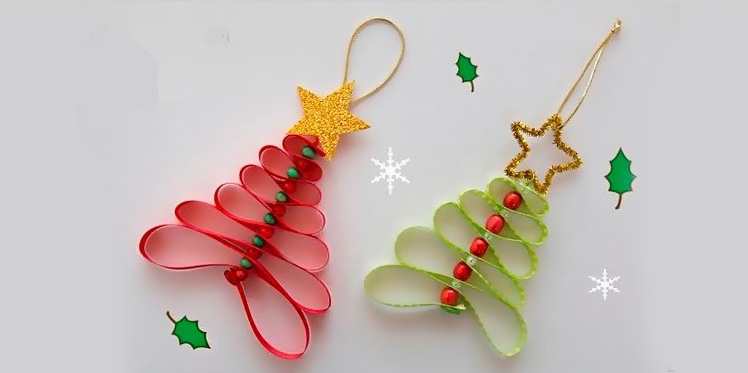
A simple and, at the same time, beautiful, decoration for the Christmas tree can be made of yarn and glue. You can also purchase special ribbons for creativity or use any available materials and everything that comes handy.
To work prepare:
- colored yarn or thin ribbons;
- pins or needles for sewing;
- PVA transparent glue;
- disposable plate or substrate made of porous material;
- bowl;
- felt-tip pen
Pour the glue into the bowl and dip the yarn or ribbon in the liquid. While the threads are soaked, start work on the form. Turn the disposable plate upside down and use a needle to create a stencil for work. To facilitate the process of creating a sketch, draw a suitable marker with a felt-tip pen. To get started, use a simple form, for example, a star. Over time, you will be able to create more sophisticated and elegant models - birds or outlandish animals.
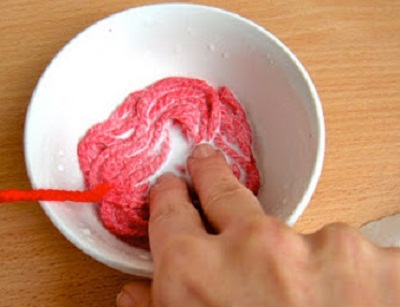
Place pins or needles along the contour of the blank - they will serve as a border for future decoration. Then stretch the threads soaked in glue along the laid out guide. Starting from the borders, gradually fill the figure with fantasy patterns of threads. When the yarn is completely dry, remove pins from the workpiece and make a loop.
You can complete the process with a decor - decorate the finished decoration with beads or with beads.
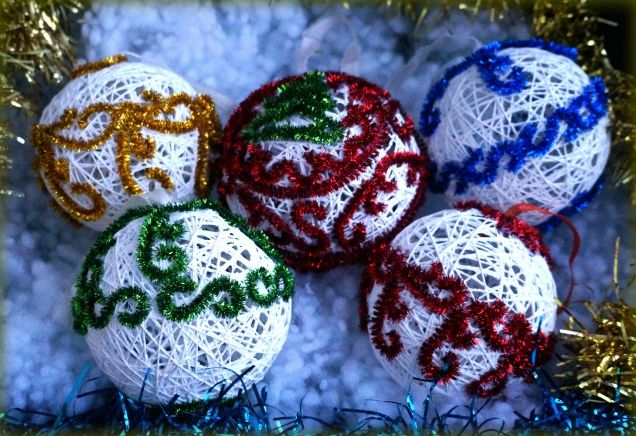
Using a similar technique, one can make volumetric spiderwebs from threads. For example, the simplest form is a Christmas ball. For work you will need:
- balloon;
- multicolored threads or ribbons;
- transparent glue;
- a bowl;
- petrolatum.
To create a Christmas ball, we advise you to use multicolored threads that blend perfectly and symbolize the New Year, for example, blue, white and silver. Dip the threads in a bowl of glue for a few minutes. At this time, inflate a small balloon and cover it with a thin layer of vaseline - this technique will further facilitate the work at the final stage. After that, chaotically and fantastically wrap a balloon impregnated with glue with a thread.

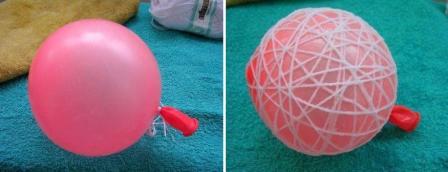
When all threads are wrapped, it is necessary to dry the ball. This will take at least 2 hours. Then gently blow off the rubber ball so that the threads continue to hold the shape themselves. Coat the ball with varnish for a more secure fit. Add a loop and a little decor, for example, bright ribbons or sequins, and the unique designer Christmas tree toy is ready.
Do not limit the creative impulse! For example, a finished ball of threads can be used as a blank, from which you can create an unusual little animal by adding several elements or gather a large snowman from three white cobwebs. And you can leave a small section of the ball without the thread wrapped around it, so you will have a hole that you can decorate and make a cozy nest for the bullfinch out of it.


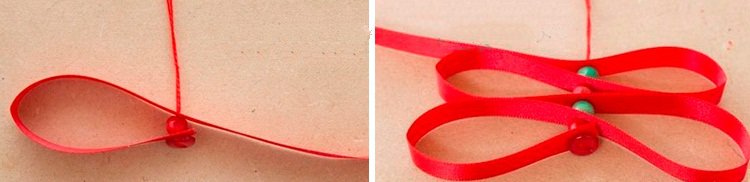
Another simple ribbon ornament can be created in 10 minutes. To work prepare:
- satin ribbon not more than 2 cm wide;
- beads of the same size;
- needle and thread;
- loop for loop;
- glue "moment";
- decorative elements - in this case a star.
Lay the ribbon in a triangle-shaped snake so that the base is the longest, and the length of the ribbon gradually decreases towards the upper tier. Then alternately string the ribbon on a needle and thread, and insert a colored bead between each tier. Gradually, the Christmas tree figure will start to turn out. Tie the remaining edge of the ribbon in a knot and cover the top of the head with an asterisk. You can make a star out of thick cardboard - cut out a suitable shape and cover it with sparkles. On the reverse side of the asterisk, fasten the eyelet so that the decoration can be placed on the Christmas tree.
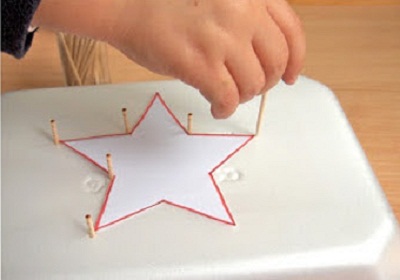
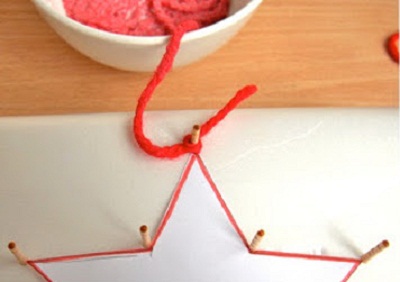
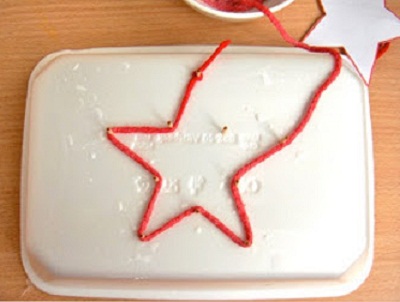
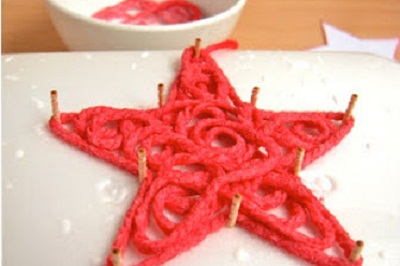
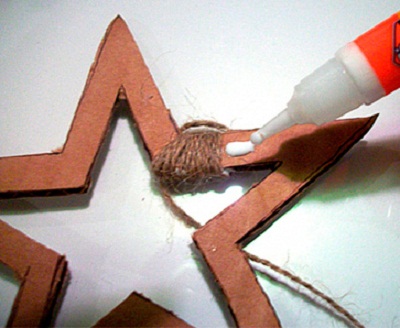
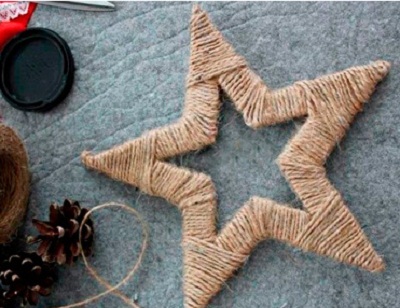
To create beautiful jewelry is not necessary to buy special materials, you can use any available tools. For example, for the next decoration you will need only cardboard, a strong thread - you can use twine or nylon, and PVA glue.
Cut a large star out of cardboard.Inside the shape, draw another slightly smaller star and cut out the blank. This way you will have a star-shaped frame. After that, you can proceed to the winding. Take the thread and free edge glue to the workpiece, hide the tail with a dense winding on top. Tighten the threads as tightly as possible so that there are no gaps and gaps. To prevent the threads from breaking up, you can use a little glue for a more secure fit.
Add a bit of decor to the finished decoration - a sprig of red rowan berries or several spruce cones will suit.
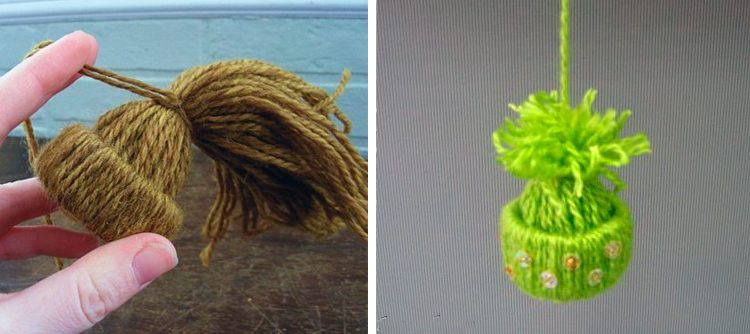
The next decoration will be much smaller, but it will take a little more time and effort to make it. To work prepare:
- colored yarn or thread;
- cardboard;
- glue;
- stapler
Preparatory work begins with cardboard. Prepare several strips with a width of 1-1.5 cm and fasten them in the form of a ring. For reliable fixation of the form, you can use a drop of glue or a stapler. Then prepare the threads - we will need strips about 20 cm long. It is not necessary to use plain threads, you can create cute and cute decorations from combined colors.Then fold the thread in half and through the loop formed in the middle stretch the free edge, grabbing the cardboard base. Pay attention to the photo instruction. Thus it is necessary to completely close the cardboard so that there are no gaps between the threads. And the free edges of the thread should be on the same side. Drag the remaining tail with a thick thread so that the workpiece looks like a hat. Cut loose threads, leaving a small portion as a pom-pom. Decorate the finished toy with decorative beads or beads.

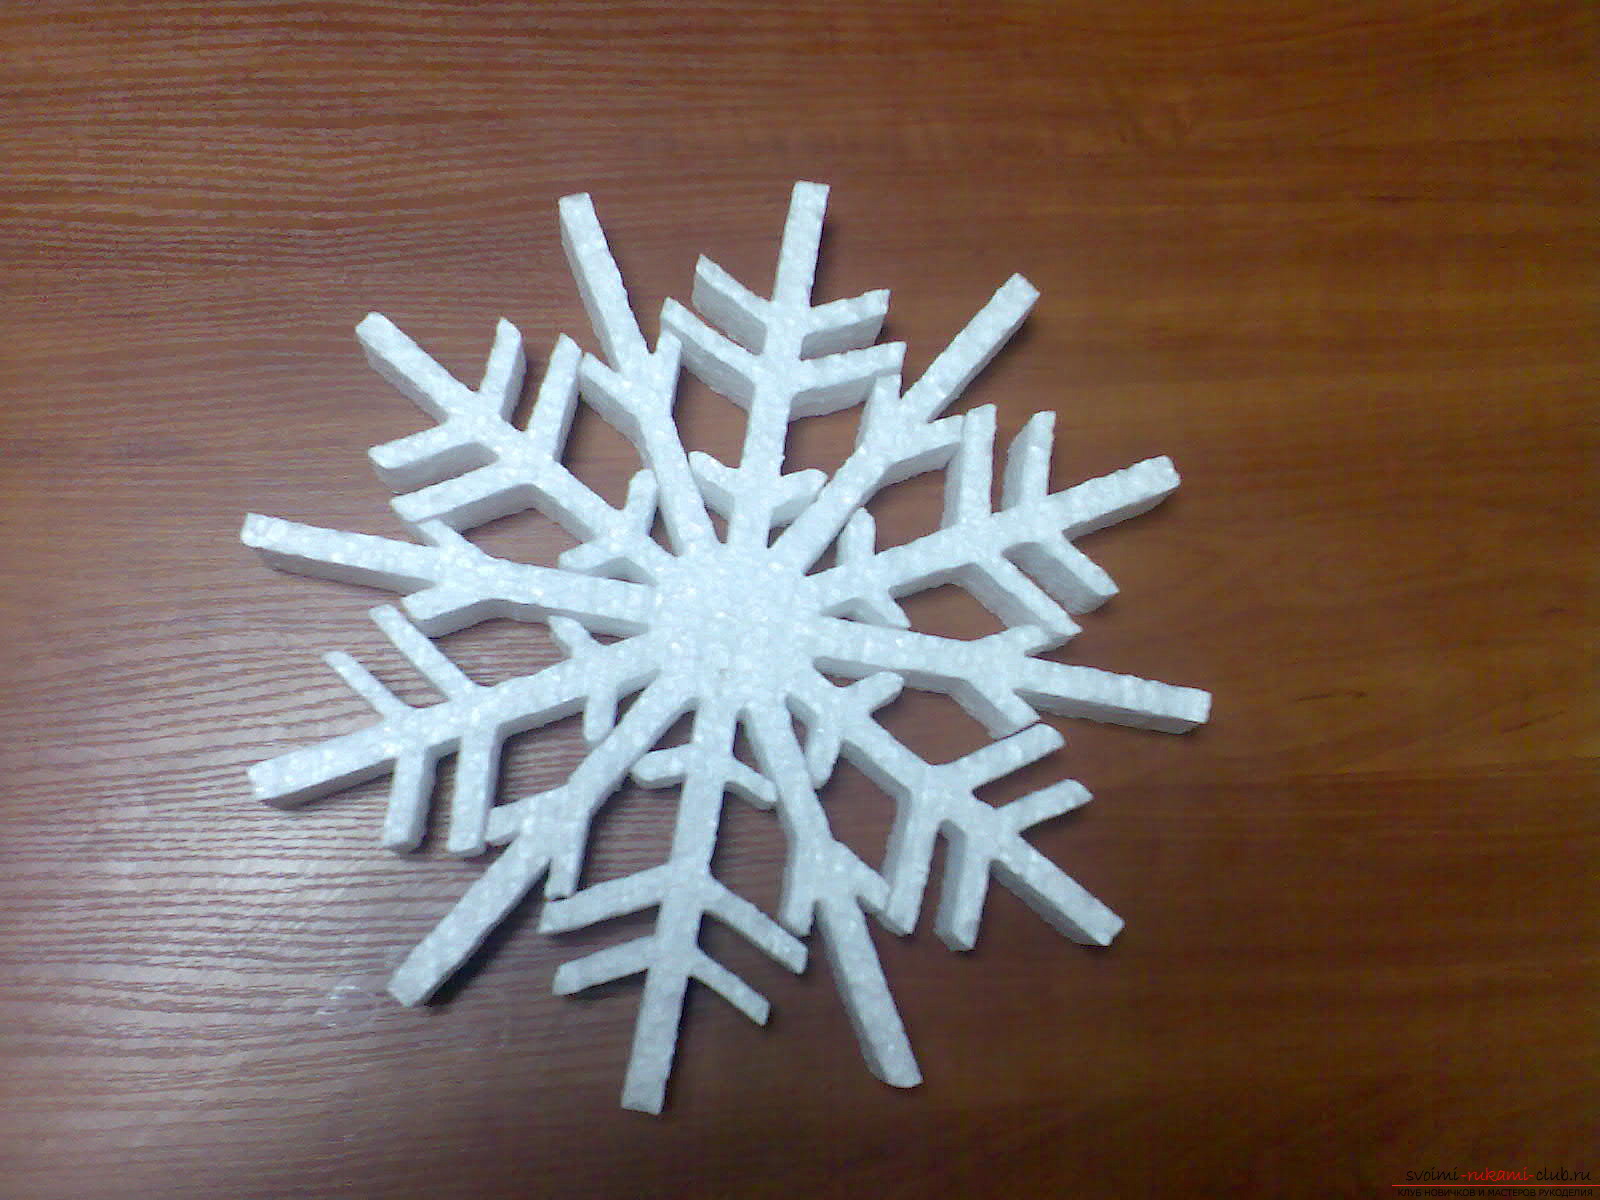
What can be made of foam?
It is very simple to work with polyfoam - it is plastic material which easily gives in to change of a form. Decent decorations for the Christmas tree can be made of foam plastic: snowmen, balls, bells, snowflakes, cartoon characters. And for creativity it is not necessary to purchase expensive materials in specialized stores, the usual packing foam will be suitable, which remains, for example, after the purchase of equipment.
Foam can be given the desired color using ordinary paintbut in this case the porous structure of the material will remain noticeable.Therefore, it is recommended to use foam only as a basis for decoration. And the most effective decor option is additional elements that will close the foam. For example, you can create vintage toys from black and white photographs. In this case, it is important to pay attention to every detail, pick up the lace, use suitable pictures, artificially make old photos.
The whole process of creating a unique toy manually takes a lot of time and effort, but what a unique gift you can present to your family for the New Year!

A small piece of foam can also be an ornament for the Christmas tree. It is enough just to wrap the cube with wrapping foil and decorate it with ribbons with a bow - the wrapped gift is ready. It remains only to attach a loop and decorate the Christmas tree.
If you have a small sheet of foam, from which it is impossible to cut a suitable shape, you will have to gut the material into small parts, and then use the glue to assemble the desired shape with your own hands. So, for example, you can create a cute snowman. To work you need to roll three balls of different sizes,and then glue the construction together. You can also add a bucket on your head, a carrot instead of a nose, an eye, a smile to a foam piece. And instead of the traditional scarf use a small piece of cloth.
More laborious work - to create snowflakes from foam plastic. This process will take more than one day and will require accuracy and a great desire to create unique jewelry. But from several snowflakes there can be an open and elegant wreath - a real work of art, created from simple materials with your own hands.

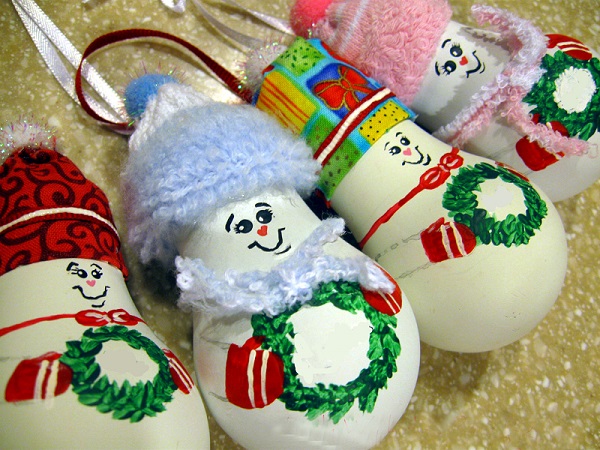
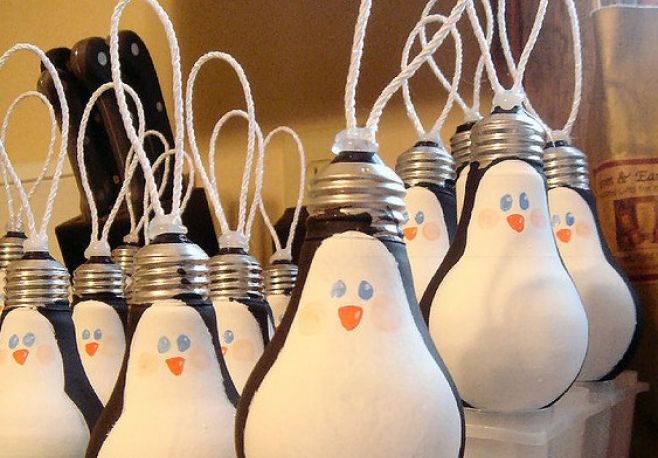
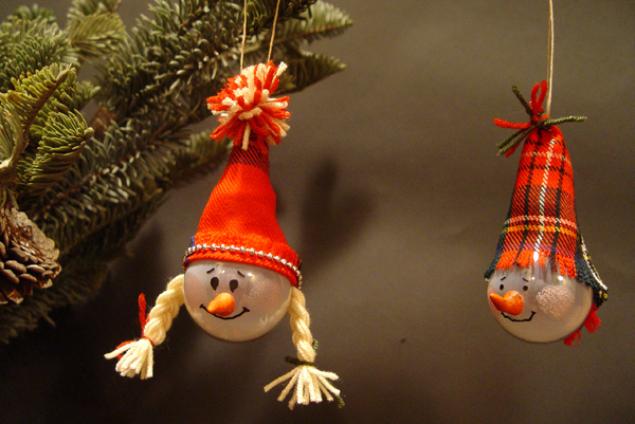
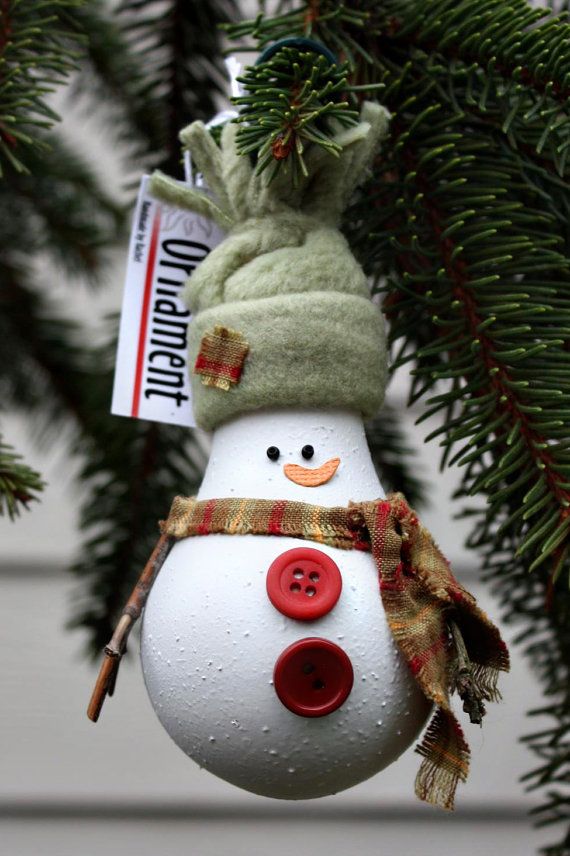
We use old light bulbs
Interesting ideas for decoration can be gleaned from ordinary household items and various scrap materials. For example, old light bulbs with beautiful decor can be a great alternative to classic Christmas-tree toys. In this case, the cost of the finished toy will be minimal, and the flight of fantasy will allow you to create a real masterpiece.
The optimal set for creating a toy from old light bulbs is small:
- brushes;
- paint;
- degreaser - you can use alcohol;
- PVA glue;
- varnish for final fixation;
- decorative items.
The main thing is that the light bulb is completely covered with paint or threads, so that the glass surface does not reveal all the secrets of the master. For camouflage, you can also use foil or colored paper.

It will not be difficult to shape an icicle into a light bulb of Ilyich. All you need is paints, brushes, thick paper, some glue, cotton wool and bright threads. Roll the paper into a tube so that it forms a cone that is the right size for a light bulb. Connect both parts with glue. Then cover the blank with white paint. You can use thick gouache or acrylic paints. After creating the background, you can proceed to create a picture. Vata will help simulate fluffy snow, and colored threads will serve as a loop. Glitter or confetti can be fixed on top of the toy.
The round part of the bulb can be used for the cheerful face of a snowman., and the upper part with a metal base can be hidden with a cap or cap. Then get a snowman, fun, who will smile with the Christmas tree. The pear-shaped design is also ideal for creating a penguin. It will only be necessary to cover the glass with a thick layer of paint,draw a cute snowman face and hide the cap with fun colored knitted hats.
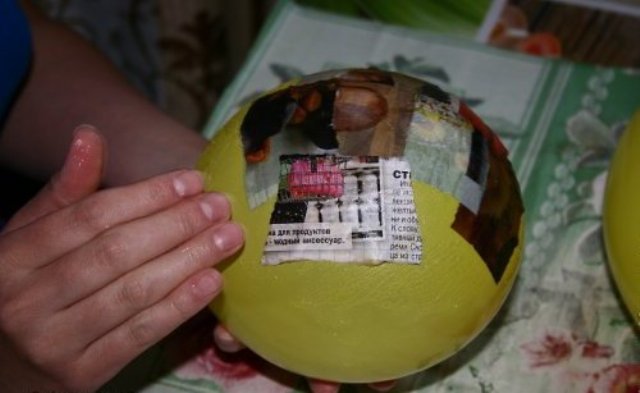
And if you do not have thick paint, you can close the glass with paper. To do this, use the technique of papier-mâché. And then dry up the paper layer paint in several layers.
Such stylish toys can be used to decorate a Christmas tree, not only at home, but also on the street. In this case, special attention should be paid to the materials used: glue and decorative elements must be resistant to frost and moisture. And also the loop of a usual thin tape will not be suitable for the street - it is better to take care of a reliable and strong lace at once.
But it should be understood that working with light bulbs, as well as in the future to store ready-made toys, it is necessary with extreme caution. When falling, the toy can instantly shatter.

Papier mache
We will tell more in detail about the papier-mâché technique, since it is possible not only to create various decorations with your own hands using unnecessary household items. A distinctive feature of technology is the use of paper. It allows you not only to change old objects or give life to pale toys, but also to create unique designer jewelry from scratch. In this case, you can make a figurine of any shape.
Set for creativity in the technique of papier-mache:
- paper - it is not necessary to use stationery, an old newspaper, a written notebook or paper trays from under the eggs will do;
- paste - can be replaced with white glue or wallpaper glue;
- glue brushes;
- paint brushes;
- paints;
- office knife and scissors.
As a basis, as a rule, a certain form is taken, which is then in several stages covered with layers of paper impregnated with glue.
To begin with, it is necessary to process the surface of the used sketch with petroleum jelly so that in the future it is easy to release the blank from the craft.
Although in some cases you can do without blanks. It is enough only to crush the mass of paper and paste in the hand and give it the desired shape. The consistency of the mass should resemble soft clay. For greater strength of the product, the paste can be mixed with the PVA glue - in this case it will be easier to sculpt the basis for decoration, and the finished billet will have the necessary strength in the future.
After this, you can proceed to shaping and adjusting the shape with the help of layering paper. All coatings should be smooth, the paper should not have folds,and between the layers should release air bubbles. So, layer by layer, the new handicraft “grows”. For reliability it is necessary to apply from 5 to 10 layers of paper.
The last layer is recommended to be made of pure white paper so that the figure has a smooth color and is easy to be painted. After this, the craft should be completely dry. It may take from 6 hours to 3 days.


And so that the finished decoration had a smooth surface, you can walk on the figure with sandpaper. By grinding the surface, you can give the figure any shape. After painting, the finished figure should be varnished so that the decoration preserves the beauty for many years.
Perhaps the most original decoration can be a carnival mask. Such decoration will look amazing on a New Year tree. The finished mask is decorated to your taste. And below it, under the tree, you can place it created from cotton wool or using the papier-mache technique of Father Frost and Snow Maiden - the main characters of the New Year.
See the next video for a master class on making papier-mâché Christmas toys.


