Laminate and tile joint: combining methods
Docking laminate and tile is a popular trick used in large homes as well as in small studio apartments. This combination method is used for zoning space - dividing it into functional areas. To perform the joints neatly and correctly, you need to keep in mind a few nuances.
Special features
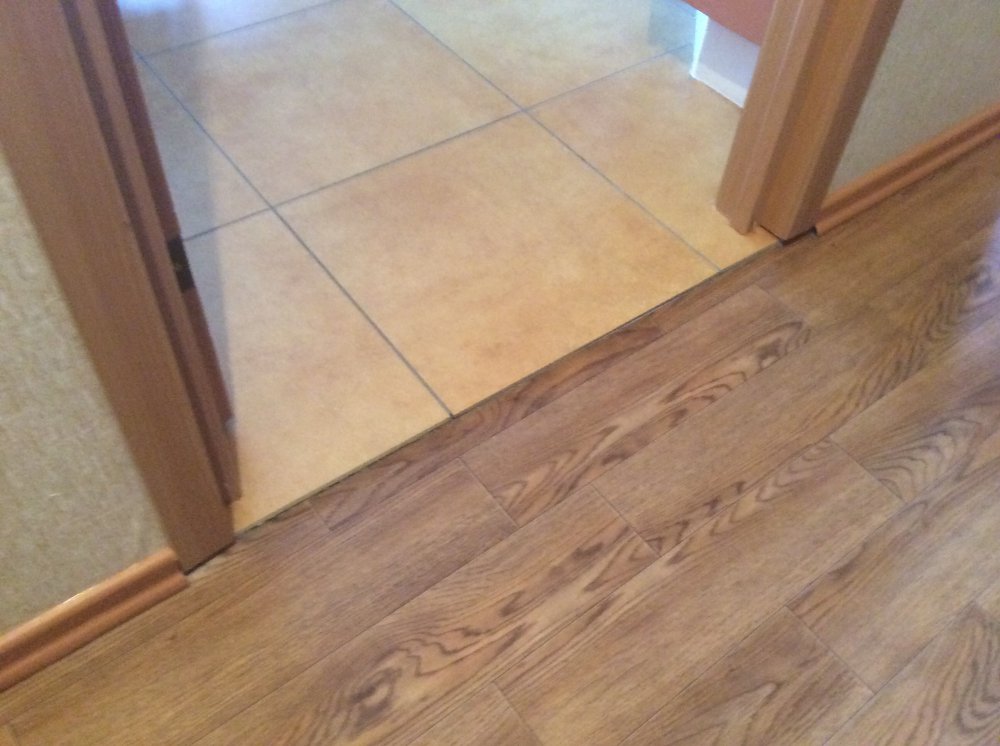
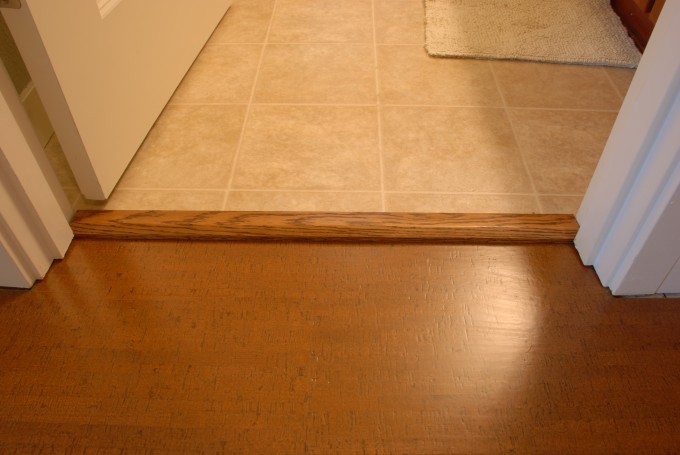
Docking laminate and tiles used in apartments and houses quite often. This is due to the fact that tile and laminate are mounted in different rooms with different functions. So, the tile is more practical than laminate, but it is colder - you barely resemble such material. Thus, we can conclude that one of the frequent places at which the junction of these two materials forms is the space under the door.
Combination in the doorway has its own characteristics. First of all, it is worth noting that not every method of docking is suitable here.
The most important requirement is the presence of a gap between the floor and the door. The gap should be about 2 cm. It is left in order for air to circulate freely.
In addition, the features of the docking are determined for different rooms. So, if you combine the joints of laminate and ceramic tiles in the hallway or hallway, then you must take care to create a small obstacle, an obstacle. This is done in order to keep dust and dirt accumulating in the hallway room, do not let them spread around the house. So, here the joint has not only aesthetic functions, but also practical.


Speaking directly about the materials, you should pay attention to their different density, different susceptibility to different conditions. If the tile is in principle not afraid of any effects other than mechanical ones, then the laminate is more capricious. It is not only prone to scratches. There is a possibility that the material will swell due to high humidity, will crack under the influence of temperature drops, so when installing the joint, you should apply gentle techniques.
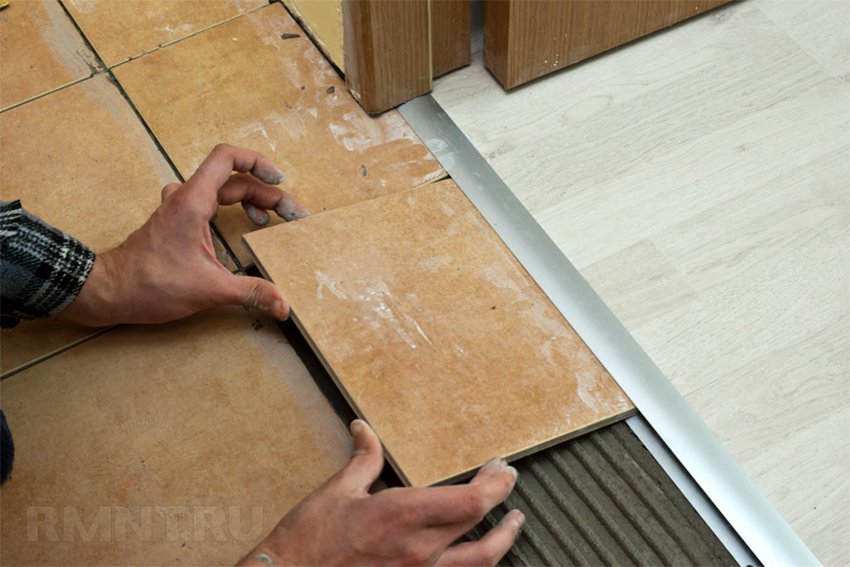
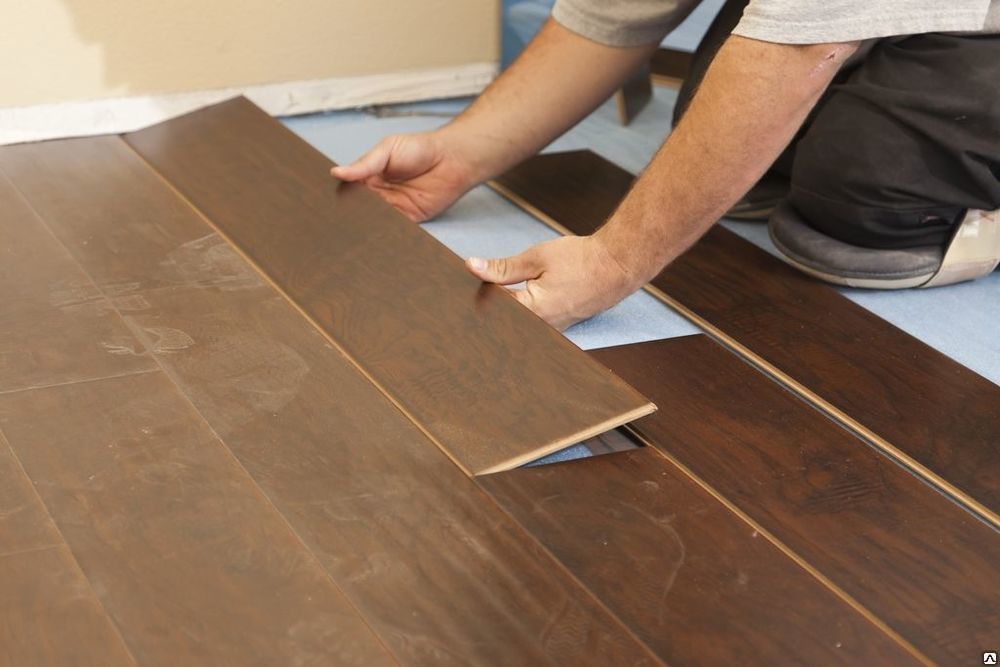
A characteristic feature of combining tiles and laminate is the sequence of laying these floor coverings. Since the tile can withstand heavy loads, it is laid first, and then a laminate is fitted under the tile. This is because if you first lay the laminate, it may be exposed to moisture evaporating the tile after it is laid. Also under the laminate can leak water. All this will inevitably lead to the fact that the lamellae are deformed and the surface will be hopelessly damaged.


Returning to the question of where the joining of laminate and ceramic tiles is used, it is worth mentioning the following areas as an example:
- doorway space;
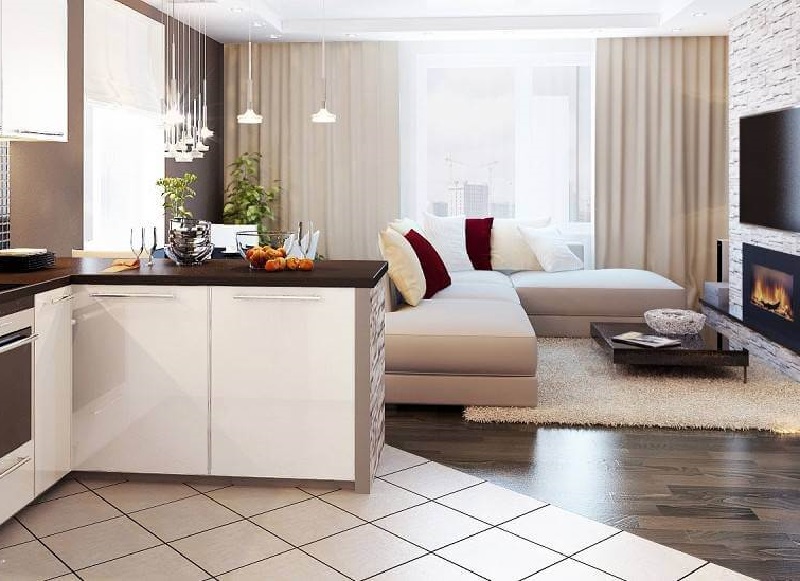
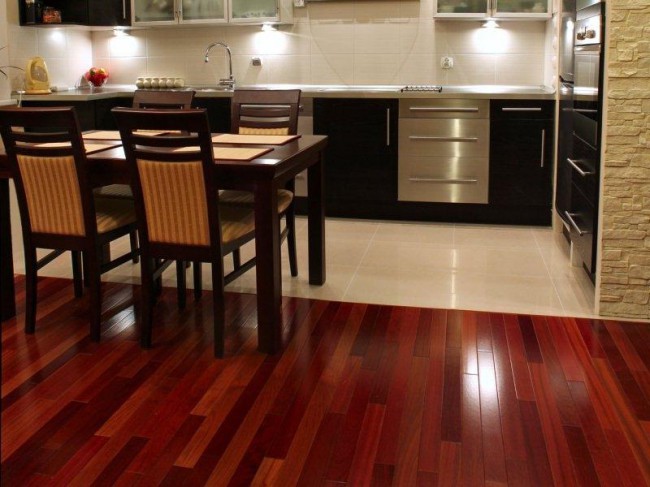
- zoning the kitchen area (for example, separating the working area from the dining area or for separating the kitchen area from the recreation area in the combined kitchen-living room);
- the separation of the zone adjacent to the front door from the rest of the hallway or the separation of the hallway itself, if it passes directly into the hall;
- separation of the loggia zone when the balcony is combined with the living room;
- design space around the fireplace.
So, the tile is used mainly for reasons of convenience or safety, while the laminate attracts primarily with its aesthetic qualities.
Please note that they do not lay out the floor completely with tiles (except for the bathroom), since it is a dubious pleasure to walk on such material. It is cold and often very slippery.
Modern docking methods
To date, experts have identified several methods of docking. Each of them is due to the shape of the joint. Some of them are simpler to operate, others only look spectacular, but in fact the work on their design, and the care of such options is extremely difficult. You should also pay attention to the fact that not every joint can be designed independently: in some cases it is better to reassign the work on clearance clearance to a professional.
There are three ways to dock: straight, wavy and broken. Each of them has its own characteristics, advantages and disadvantages that need to be considered in more detail in order to more clearly understand what will be faced with.


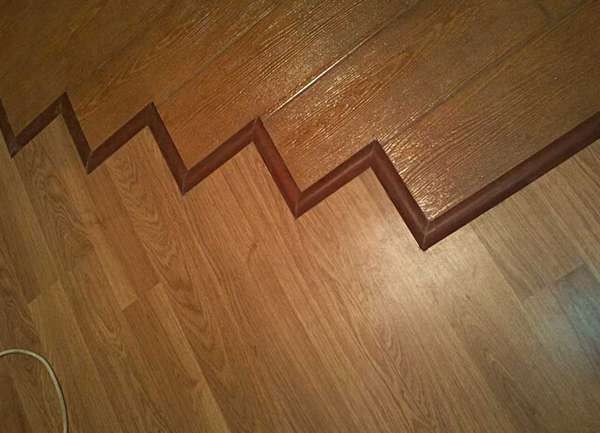
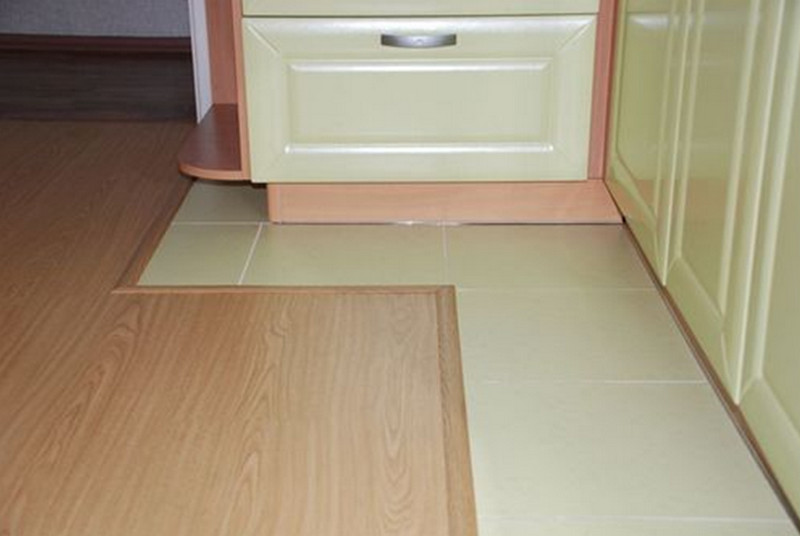
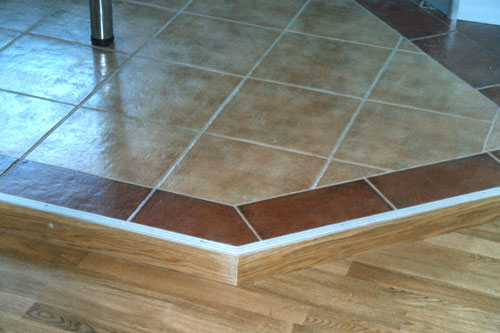
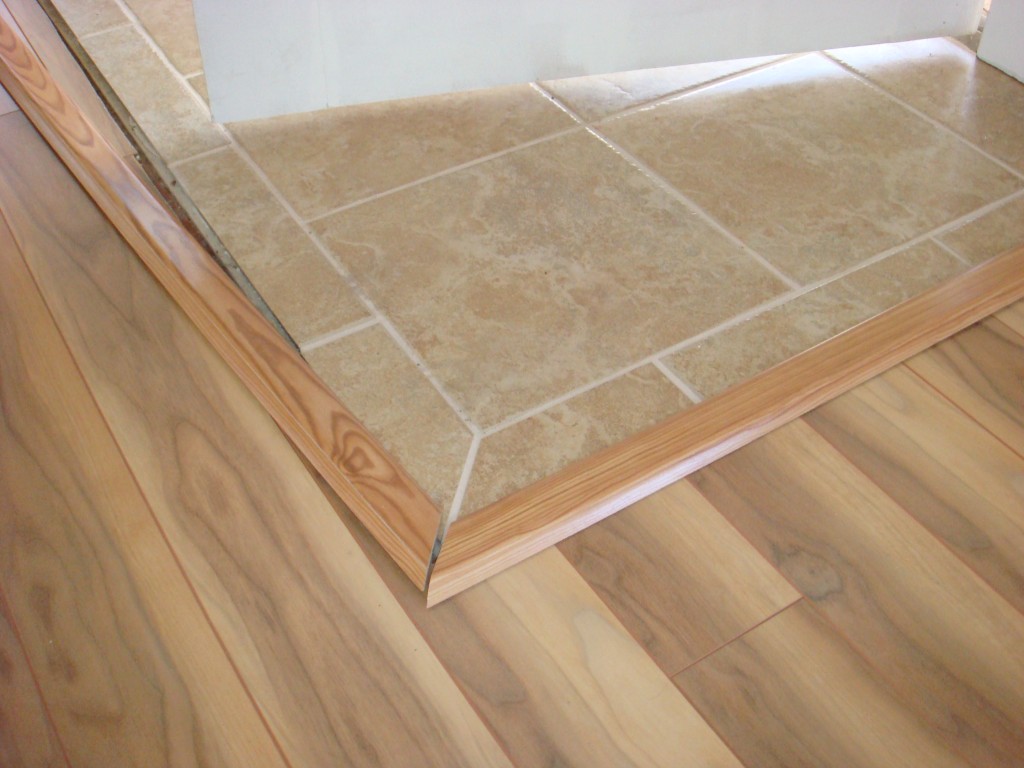
Broken
Broken option looks very impressive, but the owner of a property with similar boundaries will not be easy. First, the beautiful and proper design of such a seam is a real headache even for a professional.
All elements should be carefully verified, ideally, every detail should not be different from all the others. This applies to both the tiles and the laminate itself, as well as the thresholds, if used.
As a rule, kinks are obtained due to the fact that the tile is not trimmed, and the laminate is laid back to its end. This method is used in cases when it is necessary to combine materials of similar texture and color in order to make the canvas look like one. Such seams are rarely emphasized by any elements, since this contradicts the very concept of creating a monolithic floor.
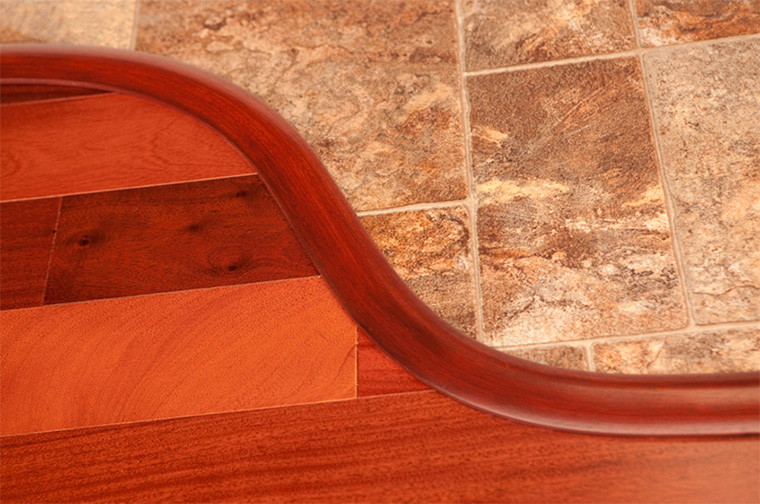
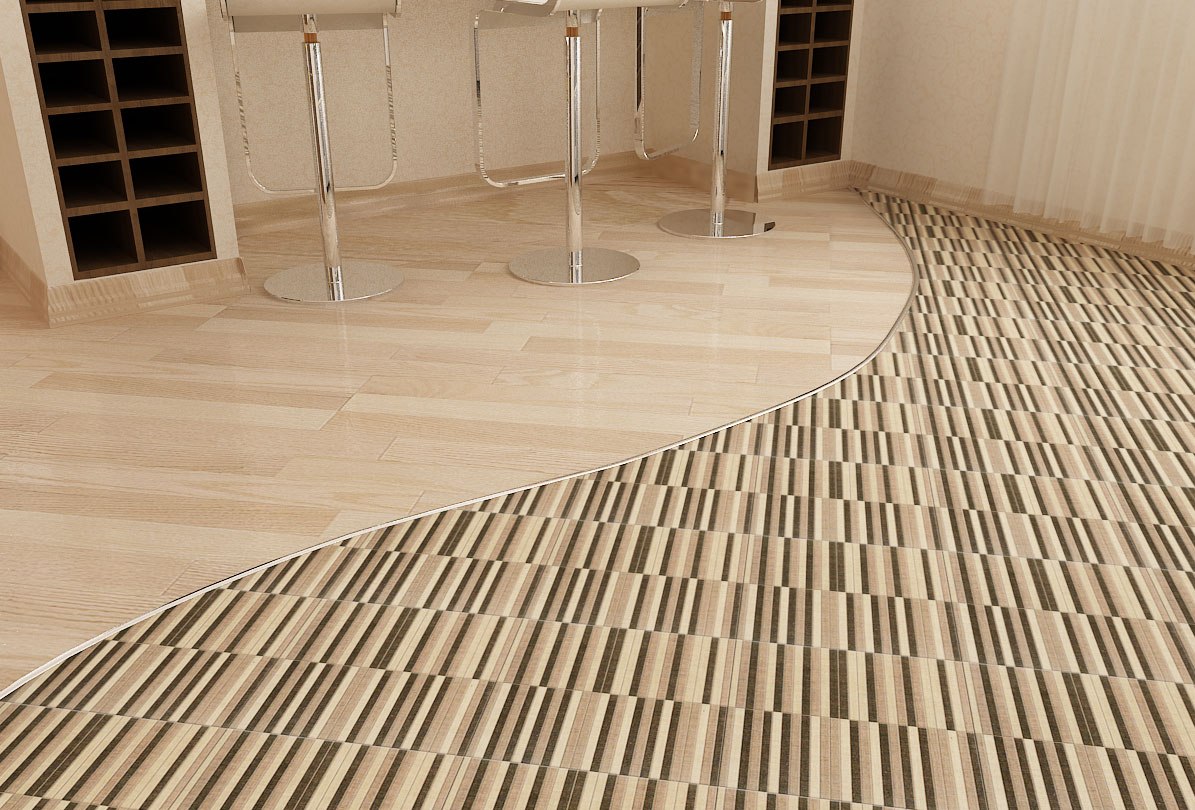
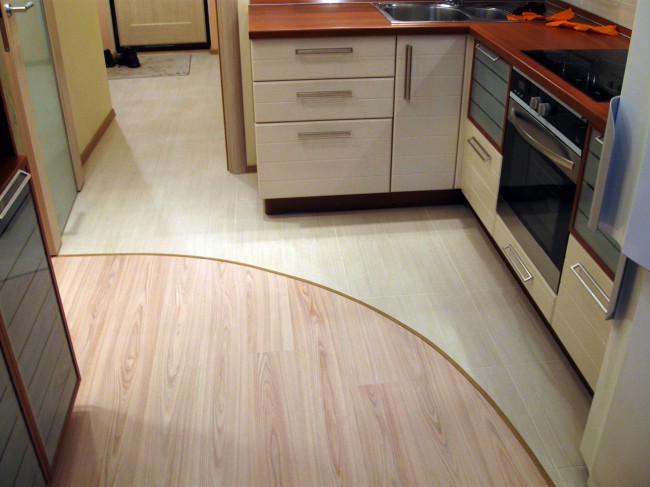
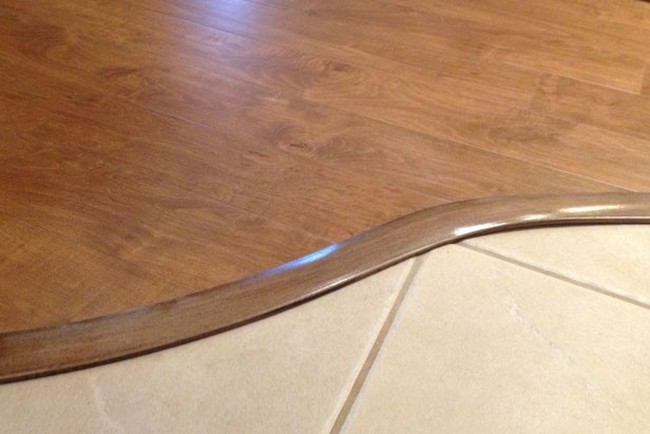
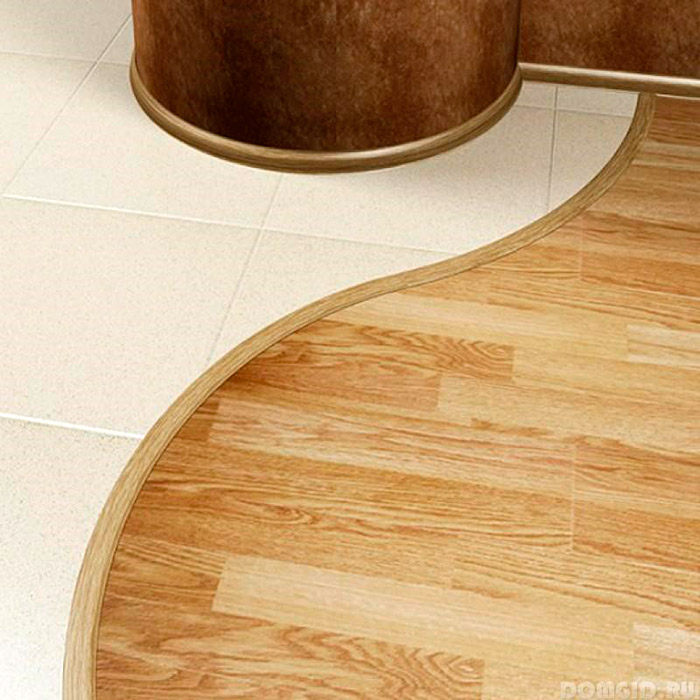
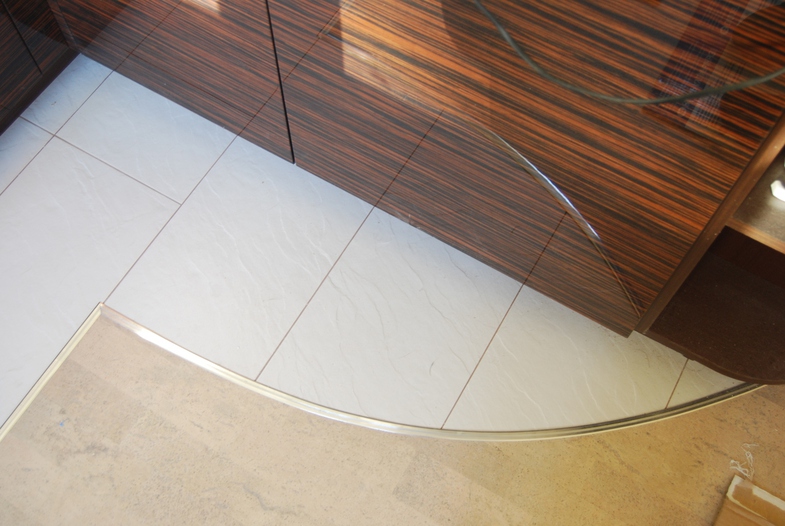
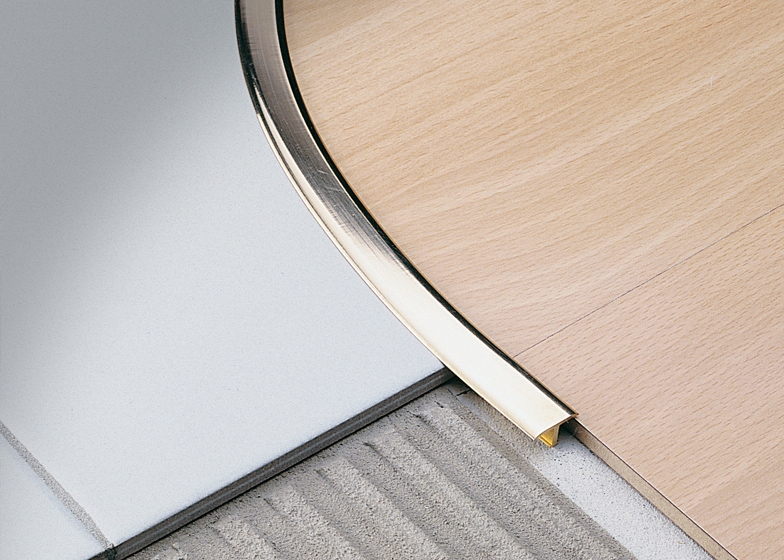
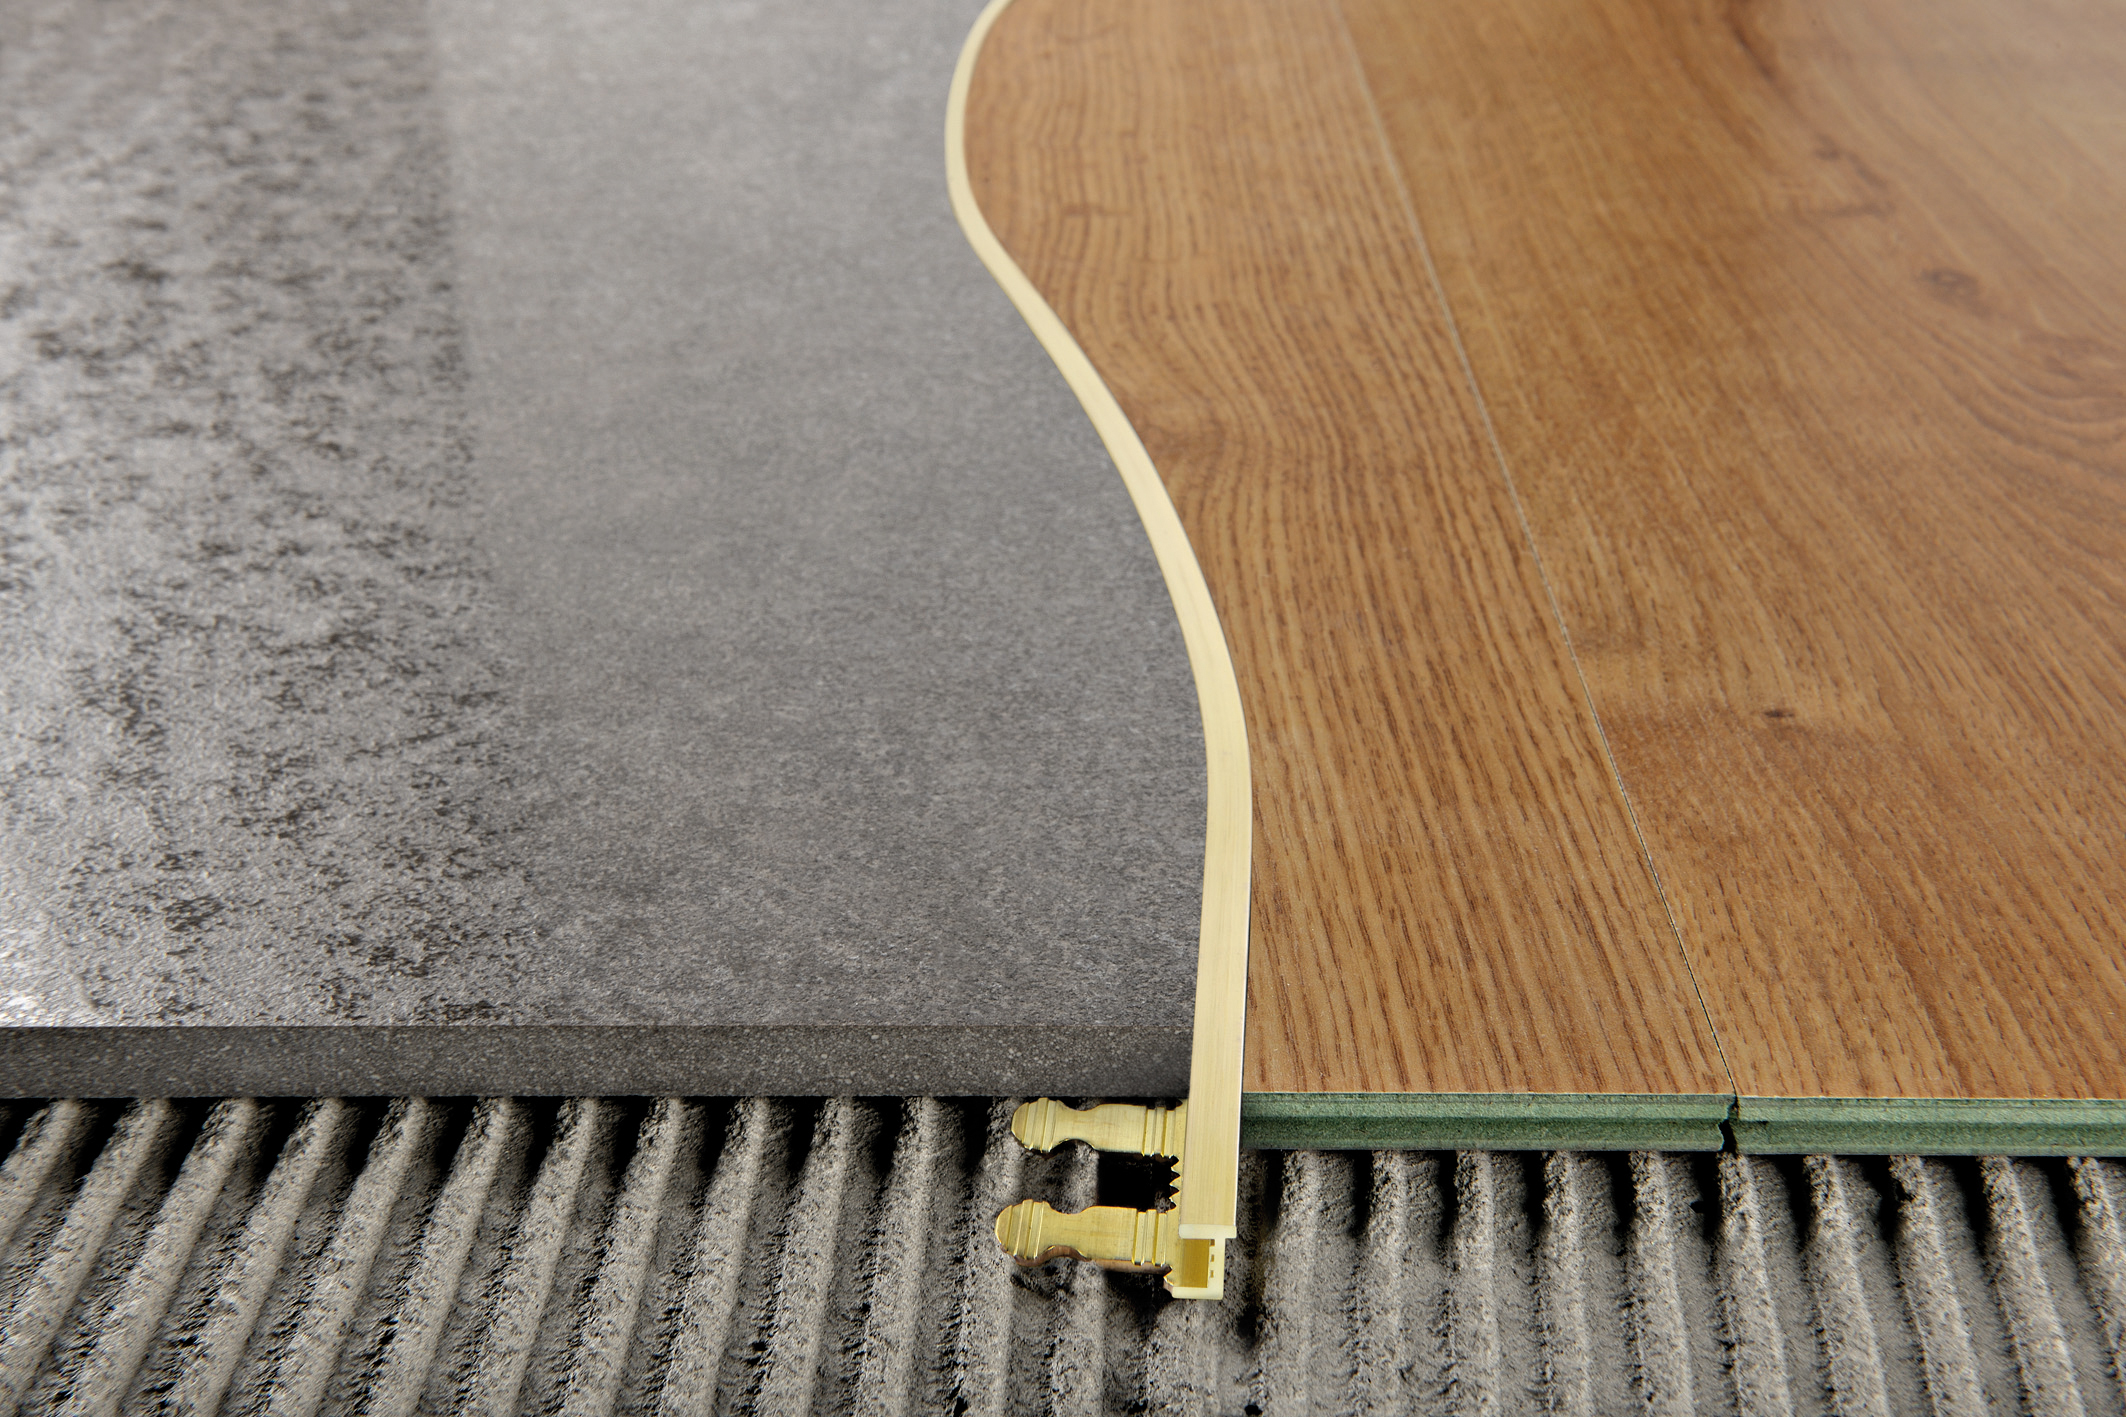
Arcuate
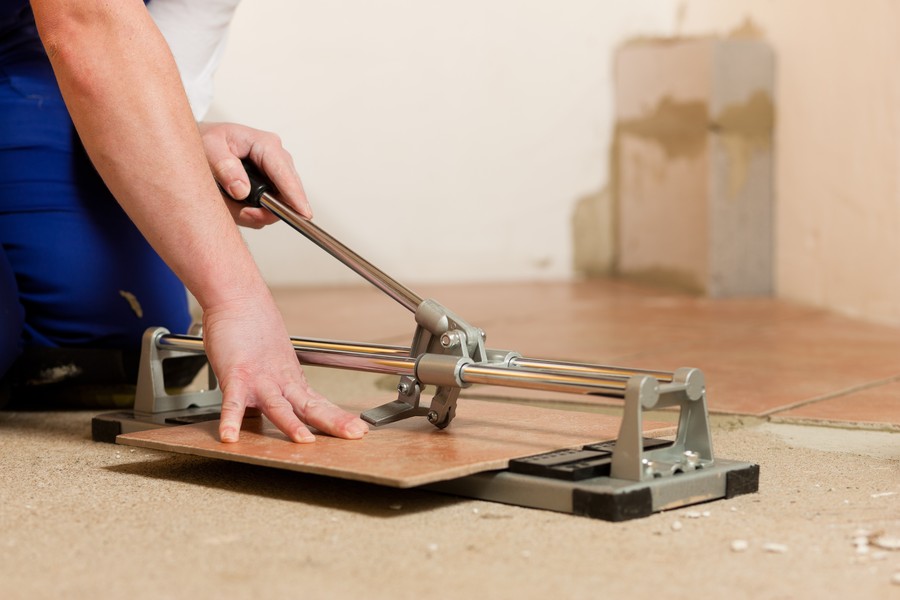
Such seams more often than others get off with the help of additional elements - powders. This is due to the fact that making the seam itself perfectly smooth is difficult. To do this, you need not only to possess skill and experience, but also to have the necessary tools, which include such expensive equipment as a professional circular saw. At home, a grinder with a diamond disc is much more often used, since it allows you to cut off a part of the tile as accurately as possible.
However, if during the cutting of any of the materials there were difficulties and the boundaries did not work out perfectly even, then the threshold is needed to close the defective seam.This achieves a harmonious view of the entire coverage It should be borne in mind that the use of the threshold is not always appropriate.

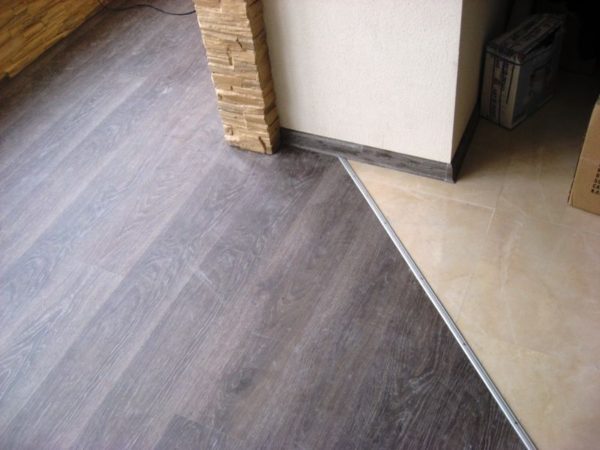
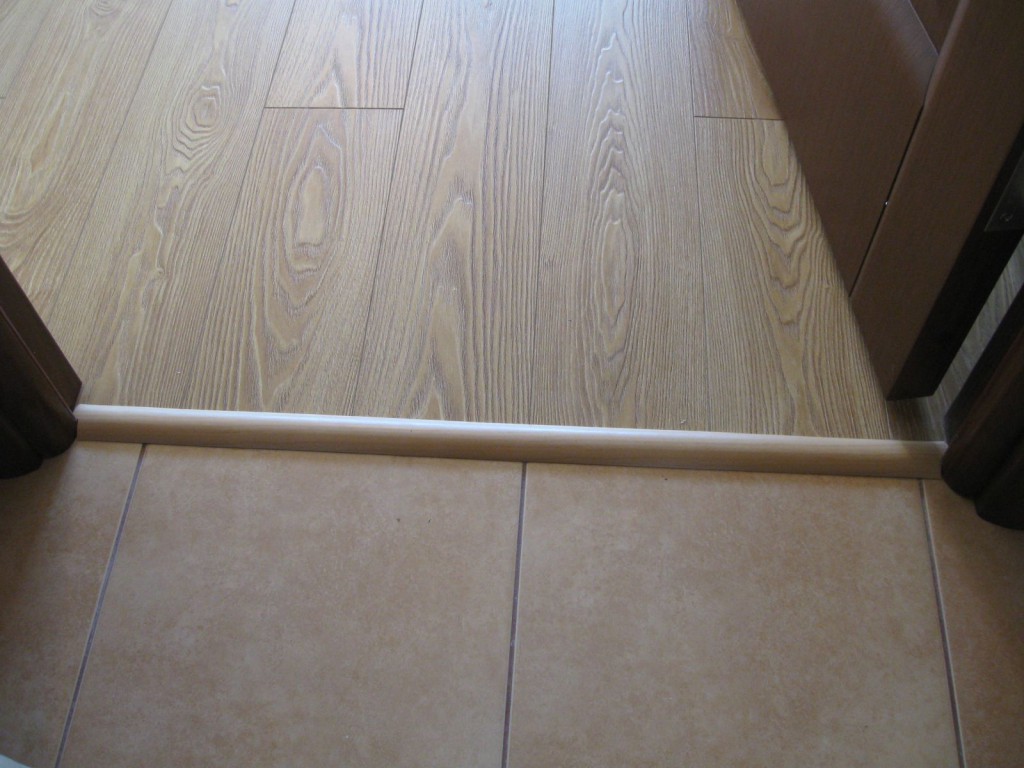
Straight
The most common variant of the slots that need to be repaired. Direct gaps are most often drawn up without the help of a threshold, since this method is more preferable on the premises. In this case, we are not talking about the location of the seam in the doorway, although even there the builders often advise against mounting the sills. The exceptions are decorative varieties, the use of which is due to the style of the room.
Each transition needs a special approach., and in order to join the coatings, it is necessary to take into account the shape of the seam.
Regardless of which of the docking methods will be chosen, it is important to know how to do this docking, how to prepare the materials correctly.

How to dock?
In order to competently make the transition of coatings into each other, you need to take into account several subtleties. In particular, we are talking not only about the shape of the joint, but also about where it is located, as well as what additional functions are assigned to the joint and whether they are assigned at all.
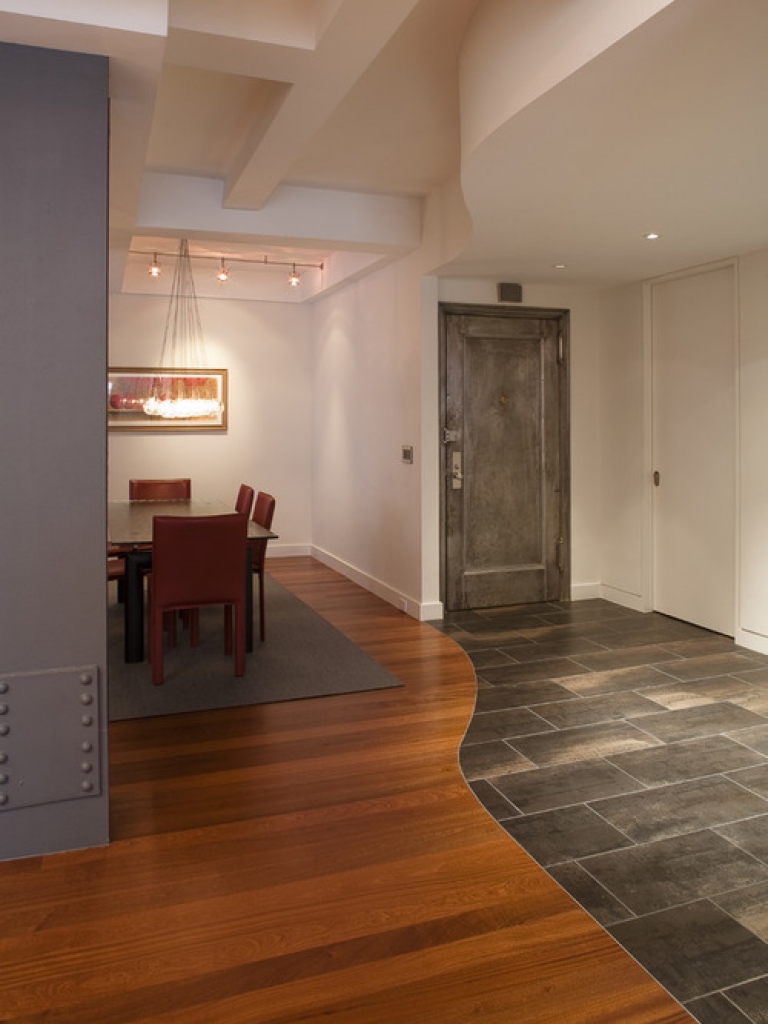
An example would be the situation when it is necessary to connect tile and linoleum in the kitchen. The center of the room is laid out with tiles, and a laminate is laid along the perimeter. In this case, the seam itself should not detain contamination or perform a demarcation function.
Flooring plays only an aesthetic role, and a similar separation is used for convenience: a stronger tile is located in a space that is subjected to constant loads.
In the described situation, the person who is thinking about the design does not pursue the goal of making the gap more visible, emphasizing it, so the choice in favor of a non-bead seal will be fully justified. You can arrange the place of junction of materials to each other using ordinary sealant. This will not only perfectly affect the performance properties of the floor, but will also look quite attractive.
In case it is necessary to seal the gap located on the border of two rooms, and even with different levels of the floor, it is necessary to use the threshold. This is especially true in cases where the height difference exceeds 1 cm. From an aesthetic point of view, this solution is less acceptable, unlike the bezporozhkovogo method, however, in the absence of other alternatives, aesthetics have to be sacrificed.
It is worth paying attention to the fact that the threshold can be fixed not only with the help of screws. You can do without drilling.

An alternative to the threshold may be the installation of a podium.
This option has its own specific features:
- It is recommended to dock the cover with the help of the podium if the transition of heights is extremely large (for example, 5–10 cm);
- the design itself is traumatic because people often do not notice the podiums and stumble over them;
- traumatizedness is especially high in cases where children live in the house;
- the podium does not always fit into the environment, so you need to take into account the features of the interior.
It is impossible not to say that from an aesthetic point of view, the podium looks more attractive than the threshold. Any bright object can be placed on it, making it the accent center of the interior. This solution, of course, is unacceptable if such a step-like transition has to be organized in the doorway.
Thus, there are at least three ways to combine such dissimilar coatings as tile and laminate. It is necessary to take into account the appropriateness of the use of a particular method, then how well the new element (or its absence) will fit into the interior.
Unlike the podium equipment, the transition without a threshold and with a threshold is universal, so it is necessary to consider them in more detail.
Without a nut
The variant in which the coatings are connected without the use of the nut can be called more difficult to perform than the design using the threshold. This is due to the fact that the seam line must be perfectly aligned. Otherwise, the coating will look sloppy, even sloppy.
If it is planned to combine coatings without a threshold, then it is recommended to reassign the work to a person who already has experience in the construction field, since working with tiles is rather scrupulous. When trimming, the tile may crack, shake, causing the entire appearance of the flooring to be hopelessly flawed.


So, there are several ways that you can do a coverage without using a threshold.
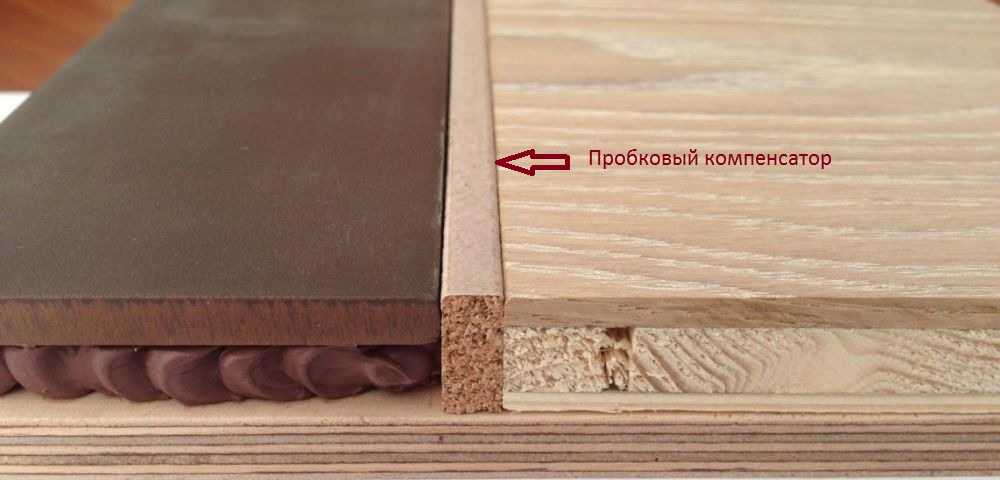
Cork compensator
This option can not be attributed to the economy class. Often a cork compensator is installed between the parquet and the tile, but there are also cases when it is chosen for installation between the tile and the laminate.
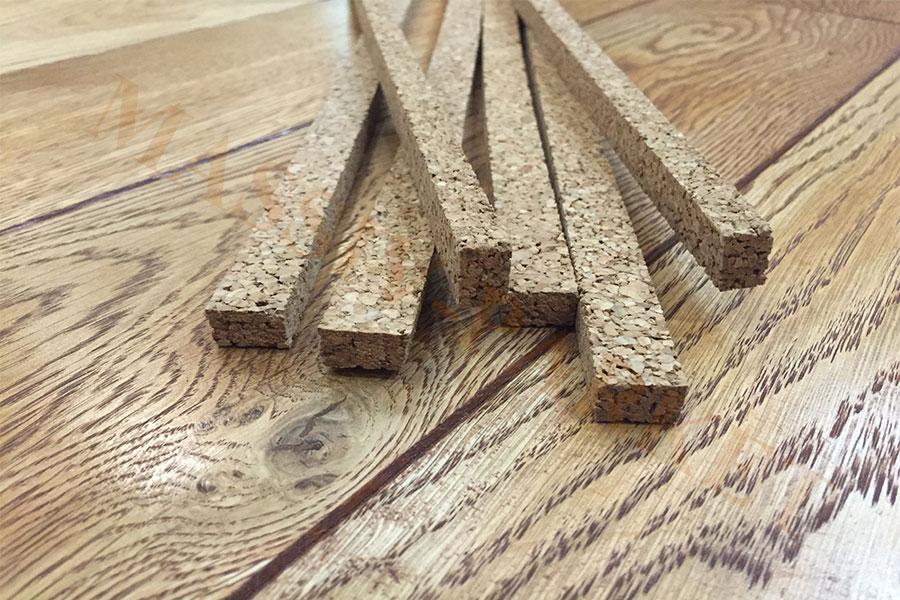
The compensator itself is a strip of cork, one of the ends of which is painted or otherwise decorated to completely merge with the coatings.Compensators are made in different dimensions. The width is 7-10 mm, length - 900 mm, and height - 15-22 mm.
Please note that in some cases it is possible to order a compensator of greater length (1200-3000 mm).
Grout
This method is not as good as the previous one, but it is also used quite often. Grout is used in cases where the coating is already laid, and there is no possibility to dismantle them. In this case, the edges of the laminate coating must be treated with a silicone compound. This is done so that water does not fall under the coating.
It is important to work out the seam itself. It must be filled with silicone more than half, otherwise the use of grout will be impractical: over time, or the coating will swell, or a fungus and mold will appear.
The same grout that was used for the gaps between the tiles is also used at the junction of two dissimilar coatings.

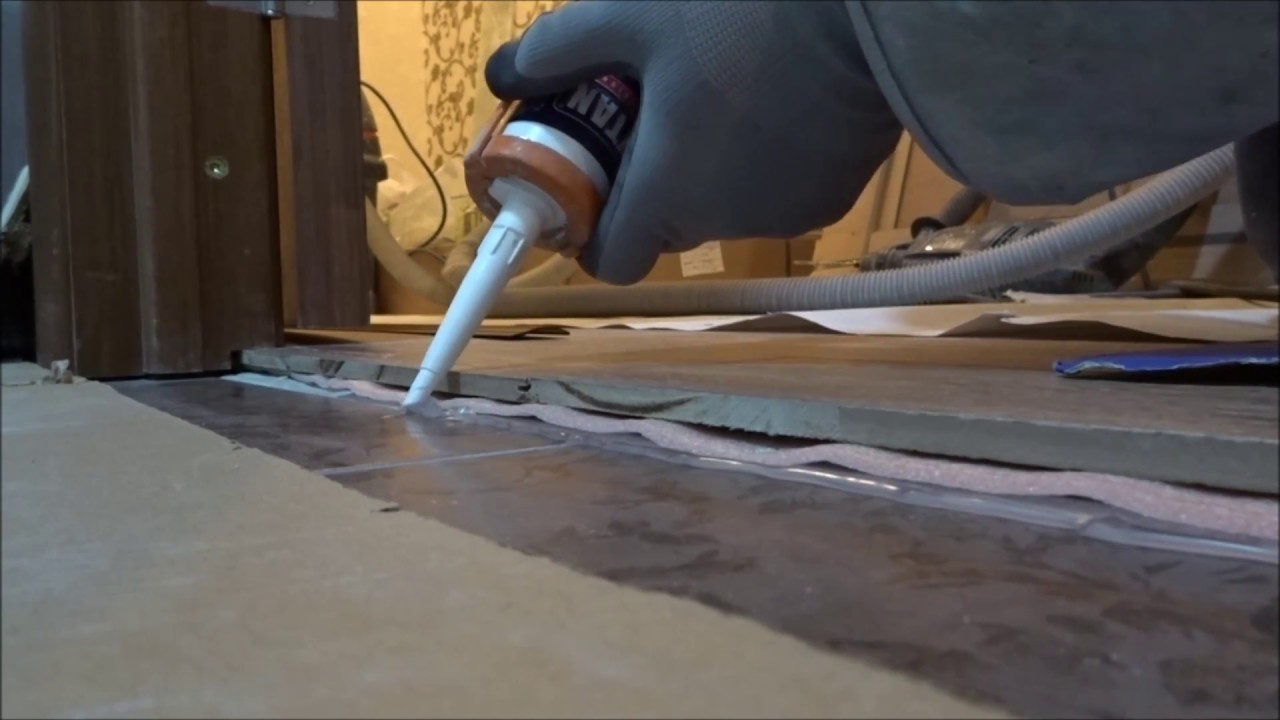
Sealant
This method is not suitable for everyone. The peculiarity of liquid cork sealant is that after drying it acquires a light brown tint, therefore it will be noticeable on too dark or light coatings.However, if this option suits you, consider it luck: neither the laminate nor the tile will not need a special moisture-proof impregnation of the seam, because this sealant perfectly protects against moisture.
The composition is applied either with a spatula, or using a special mounting gun. Often, however, these two methods are combined: first they use a pistol, and then the “bring to mind” joint with a spatula.

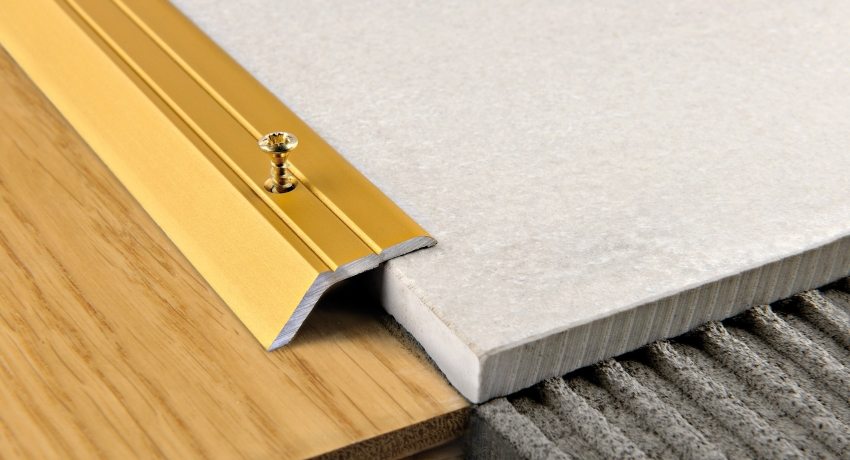
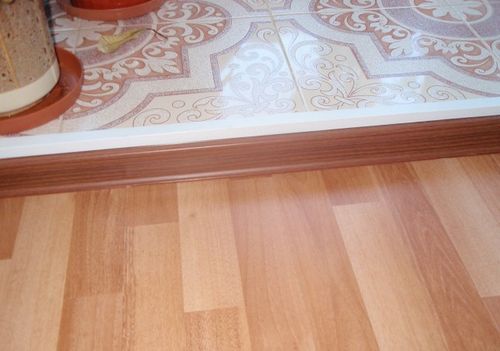
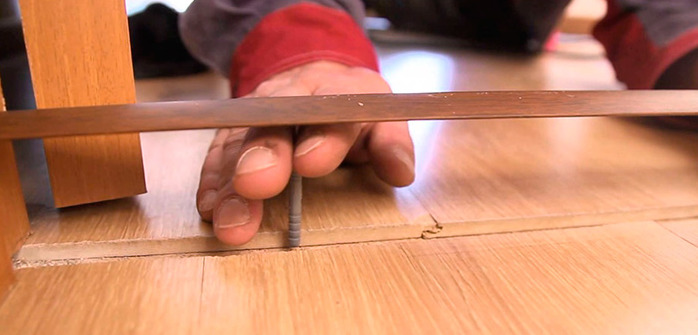
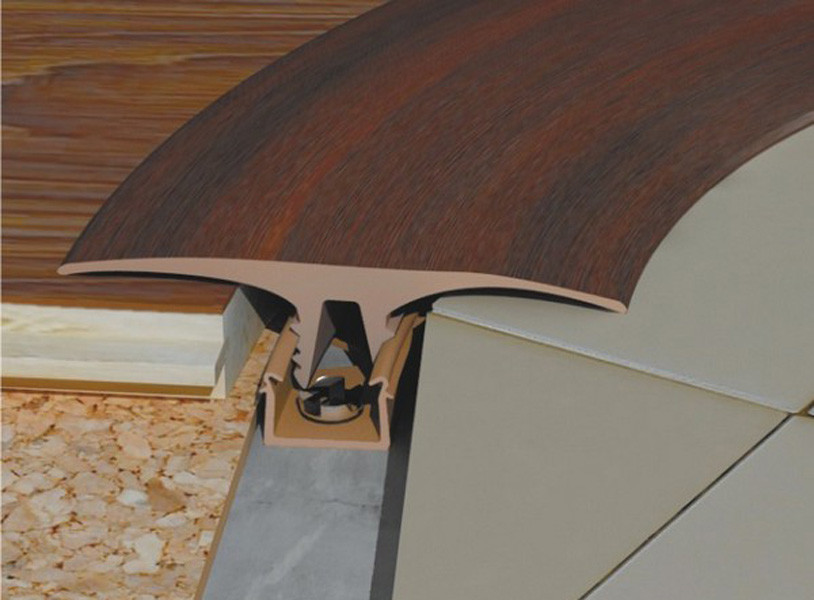
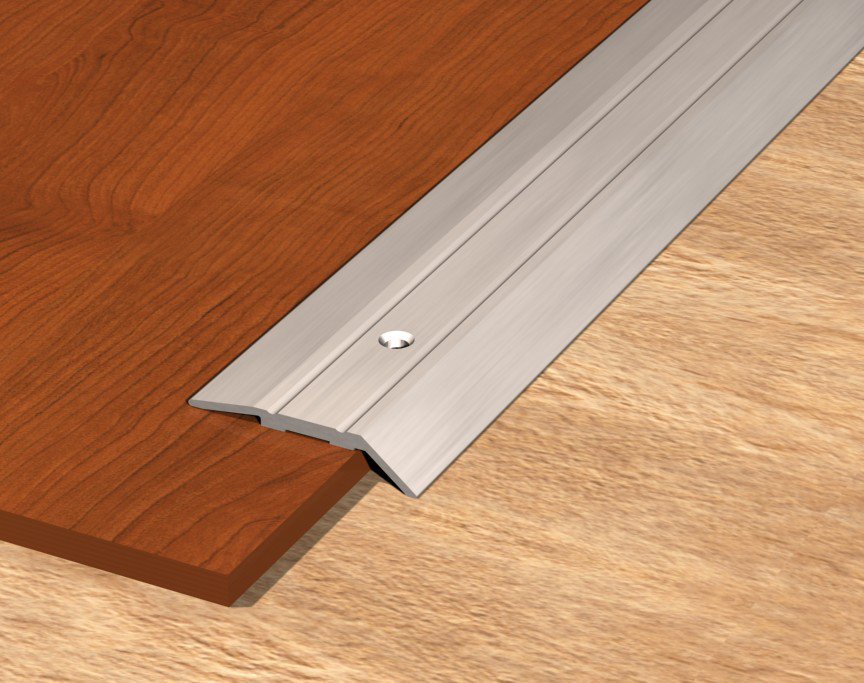
Using threshold
Situations when for processing the joint of laminate and tile have to fix the threshold, are much more common. This is due to the fact that the design using the nut is more universal, although less attractive from an aesthetic point of view. The threshold performs purely practical functions: hiding the height difference, the delay of dirt, the separation of spaces. In particular, the threshold is often used in the design of arcuate slits.
The use of the nut has not only advantages, but also disadvantages, the list of which is not so small. So, housewives often note that cleaning floors with a threshold is somewhat more difficult than without them. Under the threshold itself, dirt is clogged, and sometimes you have to make a lot of effort to clean it.This is an extremely negative impact on the health of people prone to allergies: if the dust with an allergen gets under the threshold, it will be hard to get rid of it.
Another obvious drawback is injury risk. Quite often there are cases when people stumble over the sills and get injured. This is true for families where there are children, and for those where there are older people. It may be difficult for them to constantly step over the threshold. The situation is complicated if the threshold is chosen exactly the color of the coatings, and it is difficult to consider. The contrast threshold does not always look appropriate and attractive, so it is often necessary to sacrifice security.
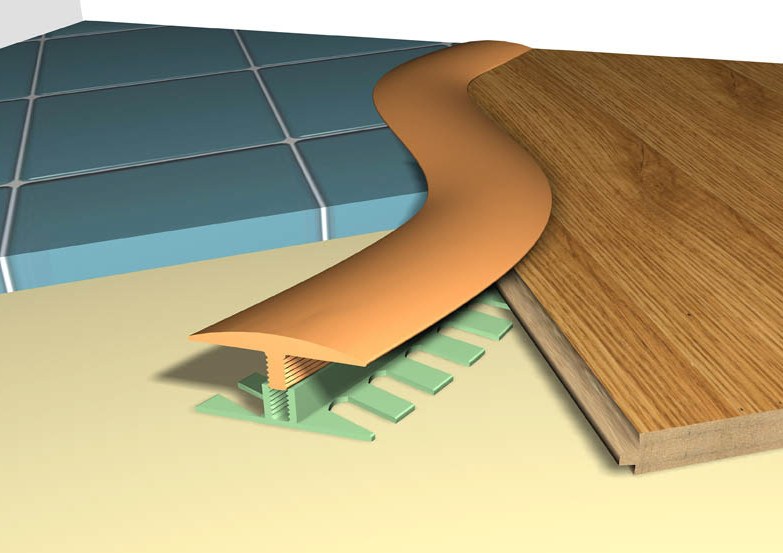
You can set thresholds in several ways, each of which is determined by what kind of threshold is used. It is also worth bearing in mind that there are not only rigid thresholds, but also flexible ones, due to which there is an opportunity to design figured joints.

It is necessary to consider in more detail the situations in which the use of the nut is fully justified:
- Hiding the drops. If the level of the floor or coatings is, in principle, even, but there is a very small difference, not exceeding a centimeter, the threshold must still be set. From an aesthetic point of view, such a floor will look better than just a multilevel one.
- Delayed dirt. It is about separating the hallway space from the rest of the apartment. Thus, the threshold can separate the zone in which people walk out, the zones adjacent to the entrance door, or the entire corridor. In each of these cases, the threshold must be set for reasons of order.
- Division of space. In some cases, the installation threshold is the best way to zoning rooms. This applies to those cases where the presence of the nut is the best stylistic solution possible. However, it is worth noting that such cases are quite rare.
- Hiding flaws. If minor errors were made during trimming of the coatings, and materials cannot be replaced or flaws are hidden, then the thresholds are used. It closes the seam, resulting in such "trouble" invisible. Since the width of the thresholds can vary, their decoration possibilities are practically unlimited.

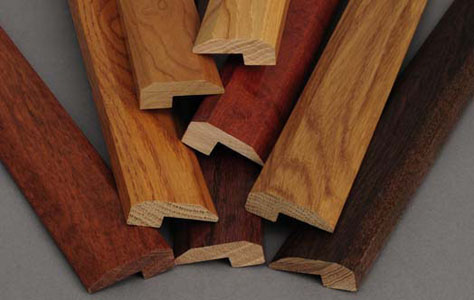
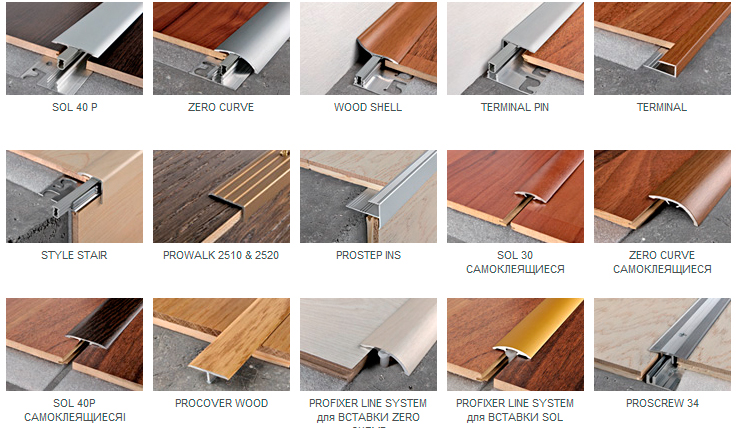
Types of thresholds
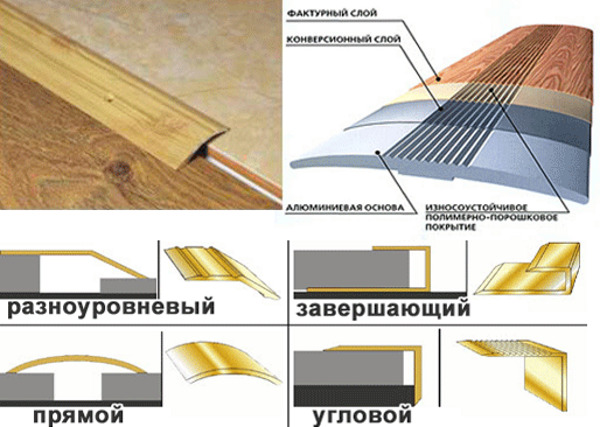
By and large, the thresholds are divided into two large groups: flexible and rigid. They are made of different materials, and it is the quality of the raw materials that determines one or another of their characteristics.
So, the wooden plinth in most cases will be tough.The tree does not bend; in order to give it a rounded look, it is necessary to use a special technology. It is logical to conclude that at home it will not be possible to bend a wooden plinth at home. To fasten a plinth, use self-tapping screws. Wooden options with hidden mount no.
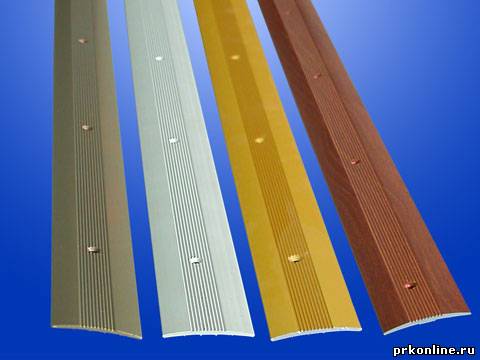
Metal adapters - intermediate version. Depending on the width, they can be both rigid and flexible. The most commonly used aluminum thresholds. Aluminum is a soft metal, so it bends easily. Only the bend radius is limited, which also depends on the width of the strip used.


Plastic powders - the cheapest option, which, moreover, gives a wide variety of options. There are plastic options "under the tree", just painted, stylized as metal. Thus, it turns out to pick up any decorative option. Plastic bends well, especially if you pre-hold the sample in water at a temperature of 70 degrees. The standard plastic separator 90 cm long will easily fit in a bath.
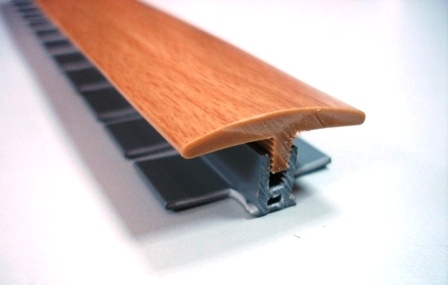
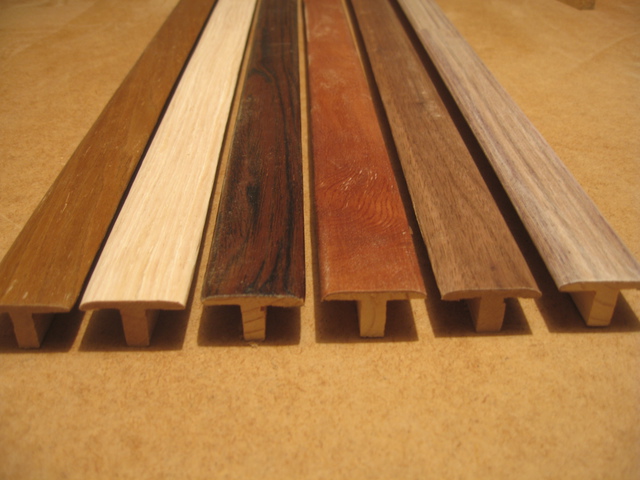
These three varieties are used more often than others, but this does not end the whole variety of options.So, an interesting solution is a stainless steel tavrovy threshold. It is used in high-tech interiors to highlight the high-tech environment, because stainless steel is a brilliant material that looks ultramodern.
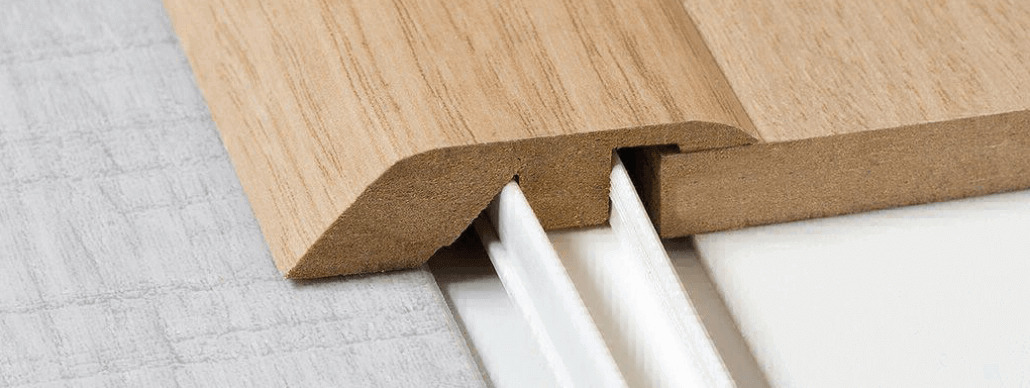
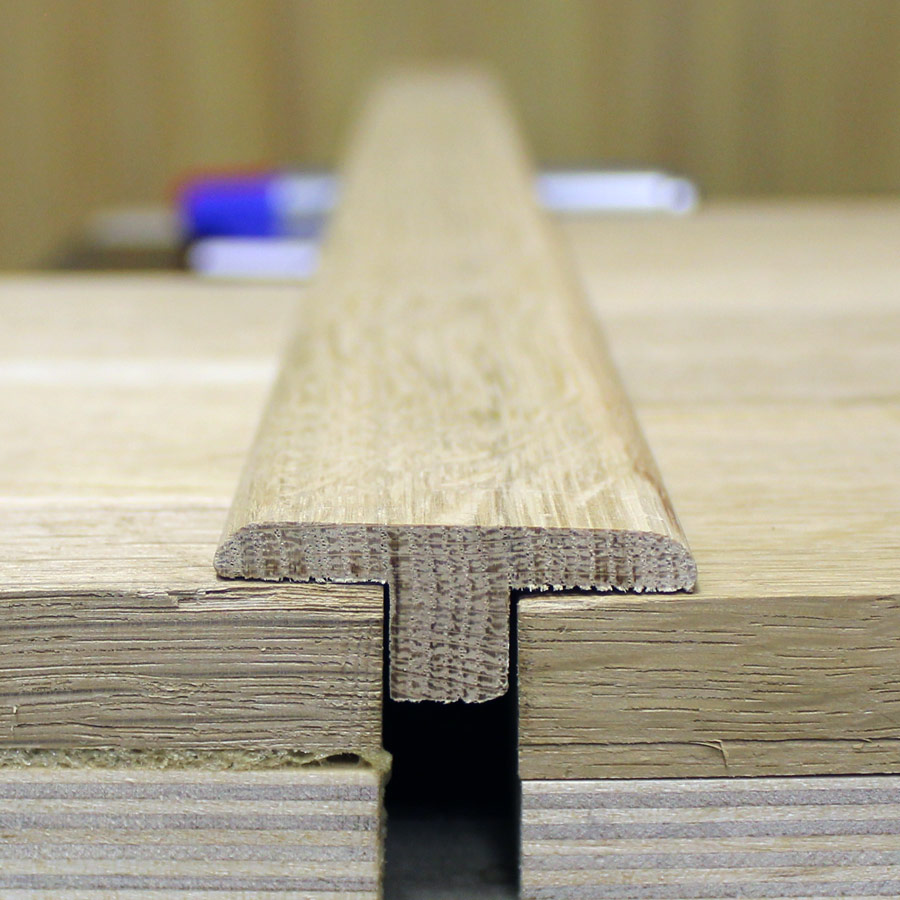
According to the method of attachment, profiles with hidden and open fastenings are distinguished. In the second case, everything is simple: the nut is attached to the docking shock with screws. In the first case, the connecting seam is left without treatment, and the profile becomes T-shaped. Later he is simply driven into the seam with a rubber mallet. Two options are equally common: when the profile is simply driven in or when the seam is first processed with glue, and then the bridge is driven in.

If you have to use several thresholds, then two approaches are also used. In the first case, the fragments are simply joined together, and the transitional place remains as it is. In the second variant, special connectors are used, which make the transition points more aesthetic and attractive. Also, these inserts have another function: they do not allow dirt and dust to clog in the gap between the sills.
Infrequently used special tape door sills - the so-called moldings. The rationality of their use is not justified by anything, but some designers use them to give the room a special color.


Thus, there is a large selection of thresholds, each of which can be inscribed in one or another interior solution. Based on what the joint of the laminate and tile need to arrange, its shape, depth and width, and you need to choose the appropriate option threshold.
How to choose the threshold?
To choose the threshold, you need to pay attention to several factors.
- Material. First of all, it is necessary to pay attention to the material used in the production of the threshold. It should be borne in mind that not every material is suitable for a particular room. So, the tree - the most capricious of all the options. It is possible to mount wooden elements only in those rooms in which there is no temperature difference, there is no high humidity, that is, in the kitchen it is better to refuse such solutions.
Plastic is a more aesthetically attractive material than aluminum, but aluminum is more durable. It is necessary to take into account all the characteristics that the threshold must meet.
- Manufacturer. Despite the fact that the threshold is a small element, it is still important to take into account the reputation of the manufacturer. A poor-quality option will not only quickly fail, lose its original appearance and deteriorate. If we take the plastic variant as an example, it can be noted that a number of unscrupulous Chinese manufacturers use toxic low-grade raw materials, as a result of which, during operation, plastic releases harmful substances into the air that adversely affect the health of households and their pets. It is very dangerous if there are small children in the house.
- Mounting method. Depending on where the threshold is installed and what its final appearance is, you can either use self-tapping screws, or a hidden method of attachment, involving the use of glue or installation in a groove. The hidden method is more popular, since it is simpler and more aesthetically attractive than the open one, but the fastening on screws is safer and easier to dismantle.
Often, designers use visible caps of screws as a special technique that emphasizes such an unusual detail as a threshold, if appropriate.
- Type of weld seam. The choice of one or another threshold depends on the shape of the gap that needs to be sealed. For direct joints, any of the options is suitable, and for curved ones - only plastic and aluminum, and then narrow ones. Also important is the depth, for example: if the gap between the coatings is practically absent, then fix the T-shaped profile here will not work. It is best to look at the options with a flat inner side, in the future simply by putting them on the glue or simply refuse to use the nut.
- The size of the joint. This refers to the length of the junction. So, if the joint is small, it is best to make the threshold imperceptible. For this perfectly suited flat options that are almost invisible on the floor. To enhance the effect, it is best to choose a threshold for the color of the coatings. If the joint crosses the entire room, then hide the threshold will not work. You can try to turn it into an additional decorative detail, beating it interesting. In the first case, the choice of plastic powder is more practical, in the second one you can choose any option.
- Pursued goal. First you need to decide what the threshold is mounted for.The goal may be an attempt to hide multi-level floors, zoning of the room, and so on - mass options. It is also necessary to decide whether you want to emphasize the joint of the laminate and tile or, conversely, hide it. In the first case, the best option would be to opt for a threshold in a contrasting color, in the second case, it would be necessary to select the threshold that maximally merges with the floor. The photo clearly shows how each of the options in its own way transforms the room.


Useful tips
There are several useful tips on how to beautifully, quickly and correctly seal the goal between tile and laminate, and so, so that the coatings retain their attractive appearance for a long time, do not deform:
- Be sure to provide coverage of the same level. Care must be taken to ensure that the threshold or podium leveled the height of the laminate and tile. This is necessary in order to not stumble when walking on such a floor.
- And before laying the tile, and before installing the laminate, take care of the optimal leveling of the floor, its preparation. This includes screed, floor cleaning, floor insulation, if provided.
- Mounting a warm floor, be sure to buy materials suitable for laying on such a system. Although such materials are more expensive, you will be able to save on the fact that you will not have to do repeated repairs in 3-5 years.
- When cutting materials, get good equipment. Ideally, rent one that is used in production, or ask for help directly to a specialized company. In order for the cuts to turn out as it should, you need to use templates. This is especially true for arcuate seams.
- In order to compensate for the difference in levels between the coatings, the substrate is laid under the laminate boards. It is important to pay attention to the fact that its thickness is sufficient, but not too large, otherwise the laminate flooring is deformed.
- Laying laminate and tile butt, take care of the presence of a compensating gap between them. It should be 5-10 mm. During operation, the laminate swells, and if you lay tile and laminate boards too tightly to each other, the laminate is deformed.
- Initially, the tile must be laid, and only then - laminate.This is due to the fact that during installation the tile emits additional moisture, which will adversely affect the strength and appearance of the laminate coating. It is better to insure and perform the work in the correct order.


There are many types of solutions for sealing the gap between the laminate and tile, but none of them will work if the installation of coatings is carried out incorrectly and irresponsibly. It is important to first take care of the basics, and then think about the little things. Act extremely carefully and deliberately, and then your apartment will be decorated with a beautifully made laminate-tiled floor option.
How to make a neat joint of laminate and tile, see below.


