Loggia insulation
The spacious open loggia is a great place for drying clothes, storing household utensils and relaxing on a summer evening with a cup of tea. However, its capabilities are not limited to this. Modern loggia is a full-fledged living room of any apartment.
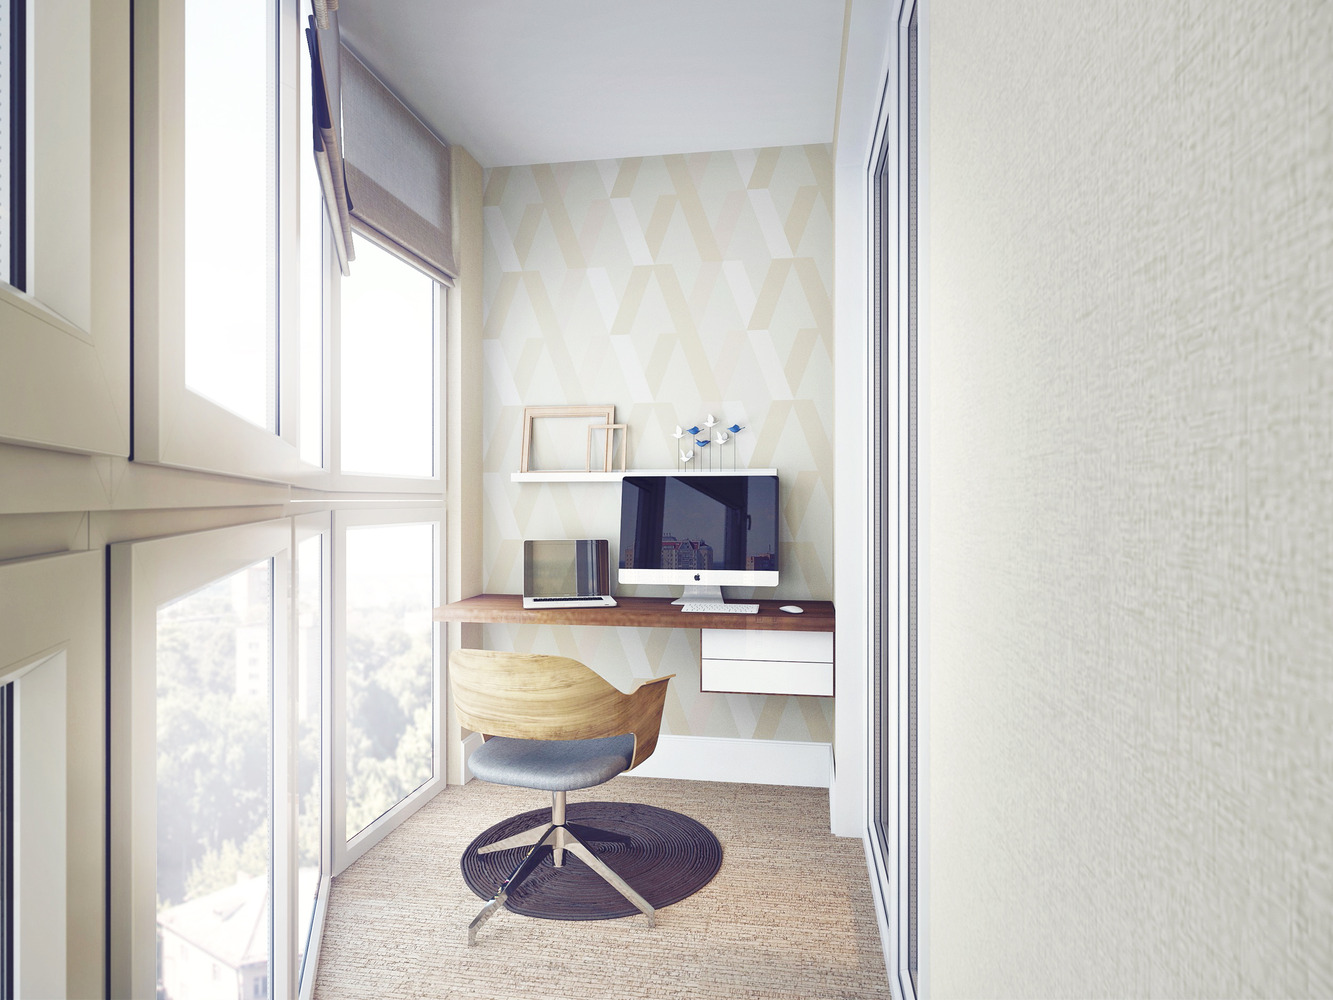
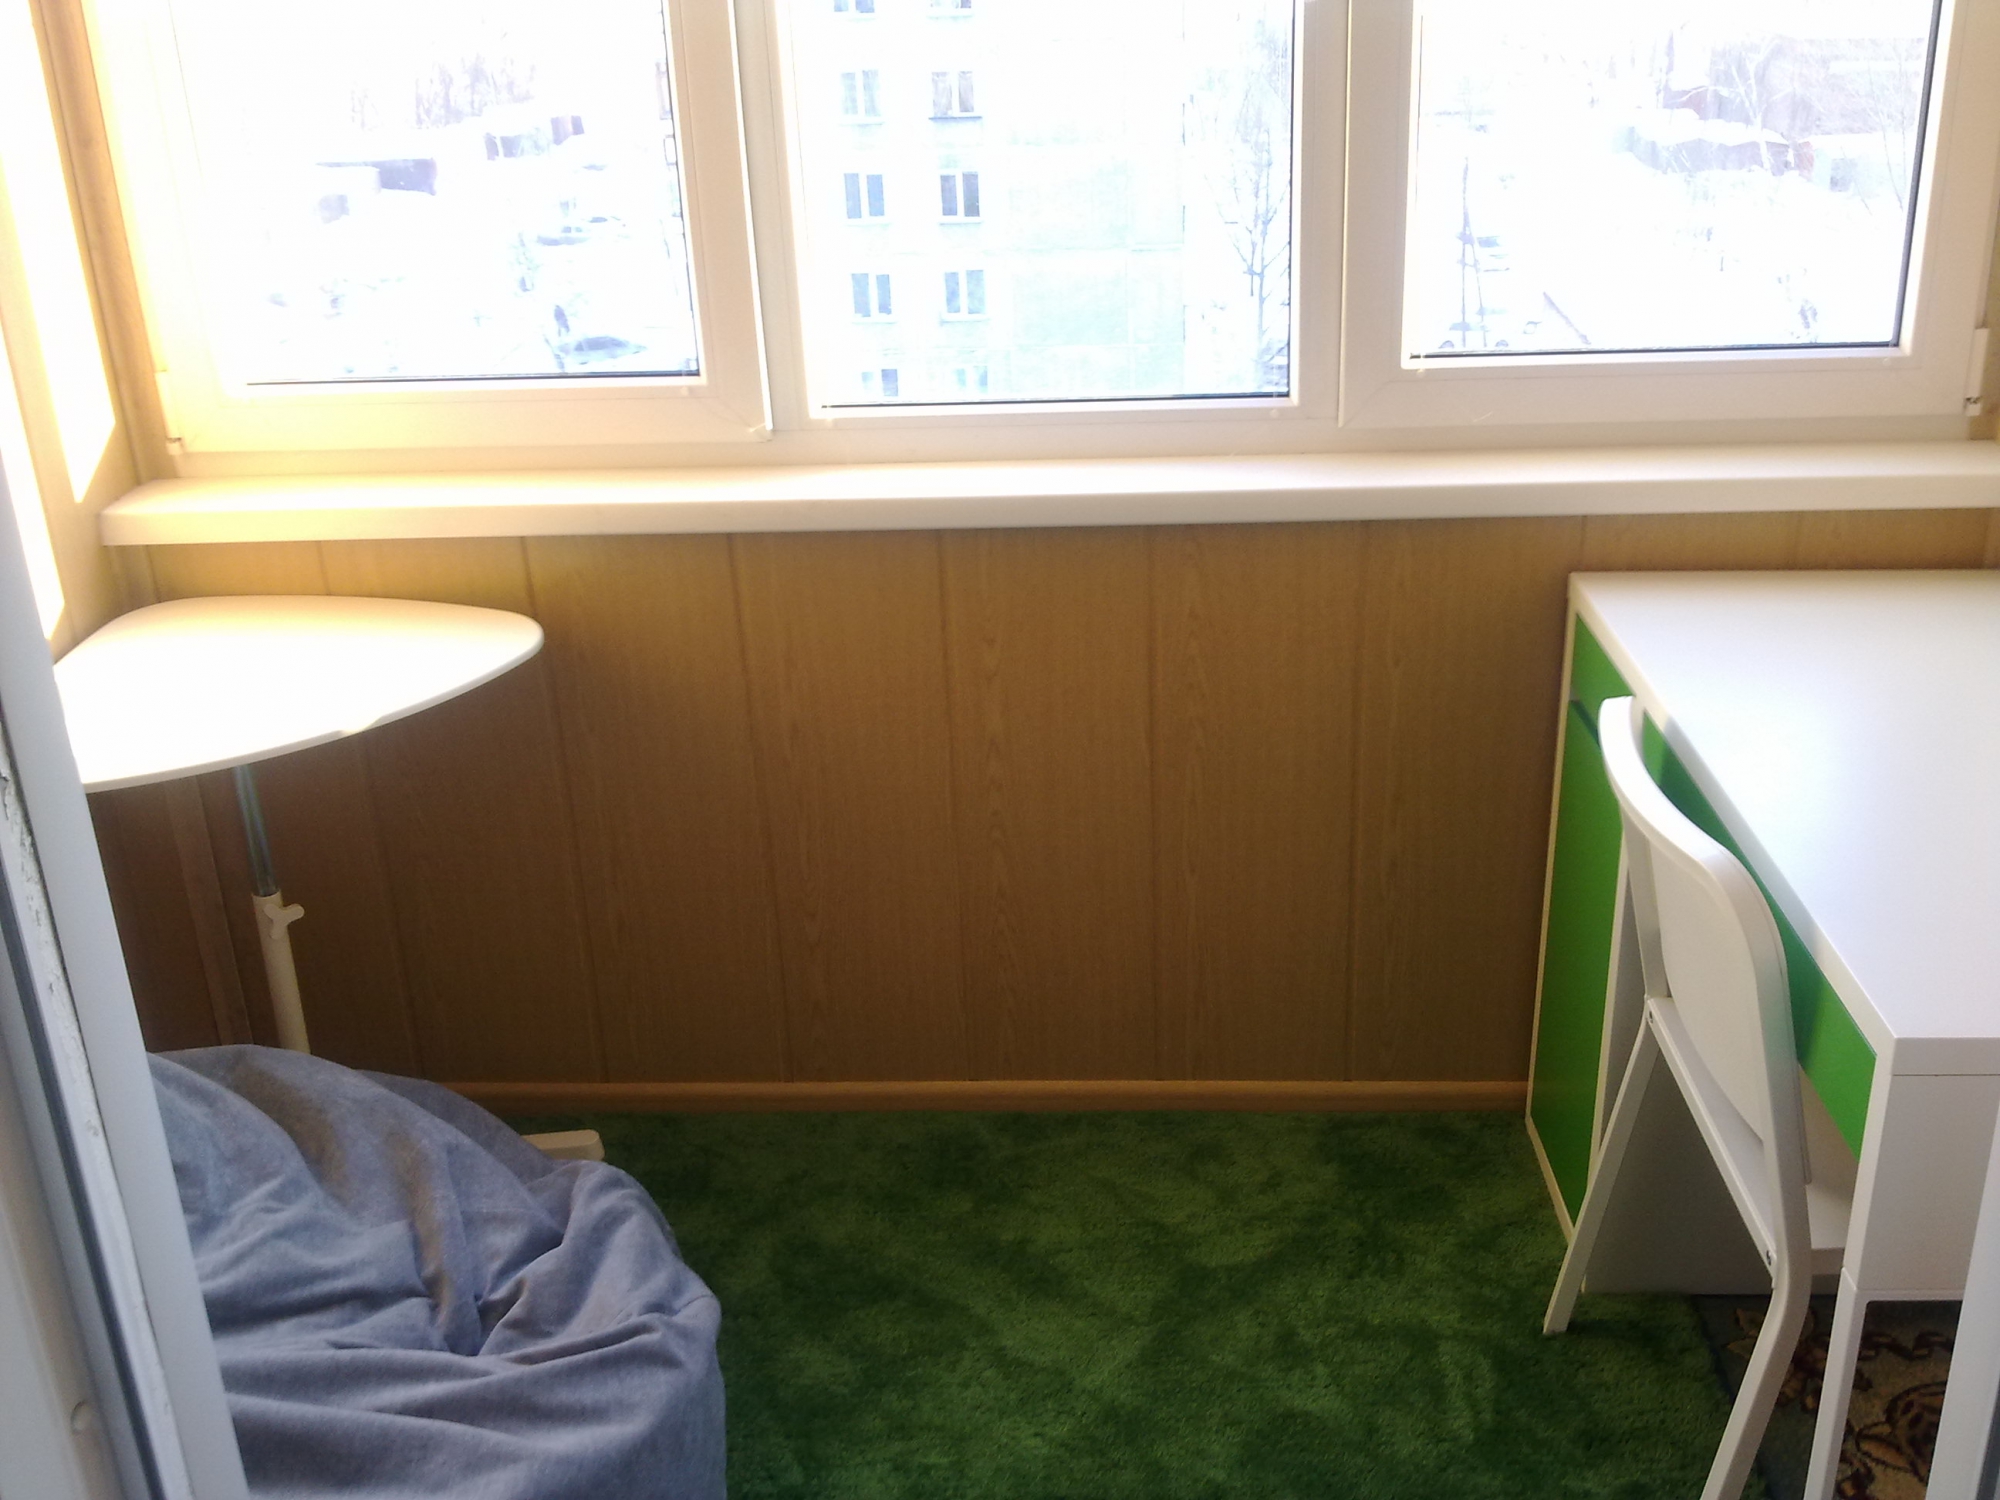
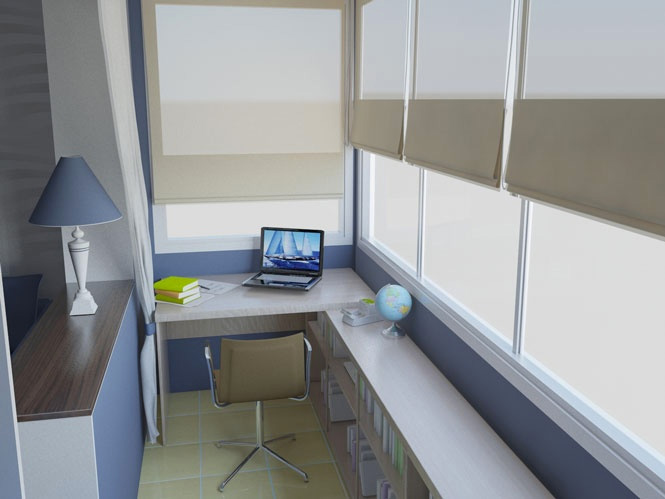
There you can arrange a bed, a working corner, a dining or play area, equip a small gym.
However, dust, insects, birds, city noise, precipitation and low autumn-winter temperatures can interfere with the implementation of these plans. Sooner or later, the majority of apartment owners need to insulate the loggia.

Special features
More recently, the issue of loggia insulation has remained open to many residents of apartment buildings. Today, the answer to this question is almost unequivocal - to warm.This will protect the home, protect it from street noise, annoying insects, atmospheric phenomena, as well as allow full use of the functionality of the loggia all year round.
For residents of small apartments in a panel house, weatherization of a loggia or balcony will also significantly expand their living space:
- You can, for example, transfer part of your wardrobe, library, household utensils to a balcony.
- The warm loggia is an excellent place for cultivation of ornamental plants or the device of the small greenhouse.
- This is a great place for rest, relaxation and a spacious veranda for a family dinner.
- Loggia allows you to use the free space to create a variety of rooms - not only residential, but also for production purposes. This is especially true of panoramic loggias adorning the facades of office and industrial buildings. These rooms are used as full-fledged cabinets, work areas and recreation areas for employees.

What to insulate?
Modern manufacturers of building and finishing materials offer a huge selection of different options for warming loggias and balconies for every budget. The materials have different composition, dimensions, differ in the method of installation, physico-chemical and operational properties. It remains only to choose and buy a suitable insulation. Among the most popular, practical and affordable materials today are two options.

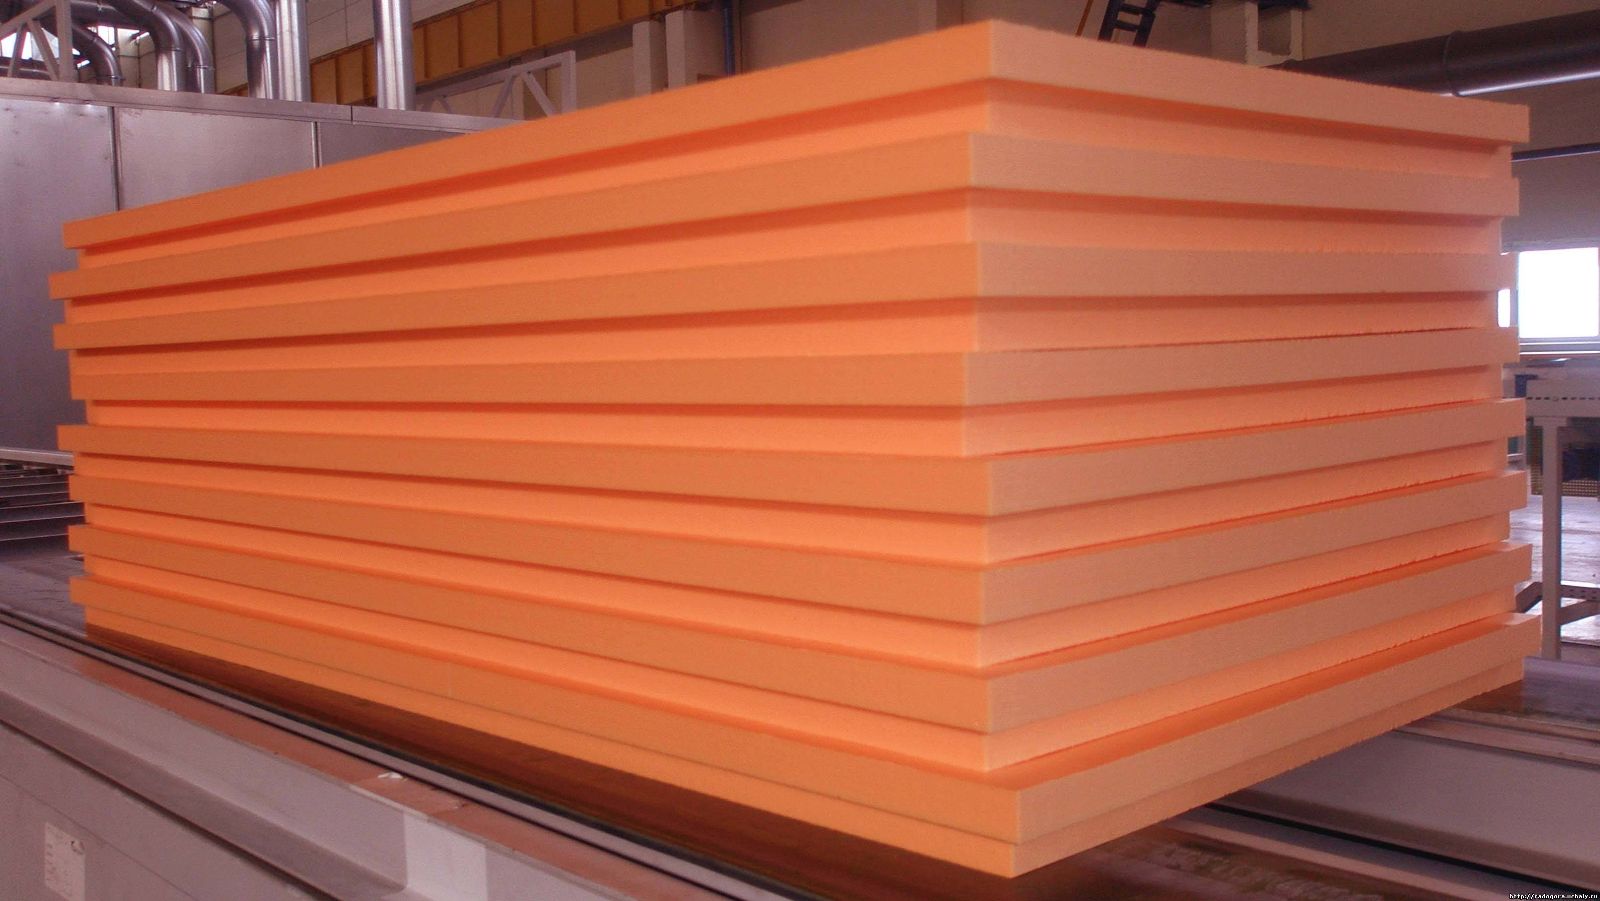
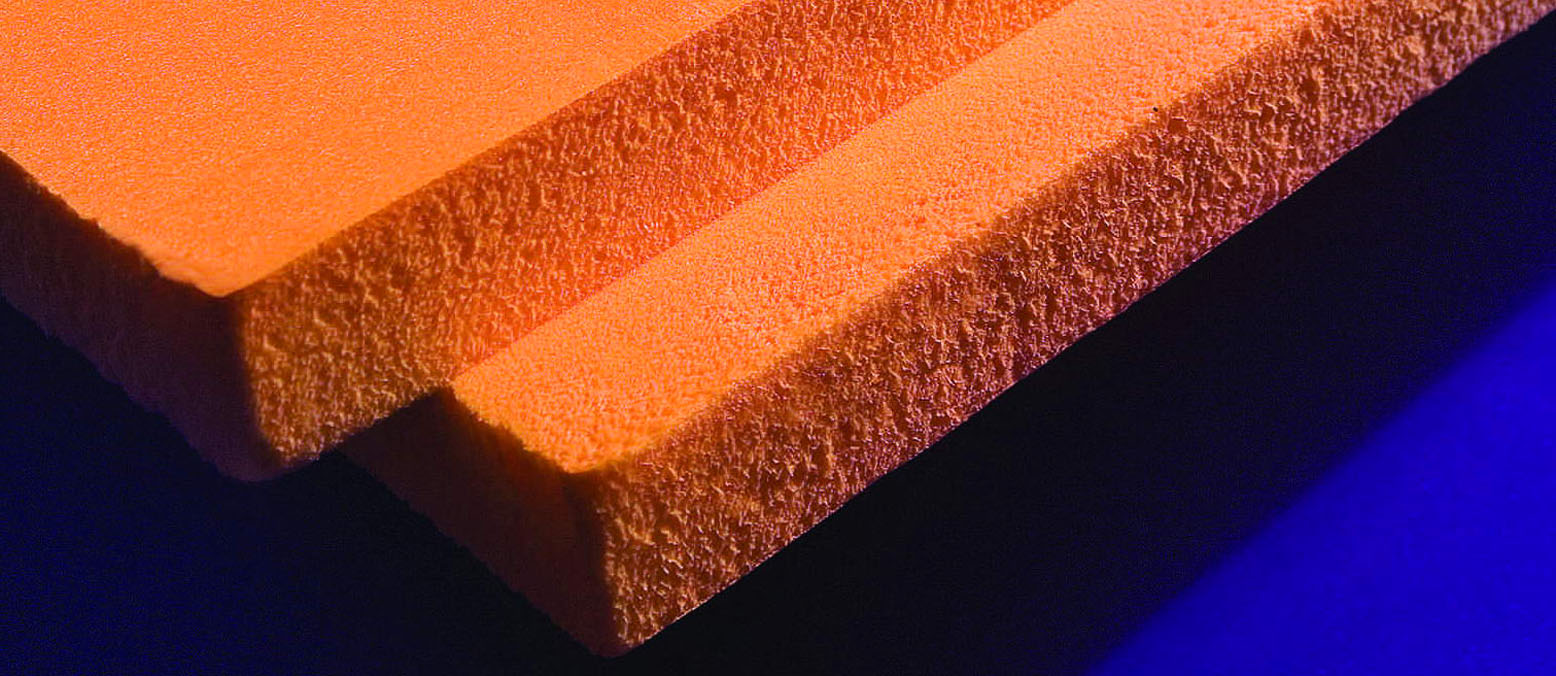
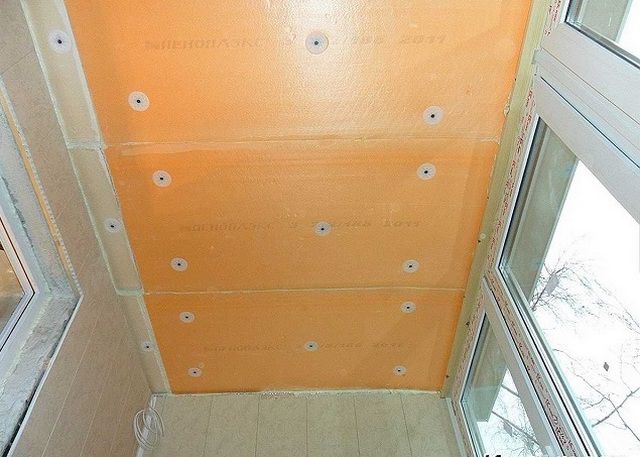
Penoplex
Penoplex structure is very similar to the familiar foam. Penoplex - one of the commercial names of extruded polystyrene, which is used for insulation.
Its advantages include:
- excellent strength (when cutting a sheet with a stationery knife, the material does not crumble, and the cut is smooth and smooth);
- high coefficient of thermal insulation;
- resistance to mechanical damage (shock, bending, kinks) - thanks to this, the material can also be used for floor insulation;
- fire resistance;
- good vapor barrier.
The disadvantages of this material are relatively high cost. The foam block is presented in several density options, so that it can be used in different climatic zones, in one or in several layers.
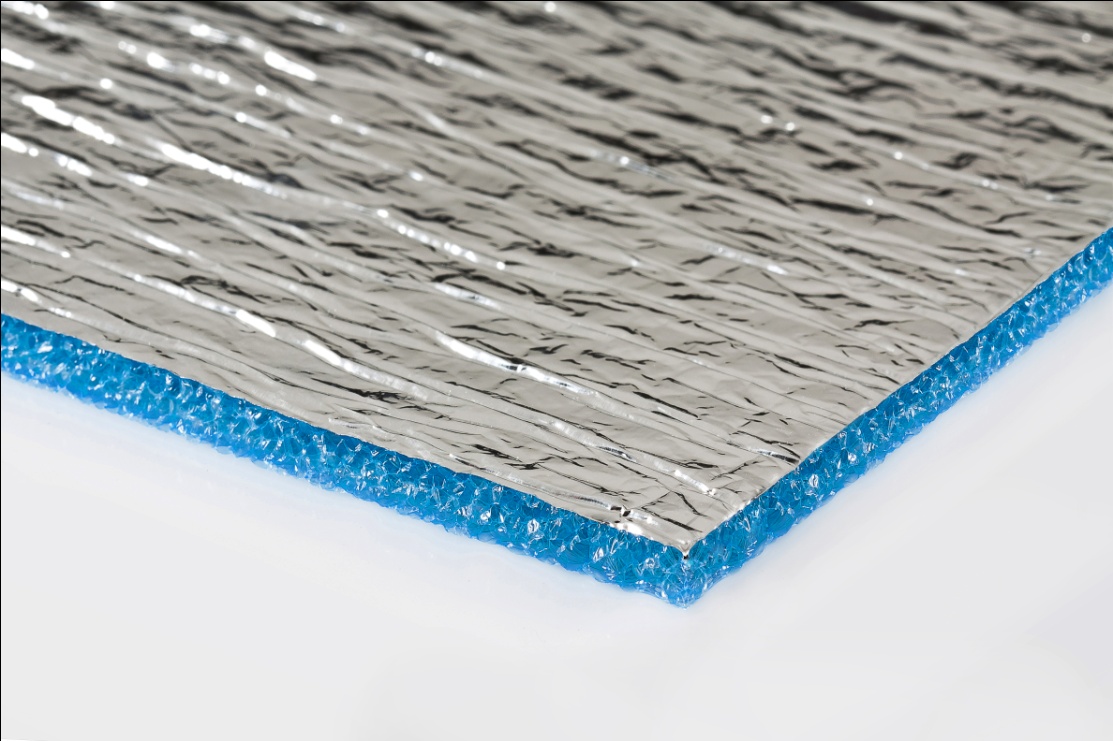
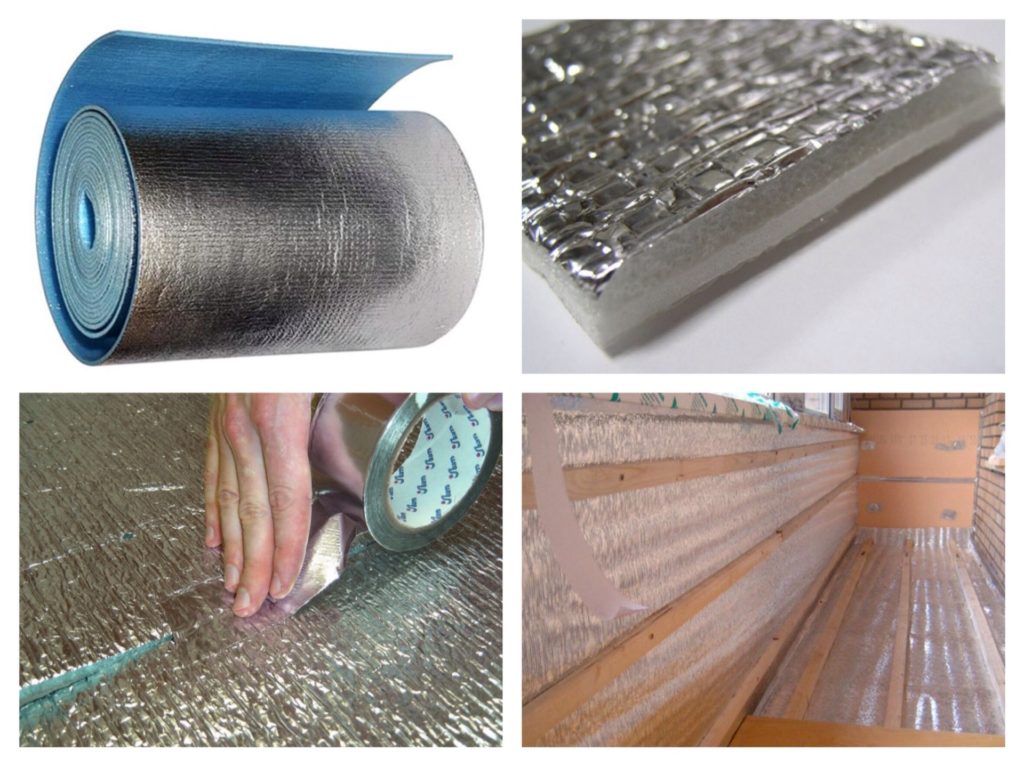
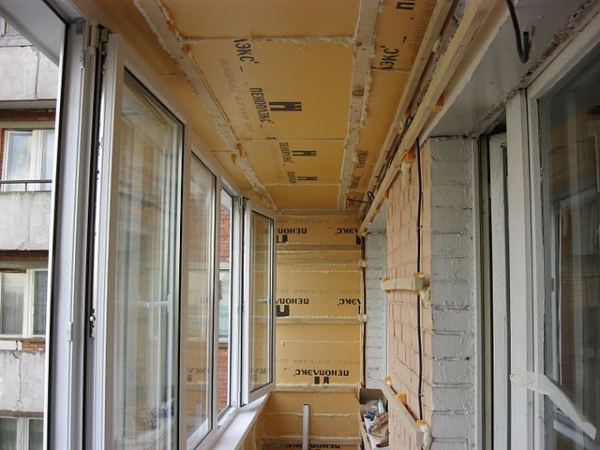
Izolon
Izolon - foil material, which allows to significantly reduce heat loss (due to the effect of heat reflection back into the house).Available as a roll, sheet or sleeve, depending on the application.
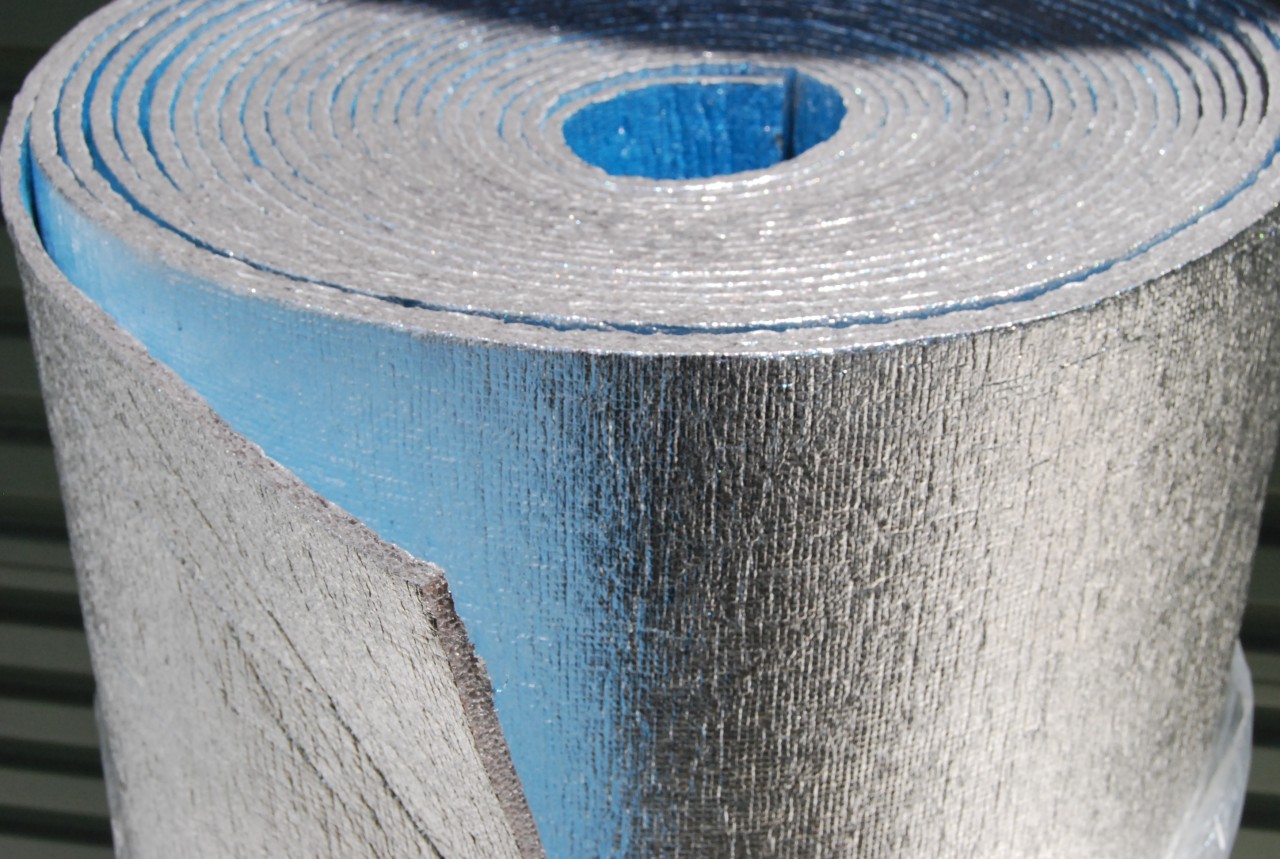
Advantages:
- a light weight;
- elasticity (the material can be easily crushed with your hands, and it will quickly return to its original shape);
- ease of installation;
- high coefficients of heat and sound insulation;
- environmental friendliness;
- vapor permeability;
- resistance to chemicals.
Its disadvantages include a rather low mechanical strength.
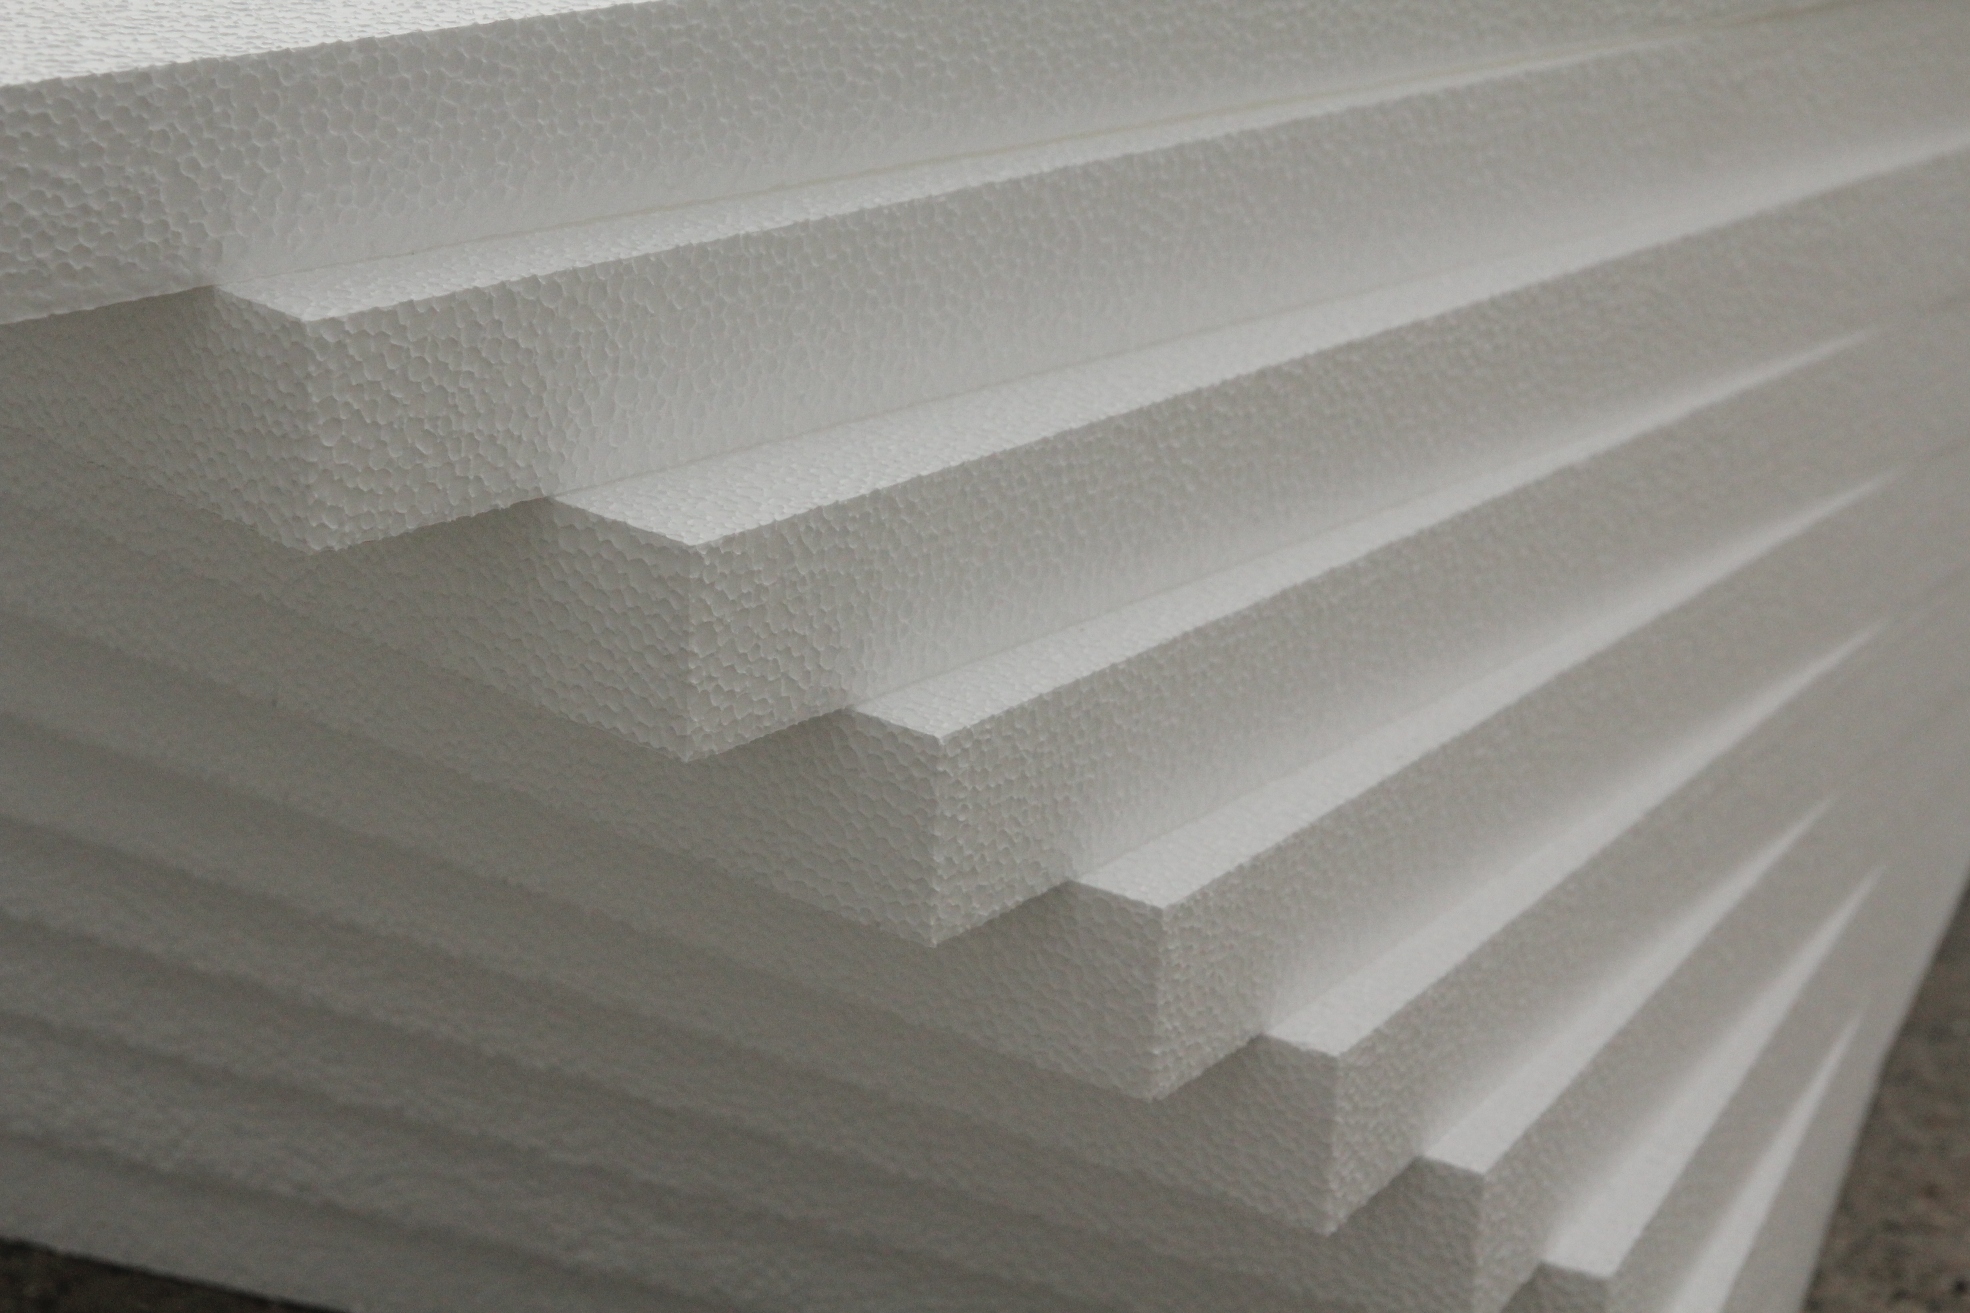
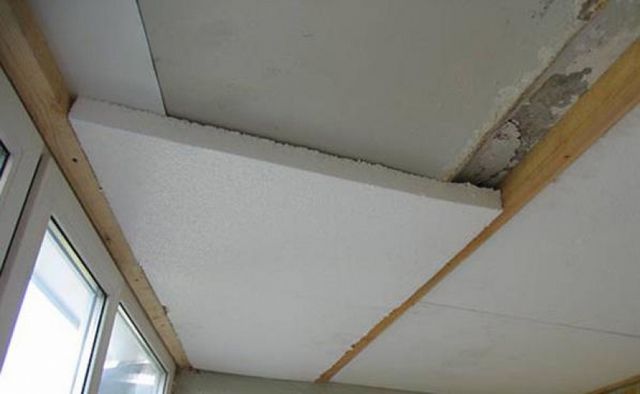
Styrofoam
Polyfoam - plate material, which is a frozen foam mass.
Its advantages include:
- high coefficient of sound and heat insulation;
- resistance to temperature extremes;
- small weight;
- low cost (in comparison with analogues);
- simplicity in installation and convenience in operation;
- durability.
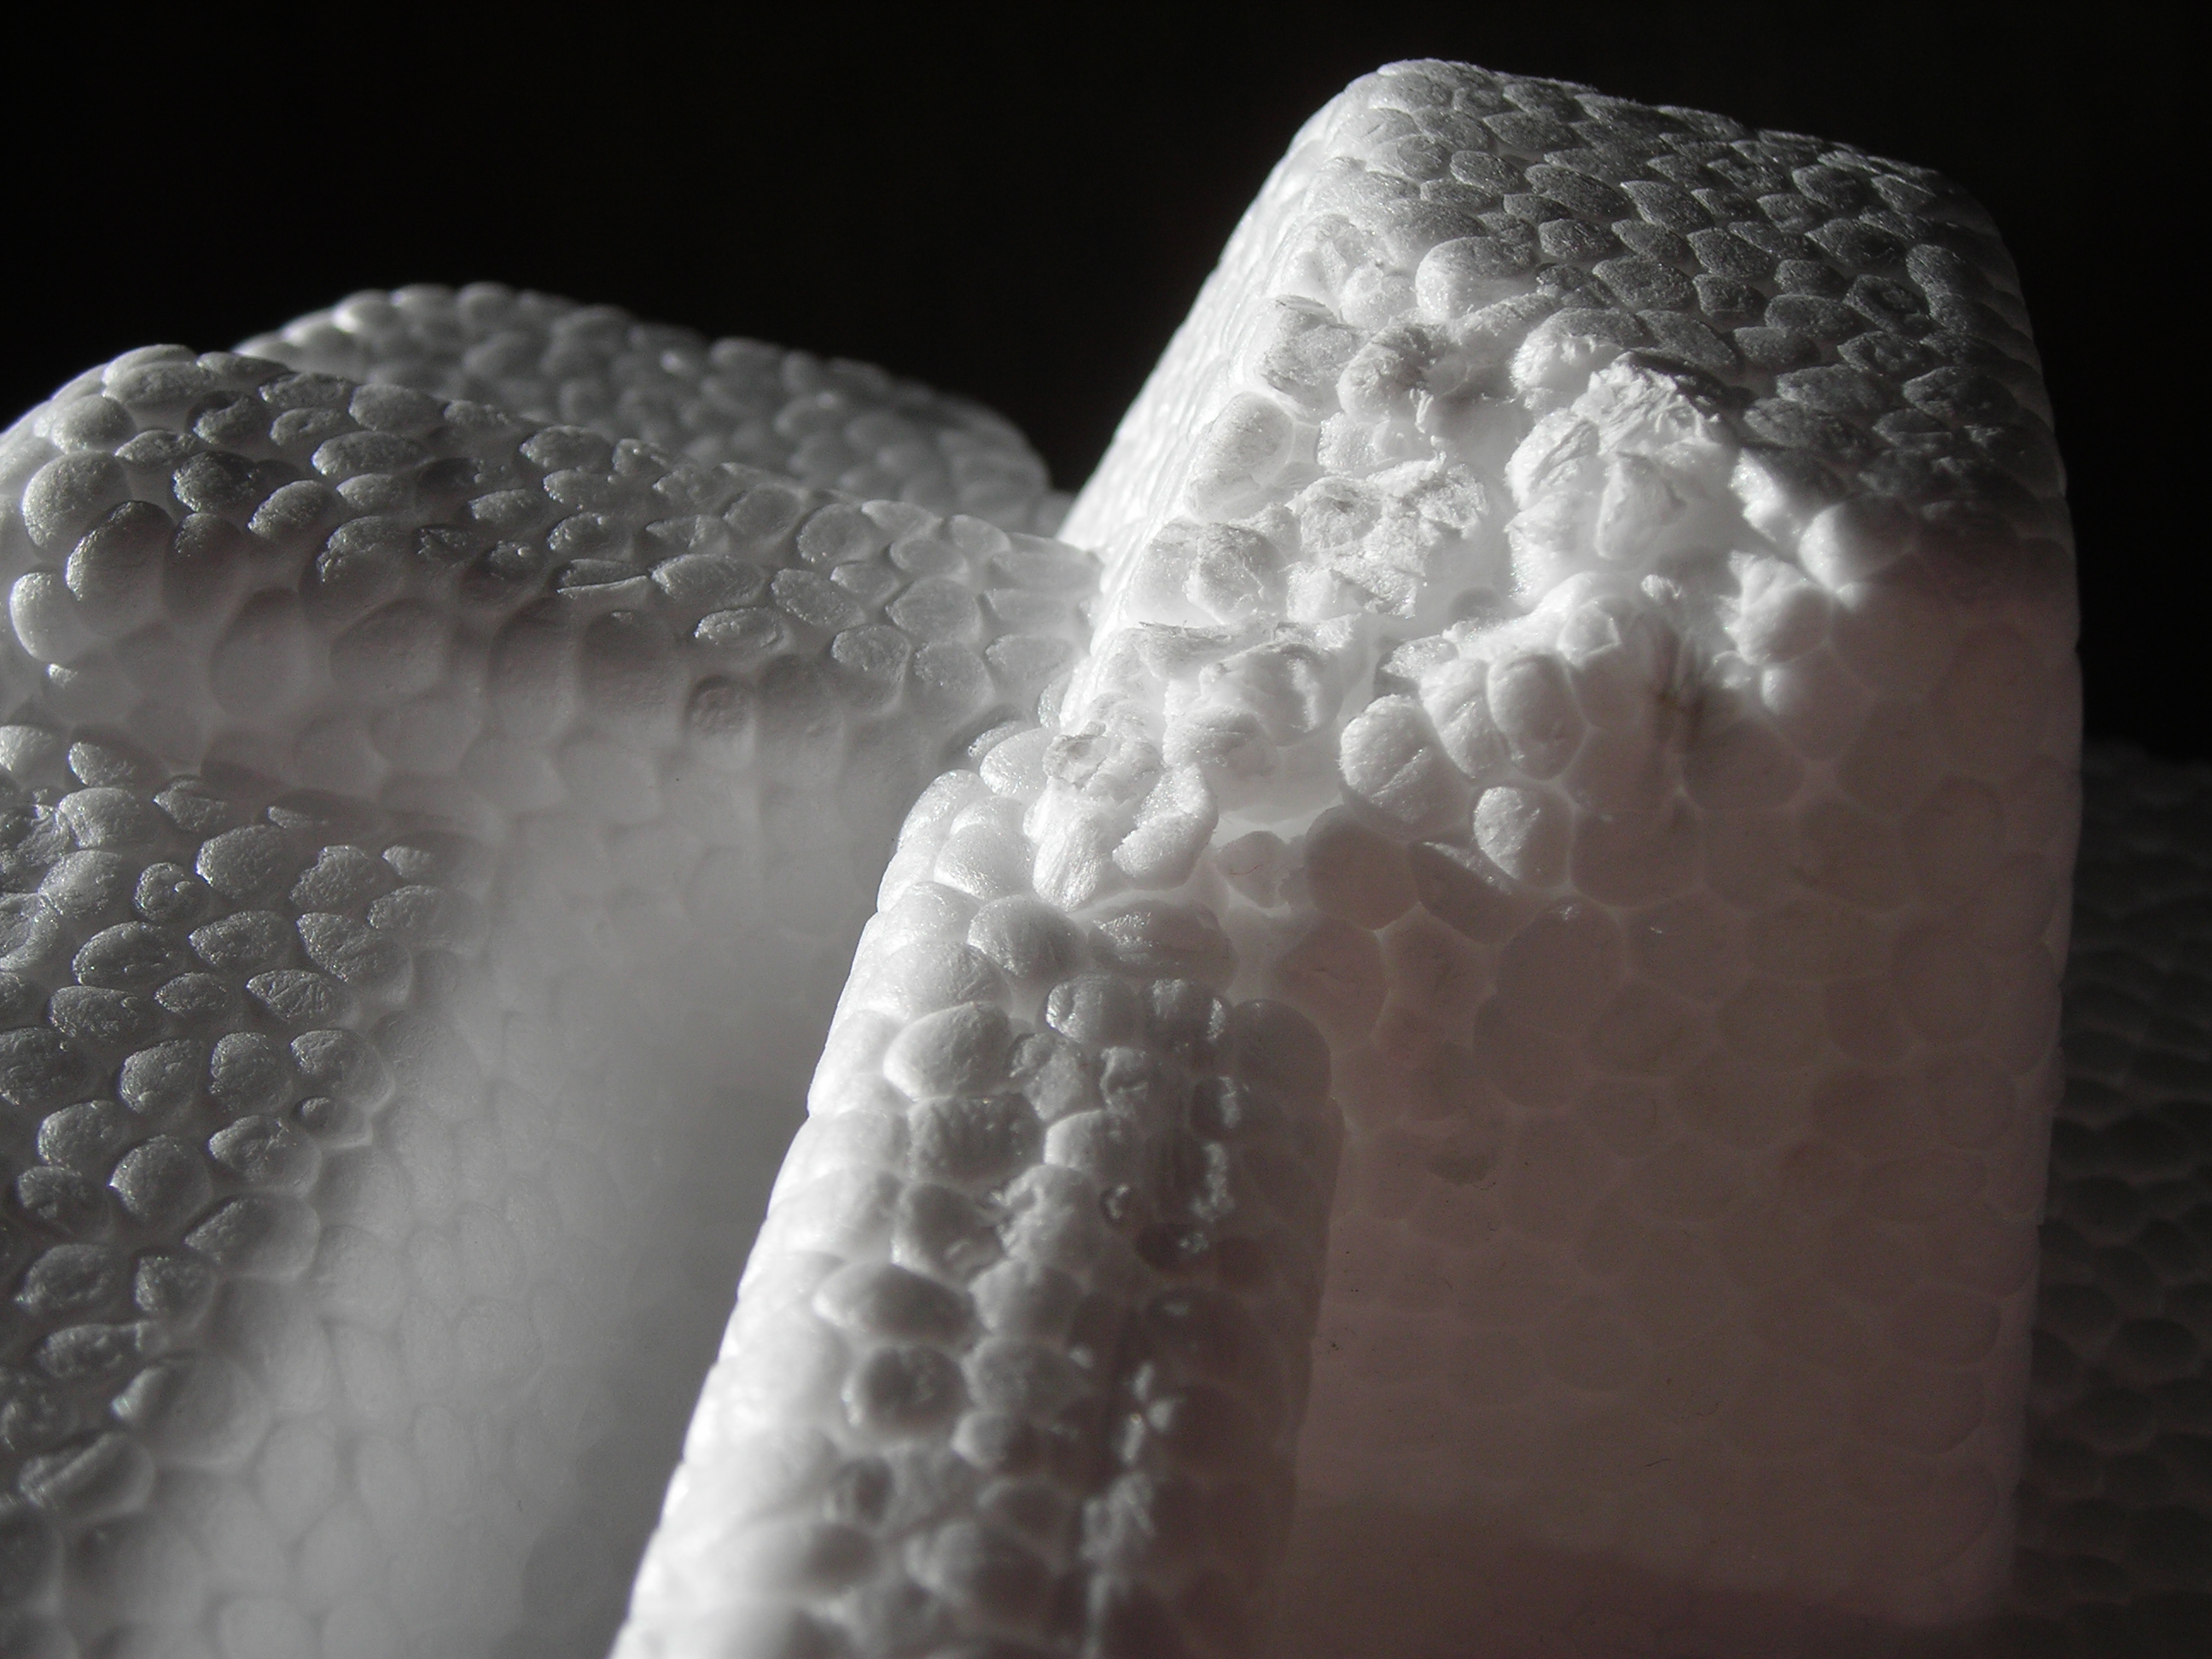
Among its shortcomings can be identified airtightness (material "does not breathe"), low strength, instability to the effects of chemically active substances, flammability.
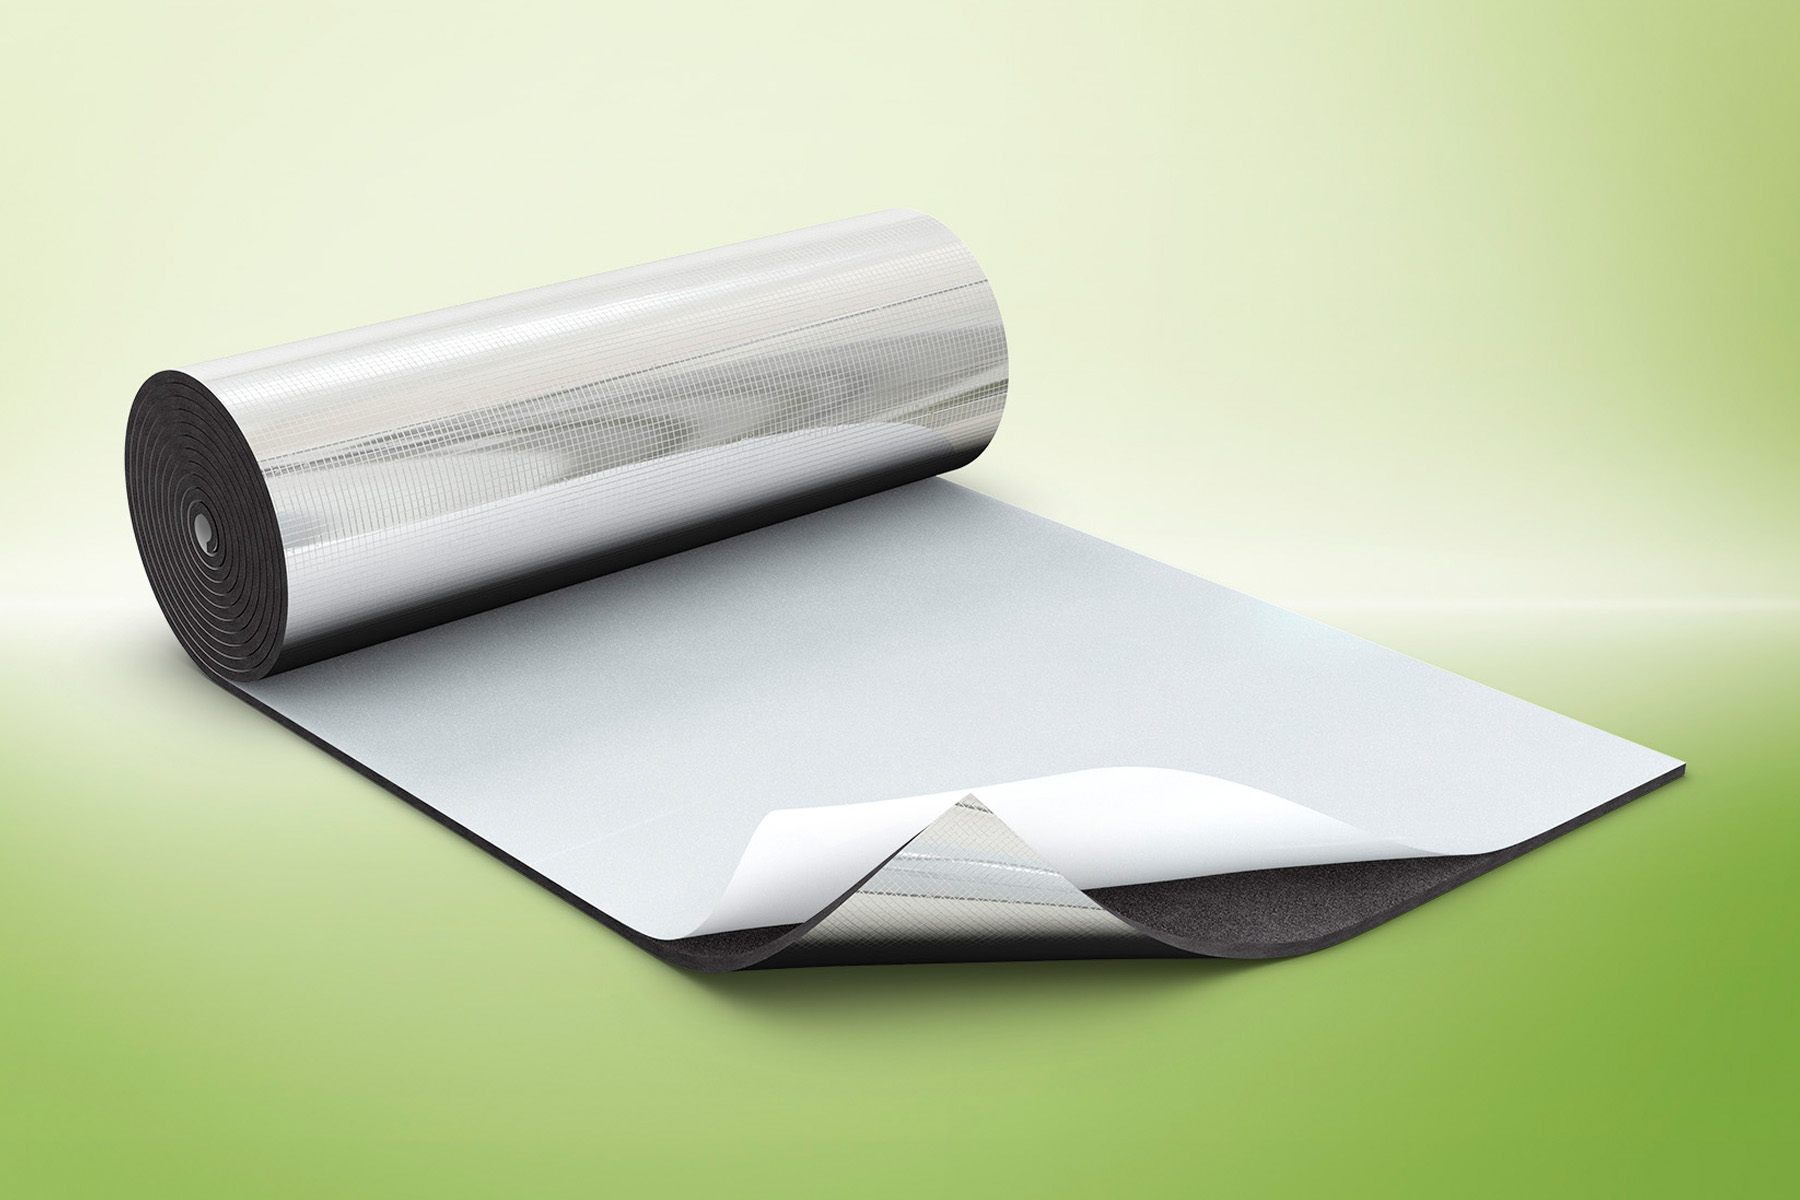
Penofol
Penofol is a material that has a high coefficient of thermal insulation, and a two-layer structure allows it to be used inside and outside the premises.
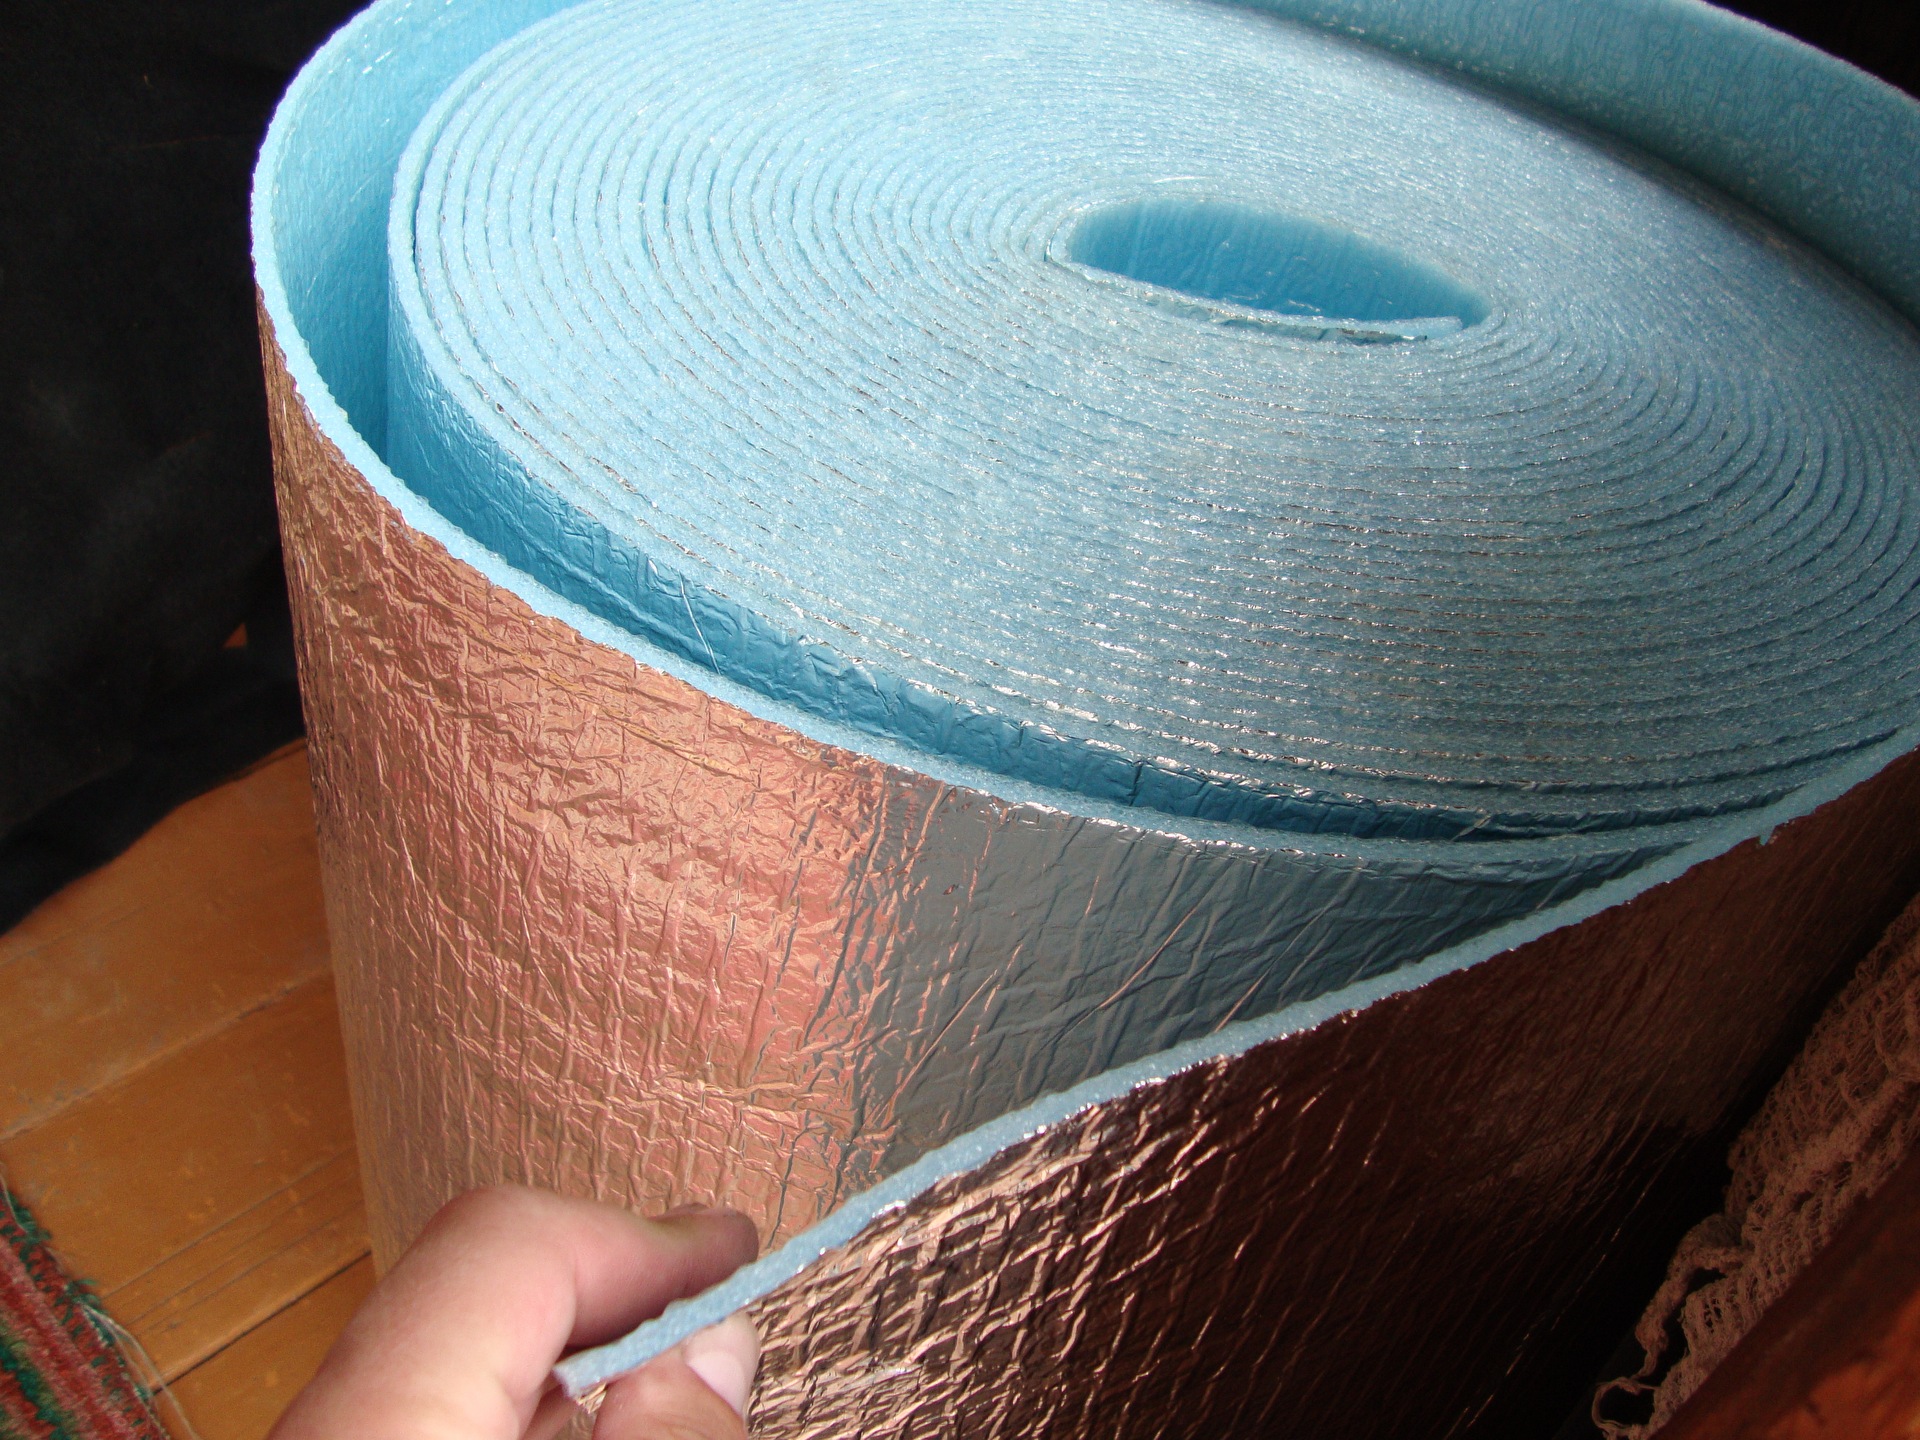
Pros:
- refractoriness;
- environmental friendliness;
- excellent sound insulation;
- low thermal conductivity;
- small thickness.
Cons: low mechanical strength and complexity of installation.
Mineral wool
Mineral wool is a fibrous material, which is divided by its composition into stone, glass and slag wool.

Advantages:
- refractoriness;
- resistance to temperature extremes;
- high mechanical strength;
- chemical resistance;
- good water repellency (not all materials have this property).
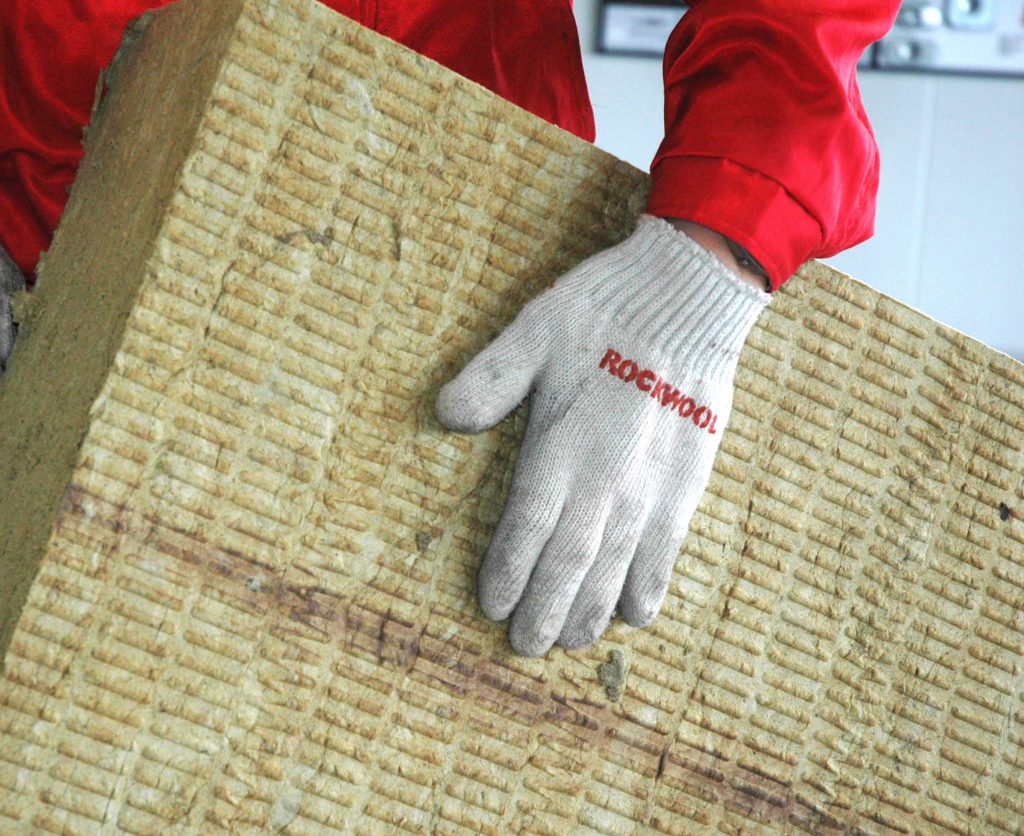
Among the shortcomings can be noted the presence in the composition of formaldehyde resins that emit poisonous phenol. In addition, the material contains particles that are harmful to human respiratory organs, so the installation of the material is made only in special means of protection.
Minvat is used for both internal and external works. It is presented in a wide range of thicknesses.
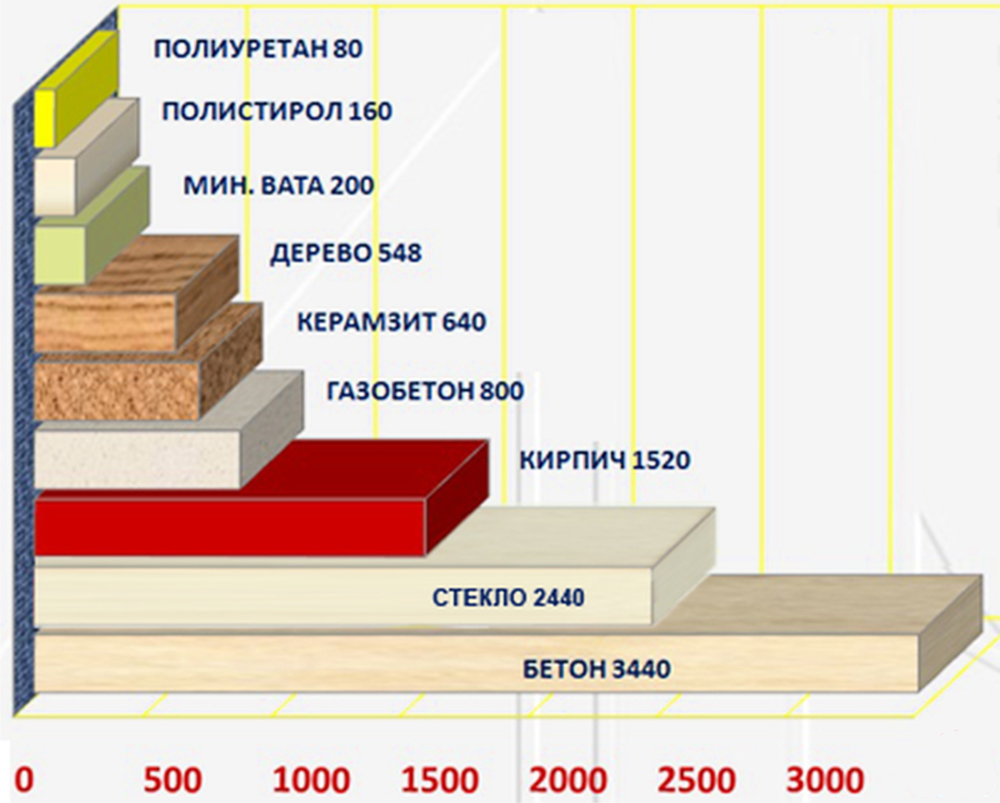
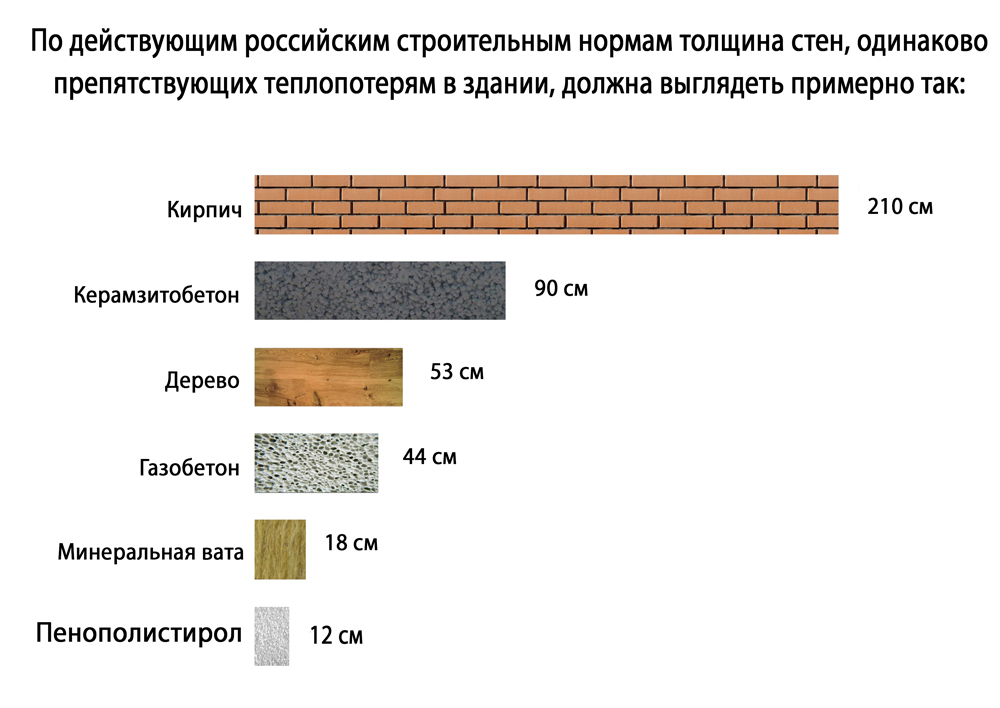
When choosing a heater, it is necessary to pay attention not only to the thermal insulation characteristics, but also to its thickness. This moment is very important for small premises, where every extra square centimeter of area is practically worth its weight in gold.
The following materials and tools may be needed for work related to insulation: drywall, metal profile, fasteners, polyurethane foam, level, pliers, stationery knife, screwdriver, wooden slats, self-leveling floor mixtures, waterproofing compounds, painting and plaster inventory.
How to warm?
This question arises in all those who first encounter the arrangement of the loggia. In order to quickly, efficiently and correctly perform insulation, it is necessary to strictly follow the step by step instructions.
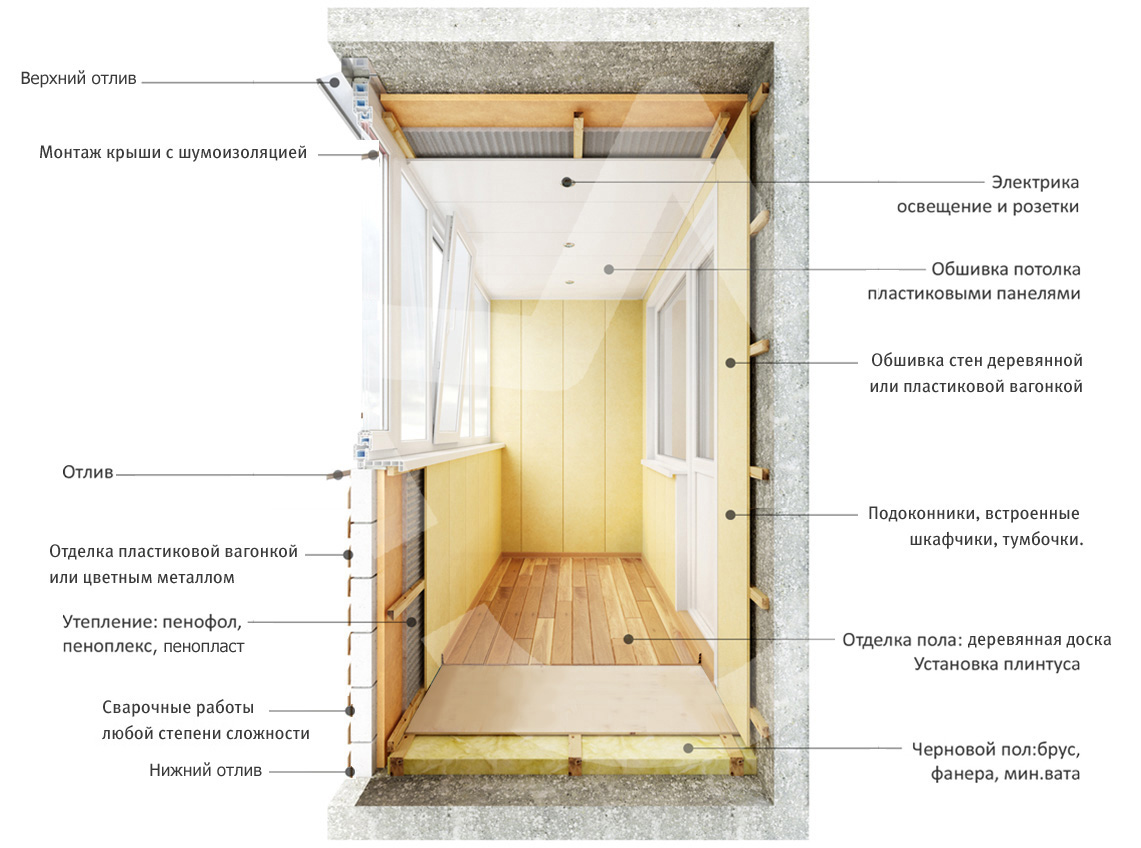
The best way to start is to determine the plan for the required work:
- The preparatory stage (clearing the area from foreign objects and removing the old coating, leveling the floor, waterproofing surfaces).
- Glazing.
- Electrification.
- Warming of all surfaces (floor-ceiling-walls).
- Interior finishing work.
If the room will be provided with a stationary source of heating, then its installation should be immediately envisaged at the initial stage of work.
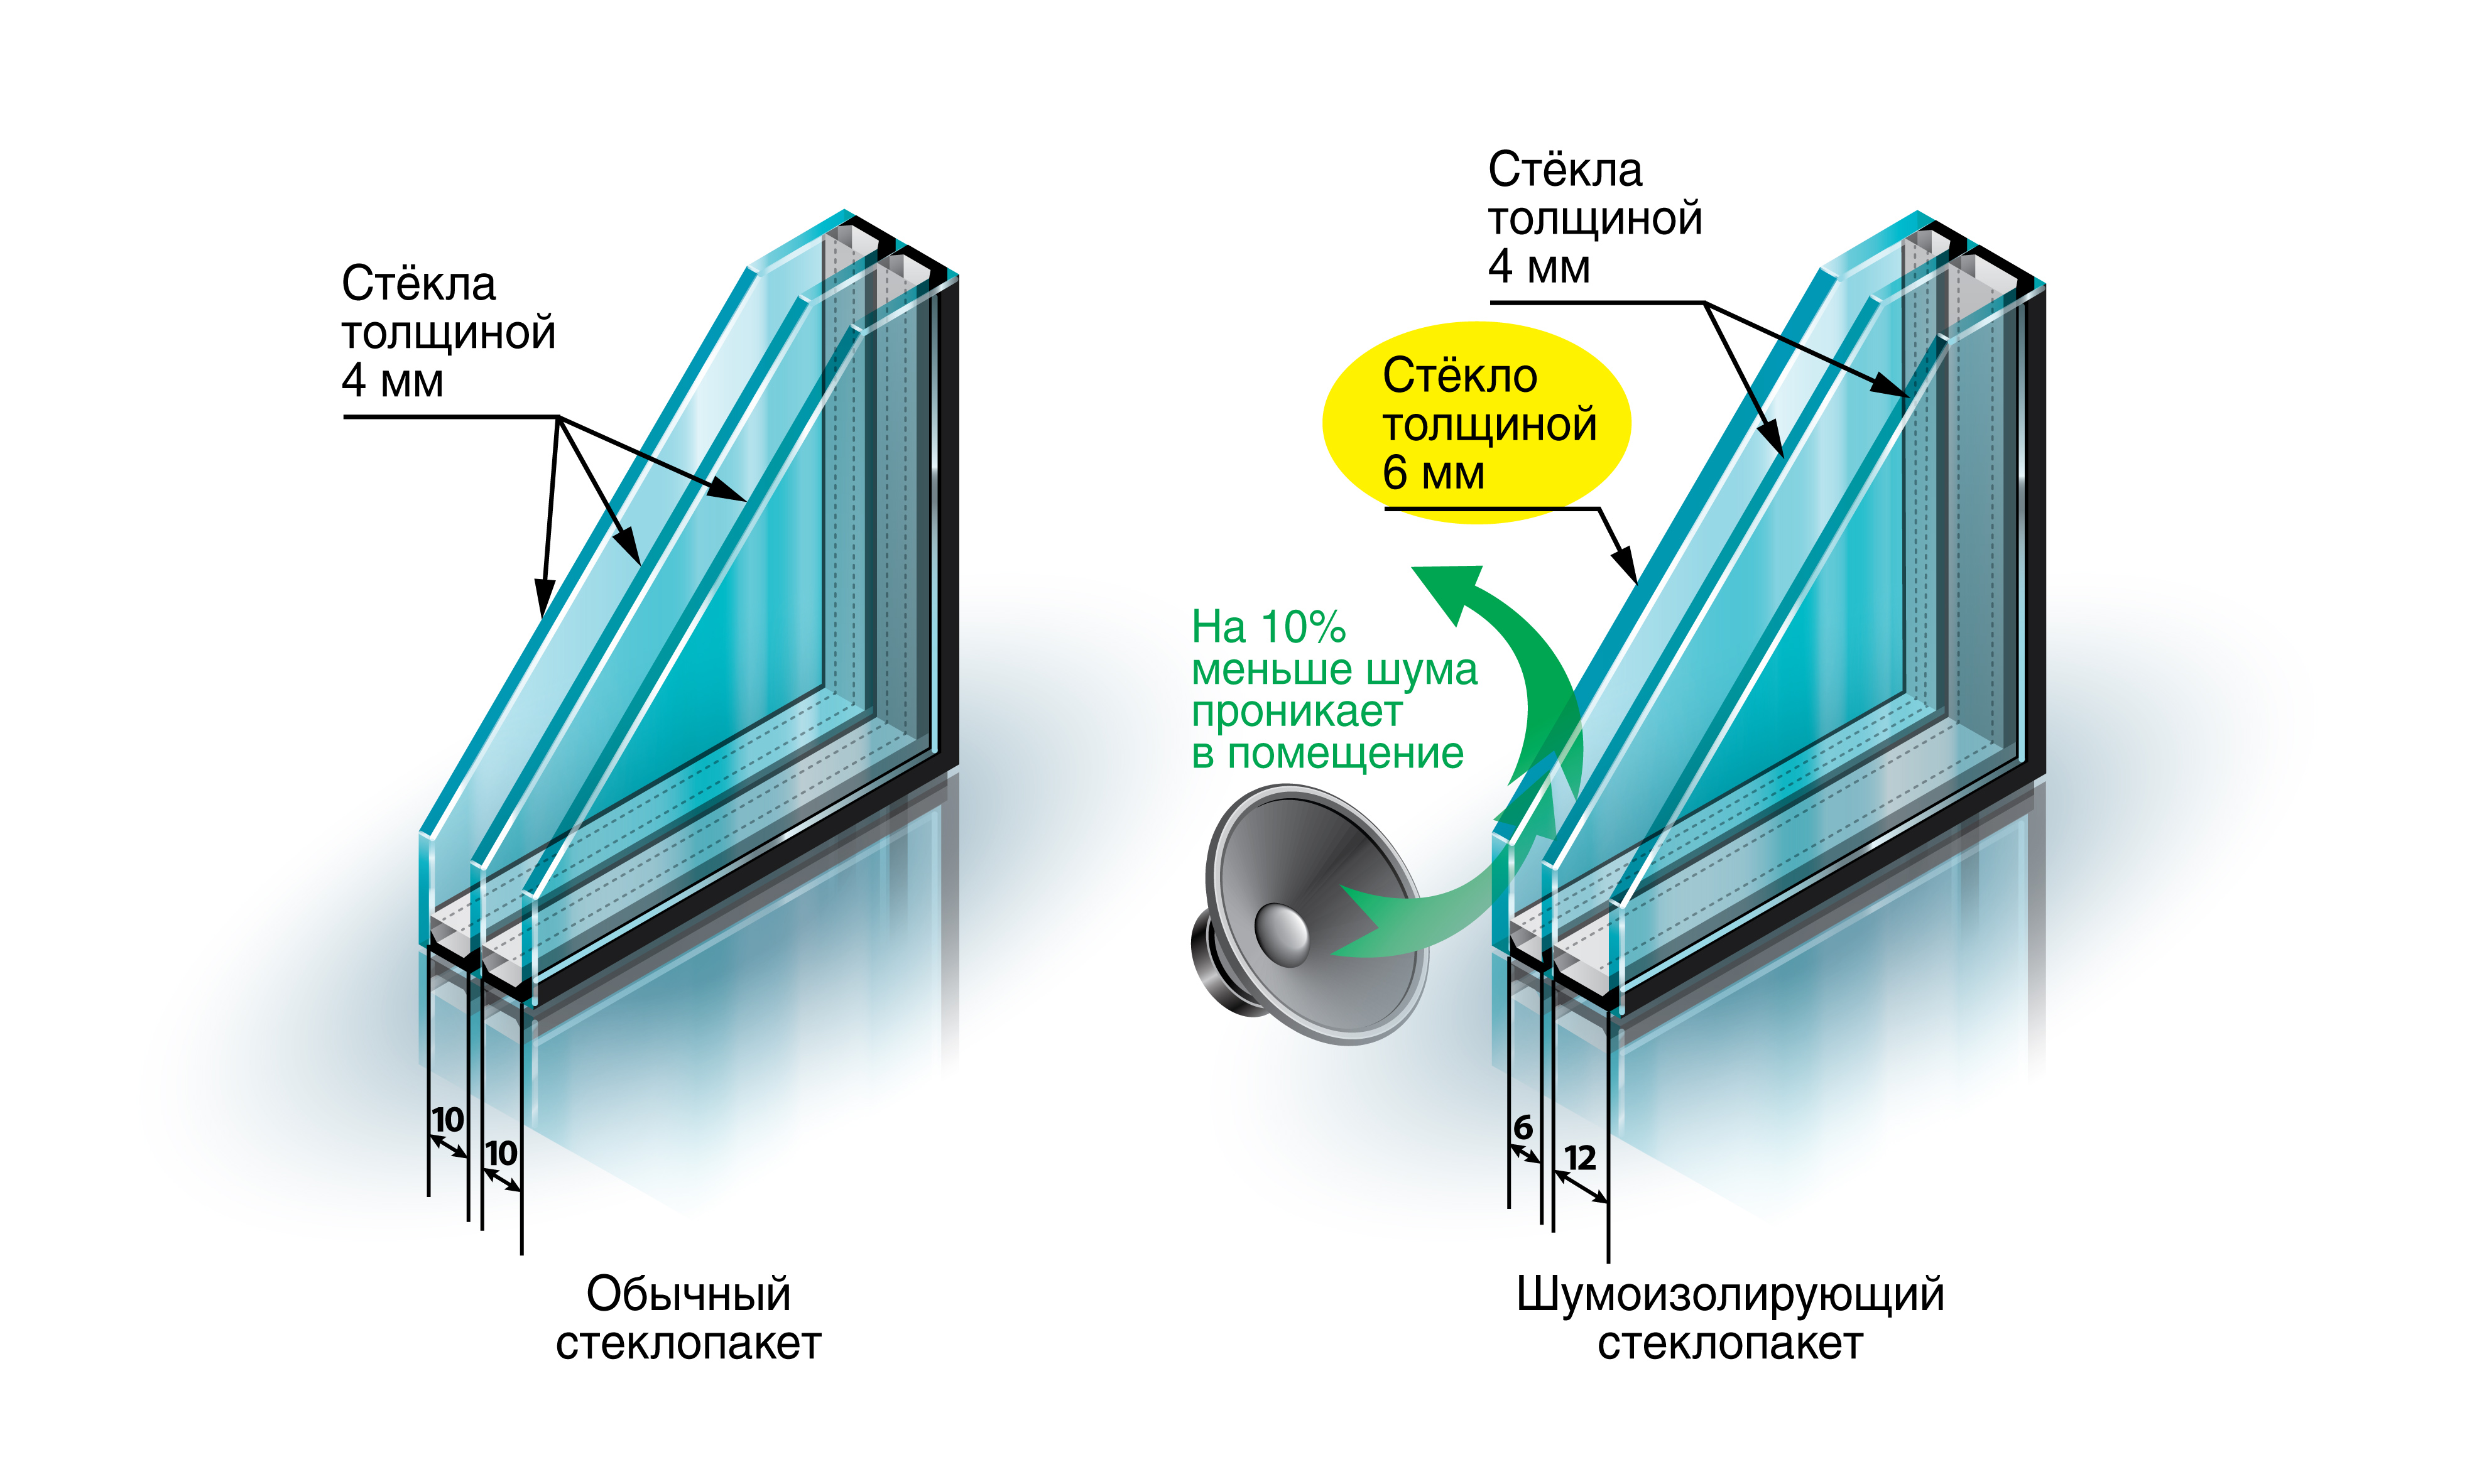
Glazing is an indispensable part of the work; without it, the insulation technology simply does not make sense.It is not worth doing glazing work yourself, it is better to entrust this to professionals.
For glazing, double-glazed windows with a glass thickness of at least 3.2 cm are recommended.

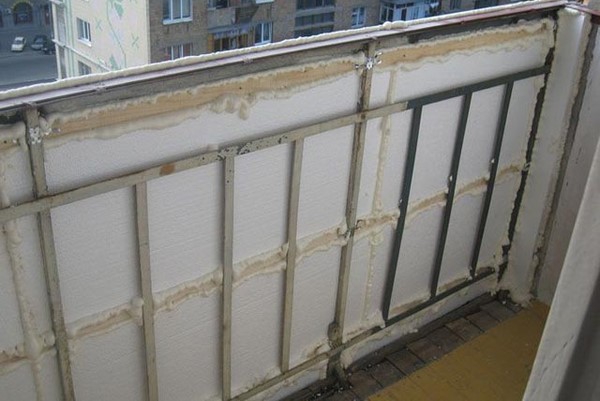
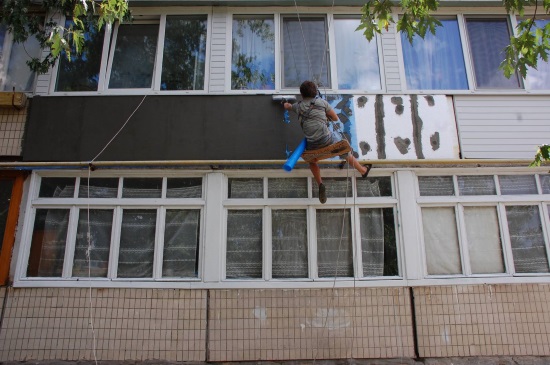
Outside
To obtain the best result, it is necessary to perform loggia warming from the outside. It is very difficult to do this yourself - due to the lack of professional equipment and the increased complexity and danger of work.
Before starting to warm a loggia, it is necessary to assess the condition of the parapet, which is its external fence. This is the most vulnerable part of the facility. It should not prevent the penetration of sunlight, but should protect the room from dust, birds, insects, cold air, wind, noise.


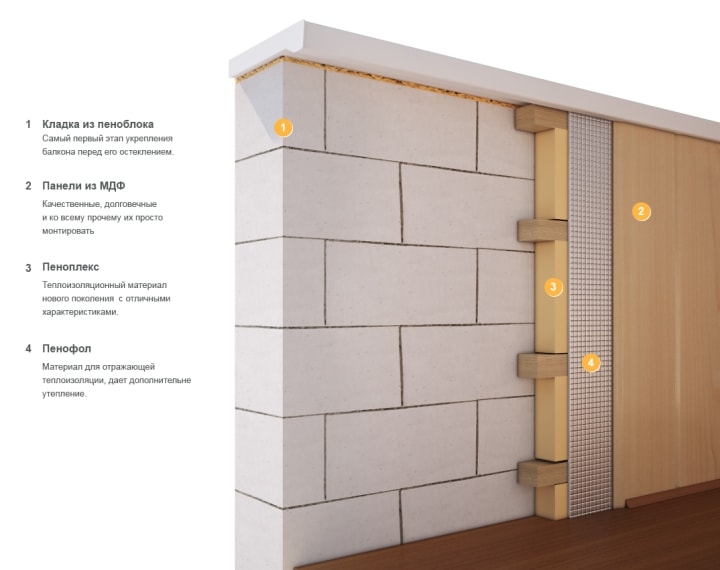
If the loggia is fenced with metal bars, then another additional foam block or brick layer is usually erected. For finishing use metal or vinyl siding, galvanized iron.
If the reinforced concrete slab serves as a parapet, then before starting the internal work it is necessary to close the wide gaps with bricks, and shallow small gaps to concrete.After the glazing is necessary to warm all windows.

An illustrative process of insulating a loggia or balcony outside is shown in the following video:
Inside
After the end of the glazing process and window insulation, you can proceed to the internal work phase. The process also begins with advance preparation.
Surface preparation
First you need to determine which surfaces need warming. Most often these are “cold” floors that do not come into contact with the heated room.
The internal space is checked for cracks or crevices in the floors that need to be filled.

Next, select the required insulation. Its thickness, type and quantity are directly related to the climatic conditions in the region. For cold places, plate types of insulation are preferred.
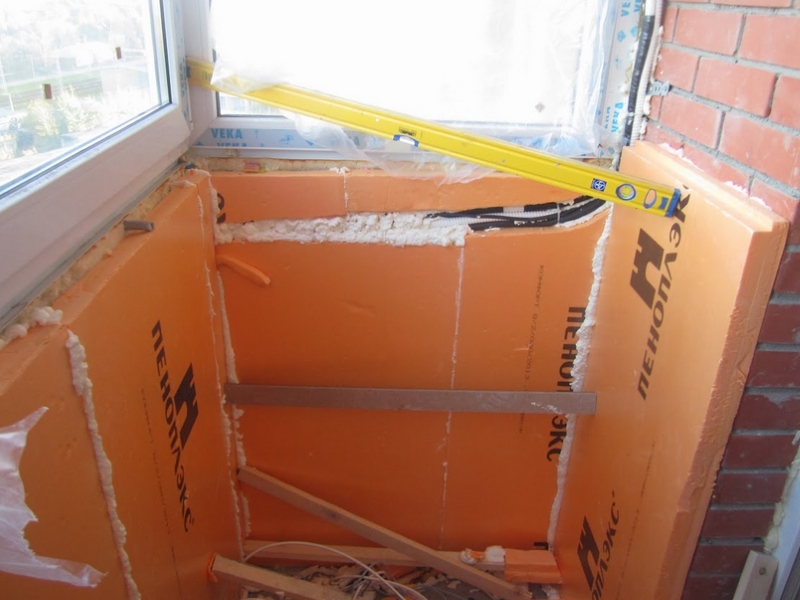
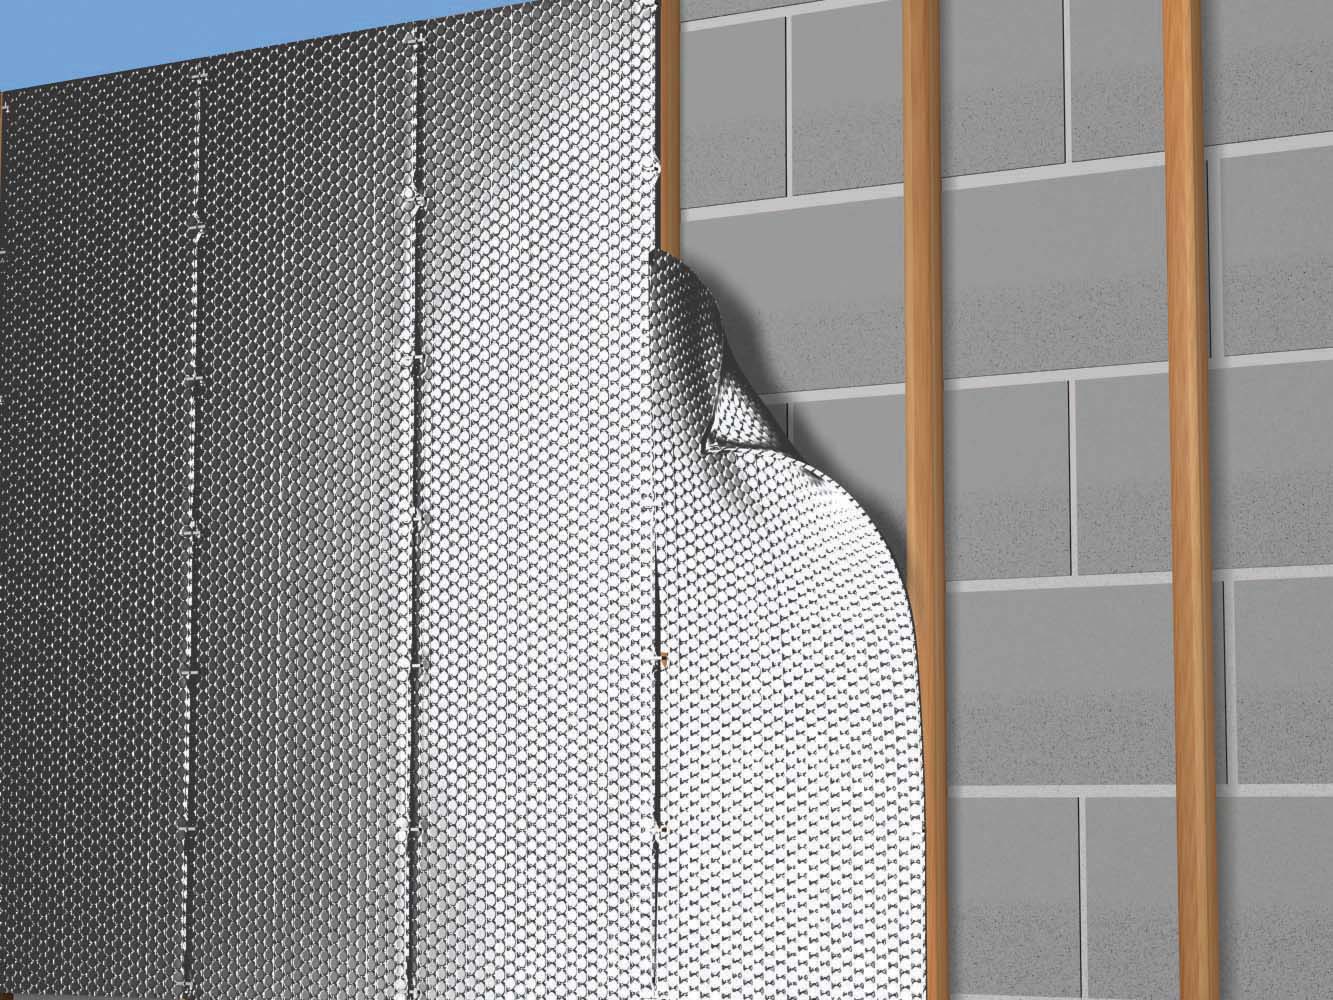
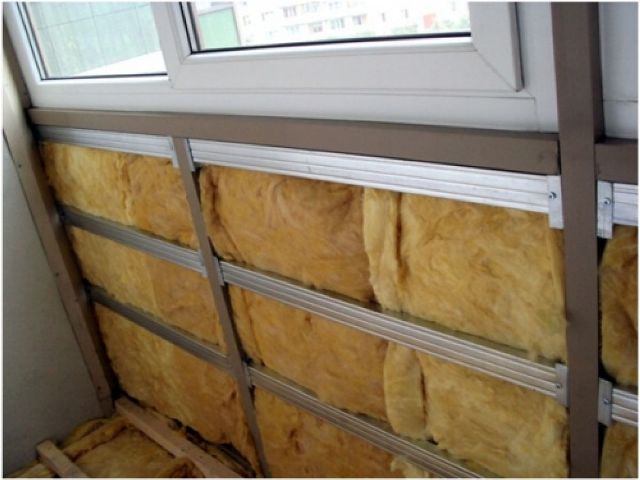
Wall insulation
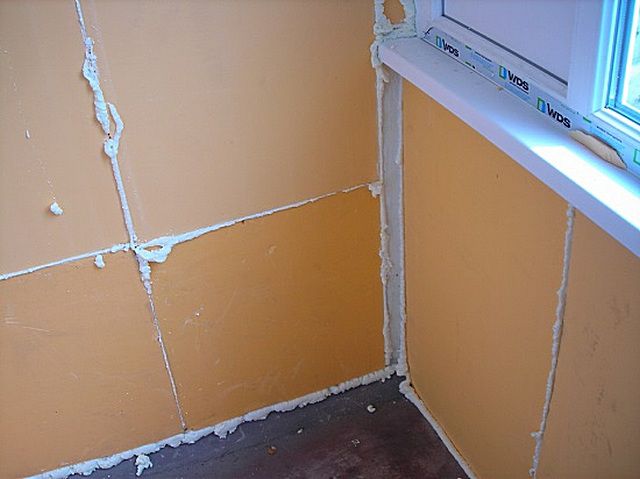
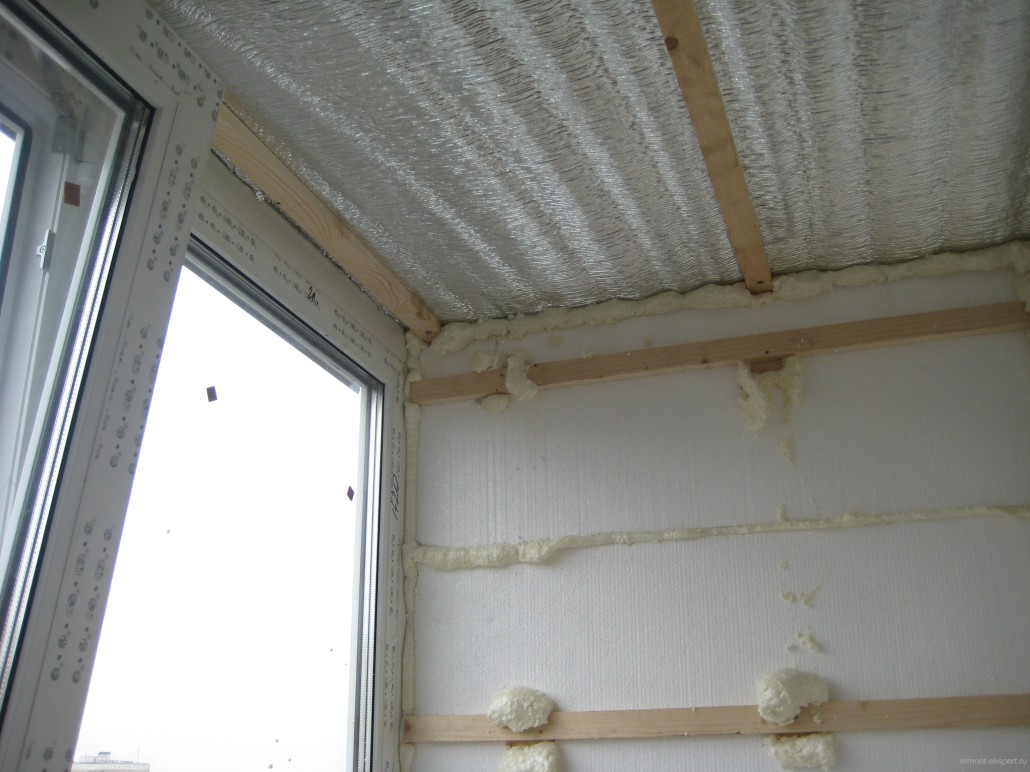
Usually, all walls and corners that border the street are selected for insulation. The selected material (for example, polystyrene foam plates) is laid out in one or several layers so that during installation no through holes are formed.
Plates are placed with a slight displacement relative to each other.
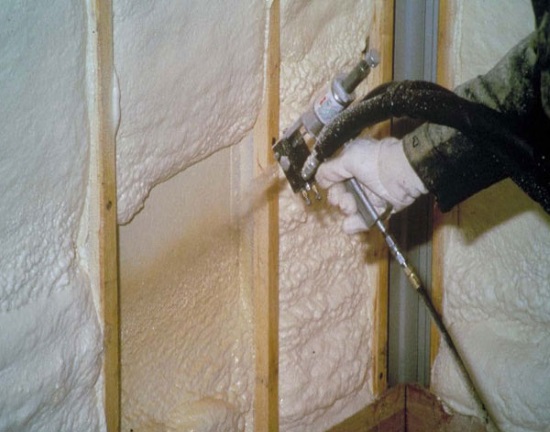
Directly to the ceiling thermal insulation is attached with dish-shaped dowels, and the next layer is glued to the first mounting foam.
Be sure to insulate the area under the double-glazed windows, as well as the inner part of the parapet.
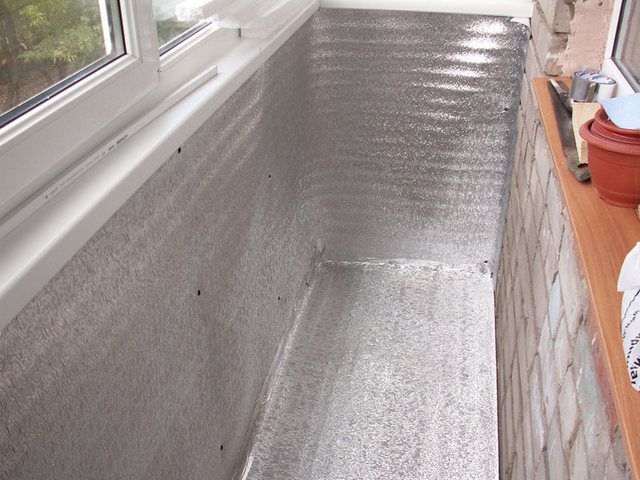
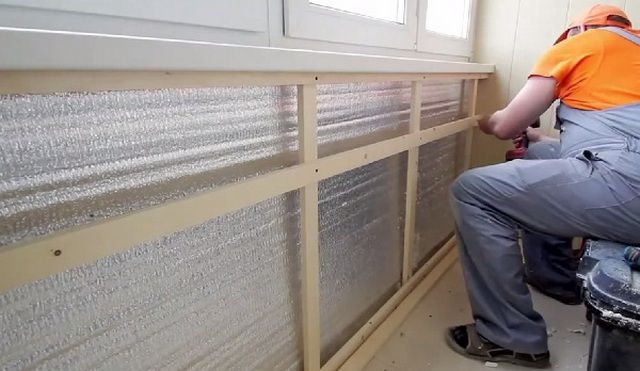
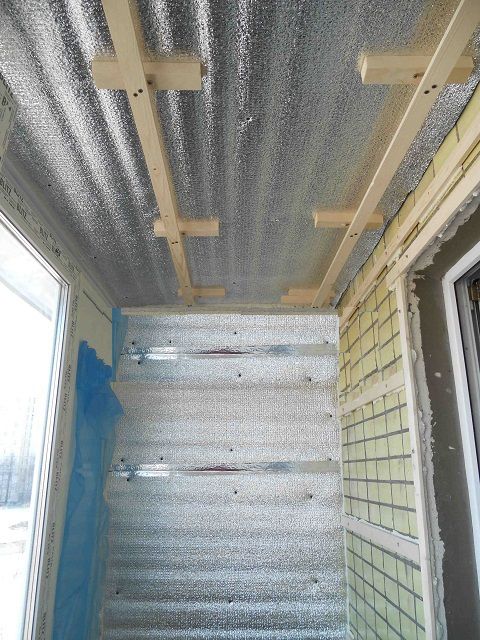
For insulation of internal corners, a material with a minimum thickness of 20-30 mm is used. From above, the insulation is closed with a vapor insulating material (foil-coated surface to the loggia). Then not pre-installed suspensions exhibited a metal profile.
This is done in such a way that an air gap remains between it and the insulation.
Detailed process of wall insulation can be viewed in the following video:
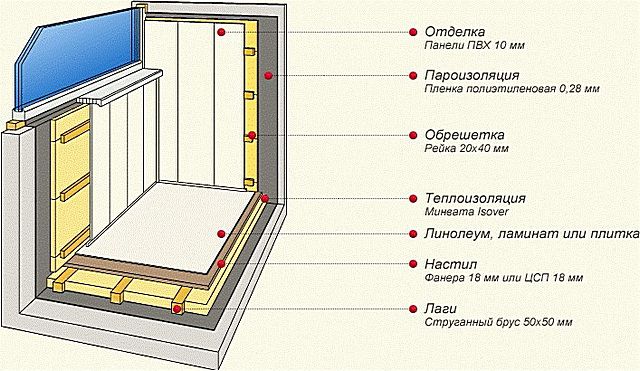
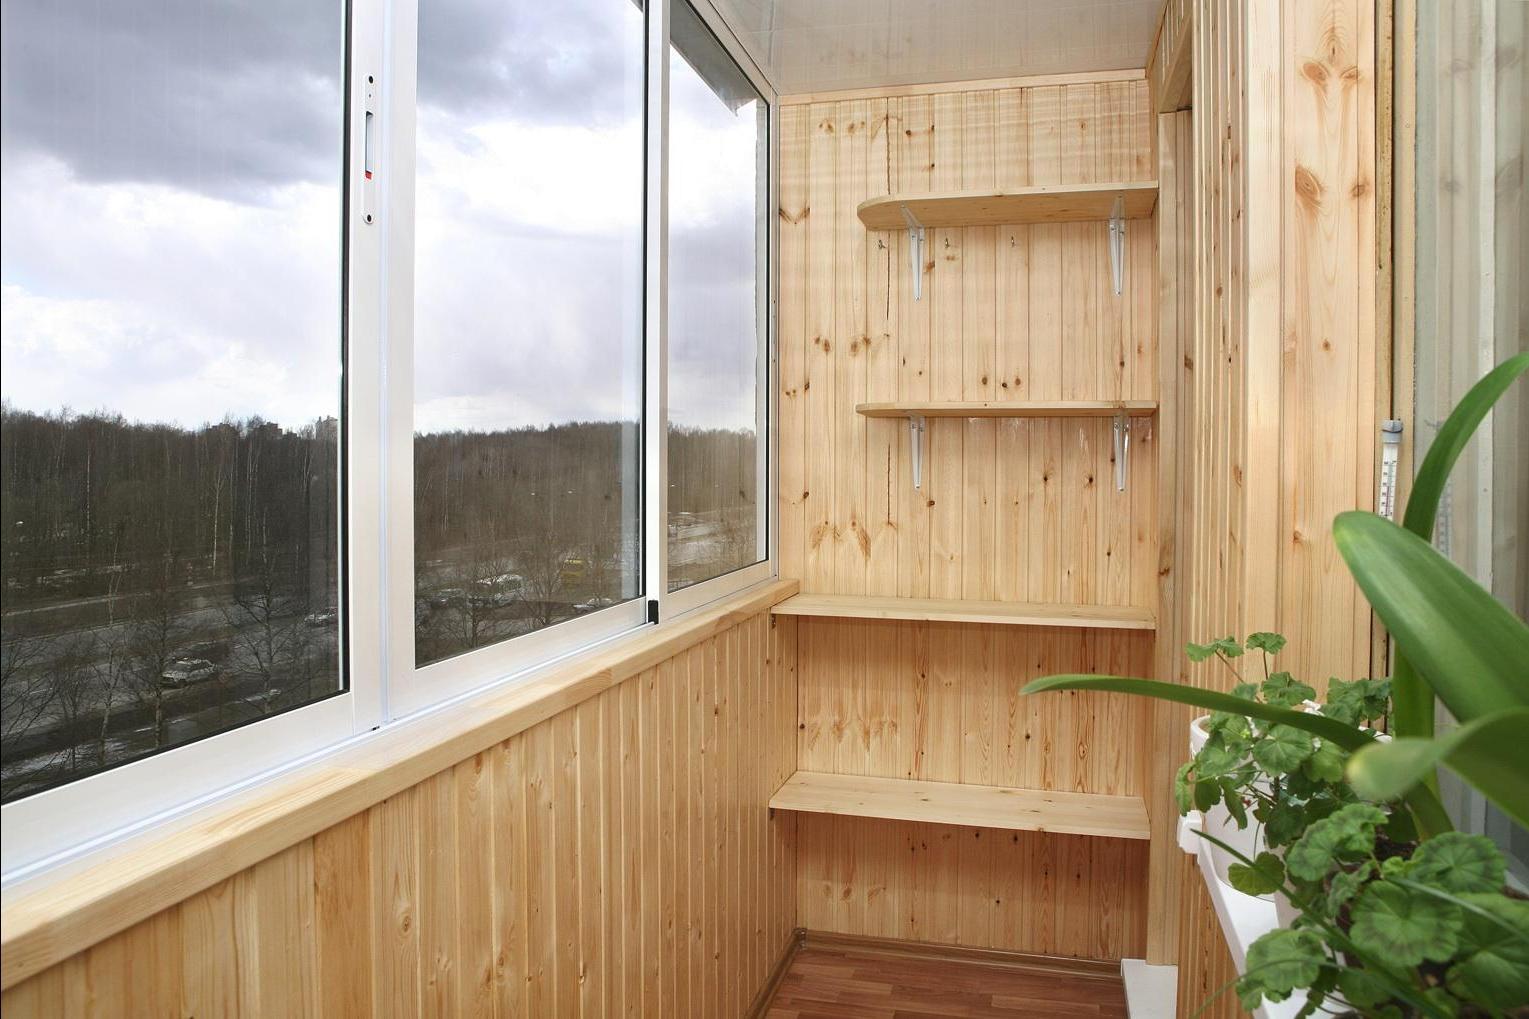
The next step is decorative trim. Plastic, wooden panels, moisture-proof plasterboard for further plastering, painting or wallpapering, as well as other materials are used as wall covering material.
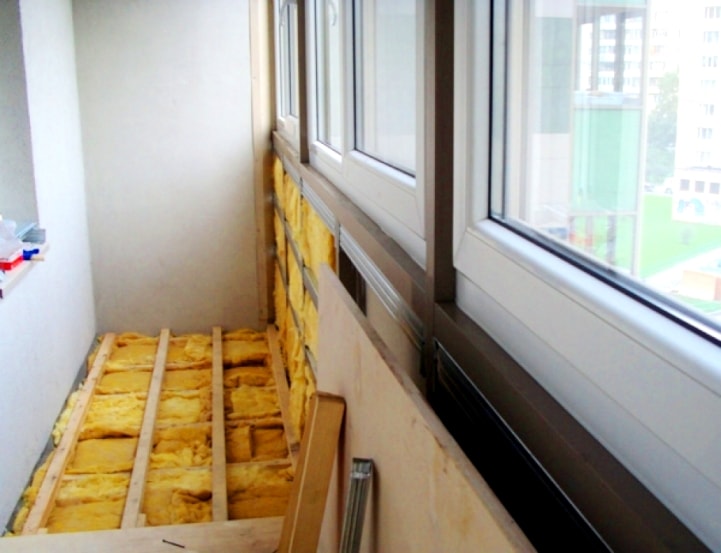
Ceiling insulation
First, the suspensions are installed, on which the crate is made of galvanized profile. Then, using dowels, heat insulation sheets are attached. Dowels can have a plastic or metal core (depending on the density and weight of the material).
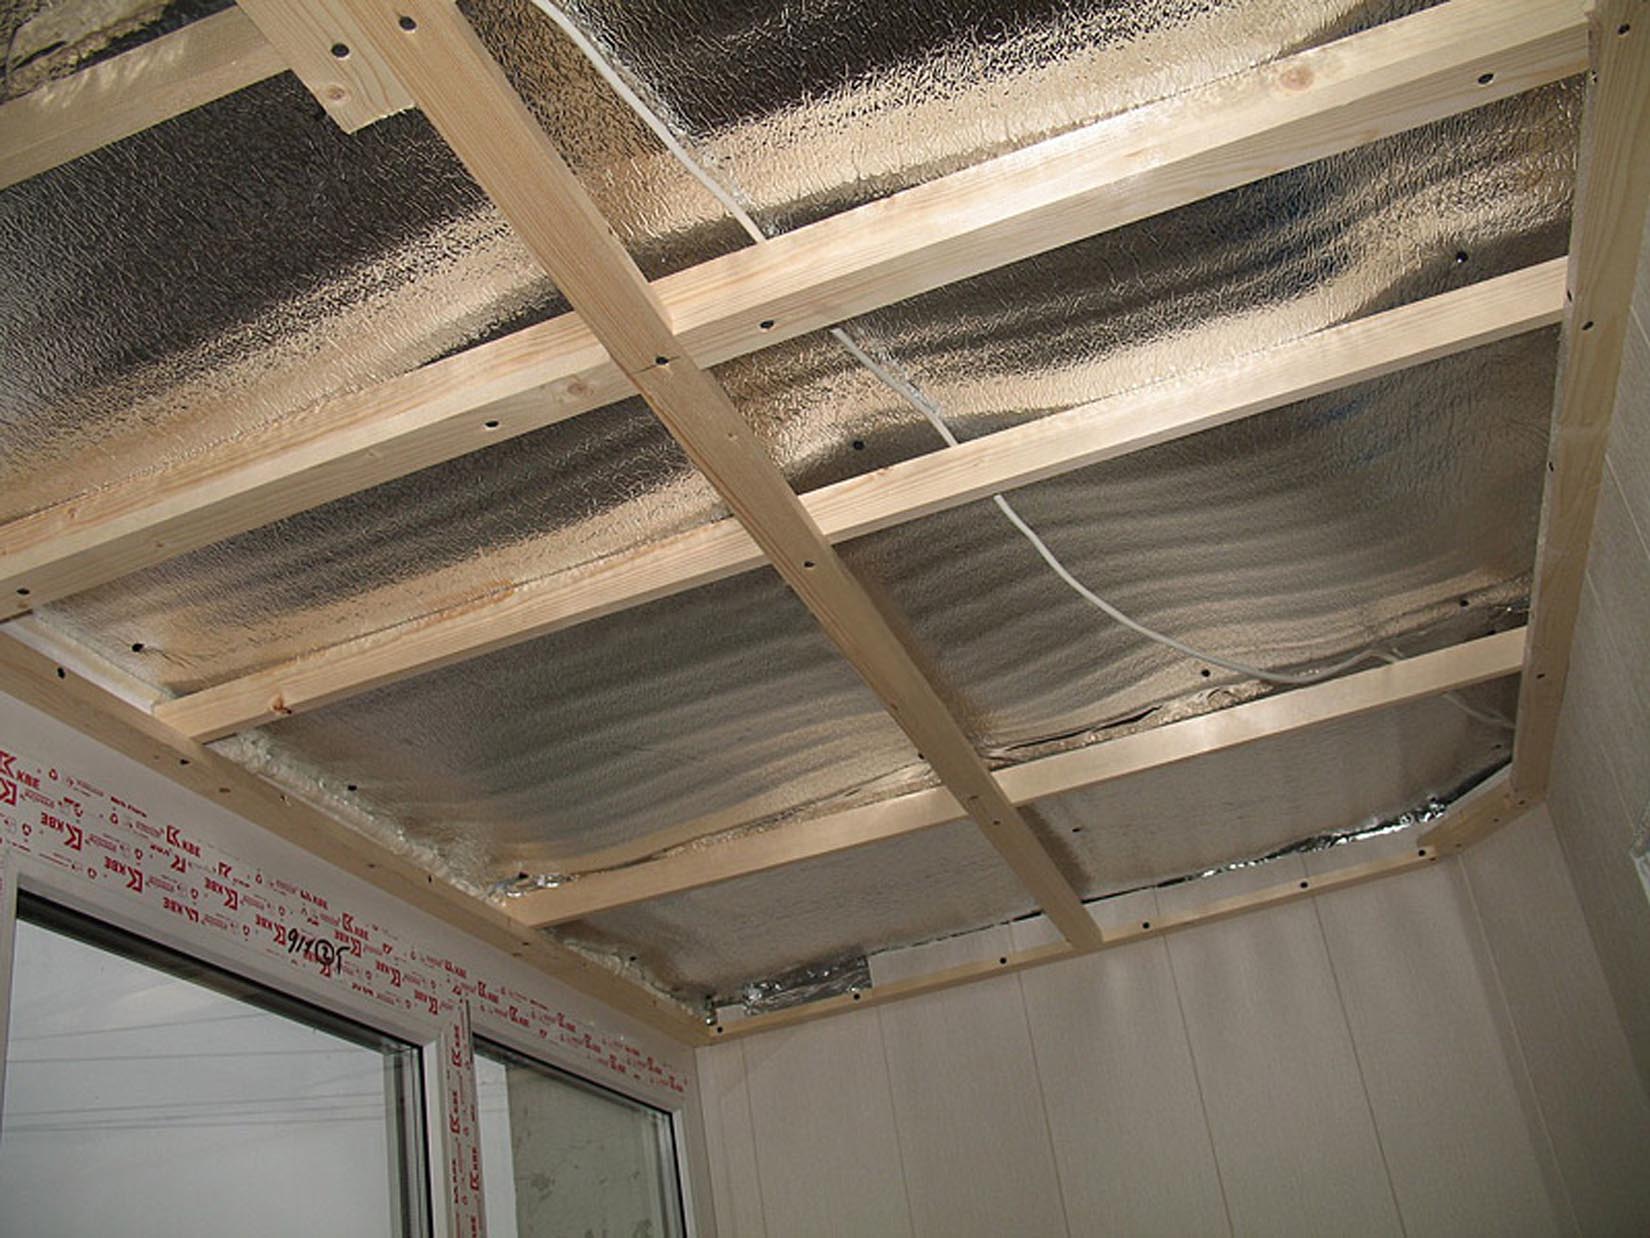
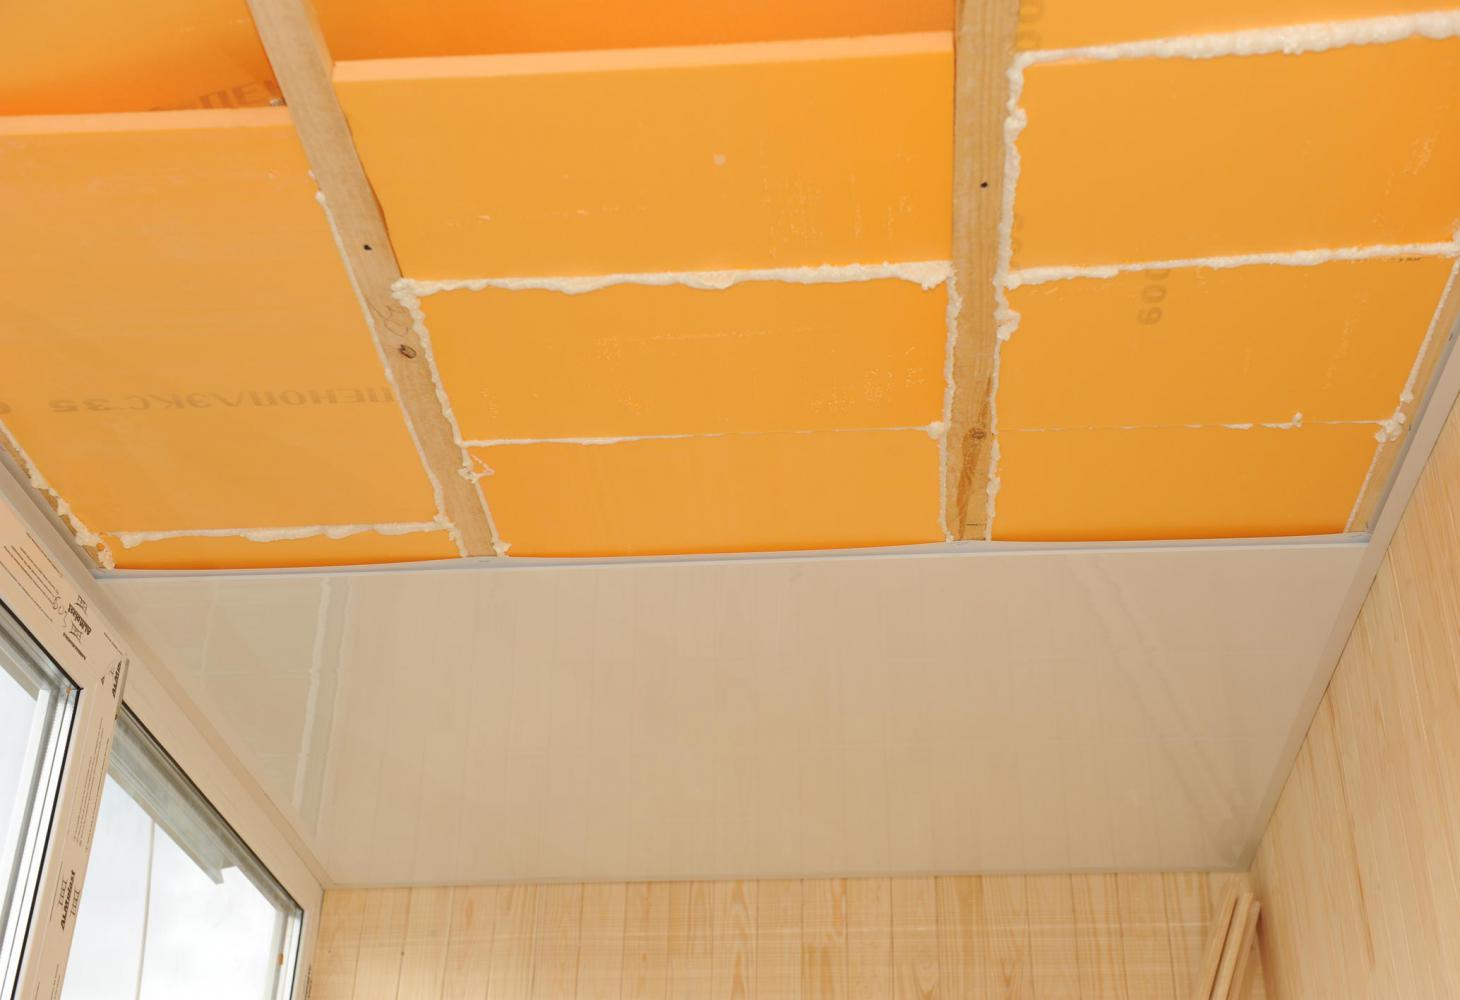
Final stage - design of the ceiling with the help of finishing materials. It can be suspended or suspended ceiling. Suitable wooden or aluminum rail, as well as plastic panels and other material.
An important point: between the layer of insulation and the finishing lining there must be a small air gap. It can be obtained using wooden crates attached to the insulation with self-tapping screws.
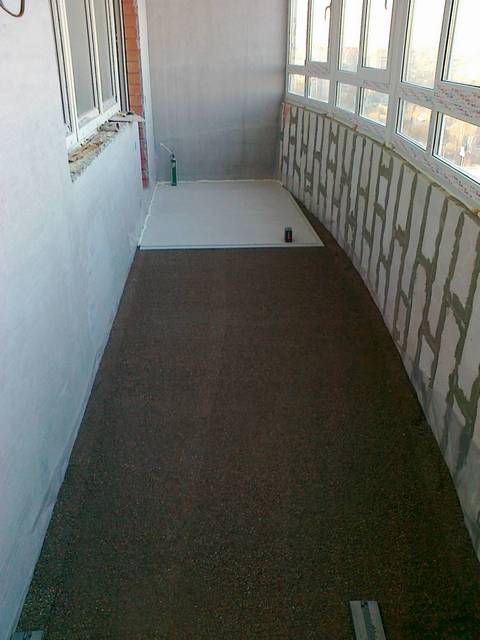
Floor insulation
Works related to flooring - perhaps the most important part of the whole process. This is the coldest surface, so it needs compulsory and very thorough insulation.
The whole process of work can be divided into several stages:
- Dismantle the old flooring (up to the concrete screed). This is done in order to maintain the highest possible height of the room. Debris is removed, the surface is carefully cleaned.
- If the original coating does not need to be fixed, the existing concrete screed will form the basis of the new floor. If irregularities are visible to the naked eye, then the concrete is poured with a layer of self-leveling mixture and left to solidify.
- The leveled floor is treated with antifungal compound. Then a layer of waterproofing material is laid - for example, penofola.
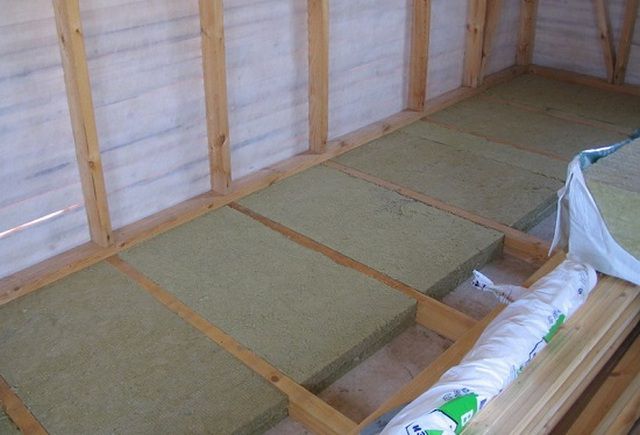
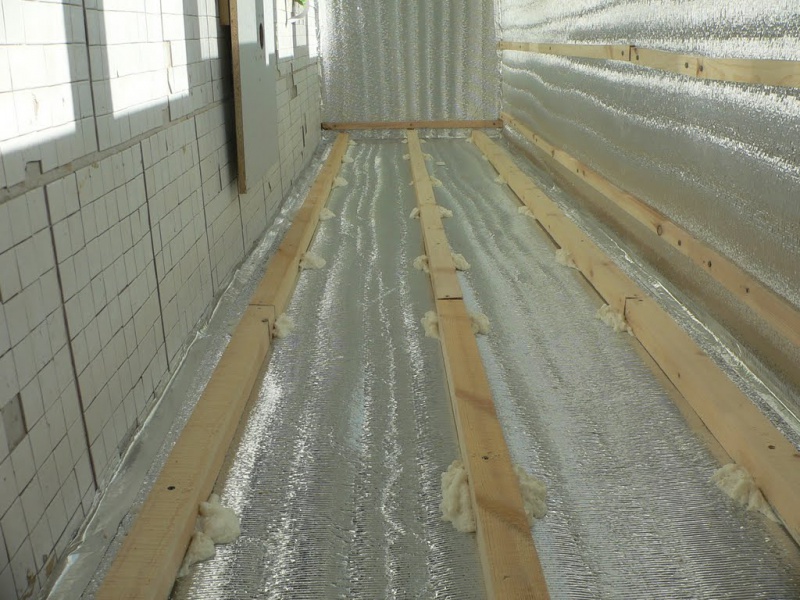
- Laying rails and transverse beams-lags, which are fastened with screws. The evenness of the separately lying elements is checked. The height of the rails should be at least 5 mm above the surface of the insulation. In the space between the lags, heat insulation plates are laid, which are covered with foil vapor insulation from above. All connecting seams of a film are fixed among themselves by a building adhesive tape.
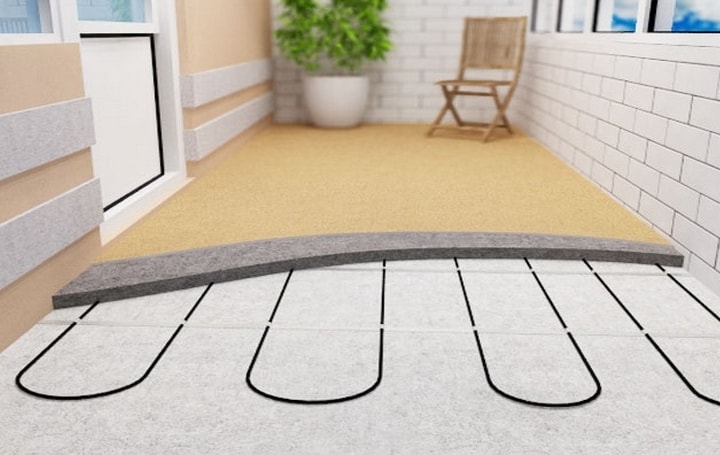
- Laying flooring - for example, euroboard, plywood or chipboard. Top floor can be covered with linoleum or carpet. If necessary, they build up a “warm” floor - especially if the loggia is planned to be used as a continuation of a residential area (for example, for children's games).
- At the final stage of work, sockets, switches are installed, the plinth is laid.
The detailed process of floor insulation using logs is described in the following video:
Possible mistakes
Before planning the construction and finishing works related to insulation, you should definitely listen to some recommendations that will allow you to avoid mistakes:
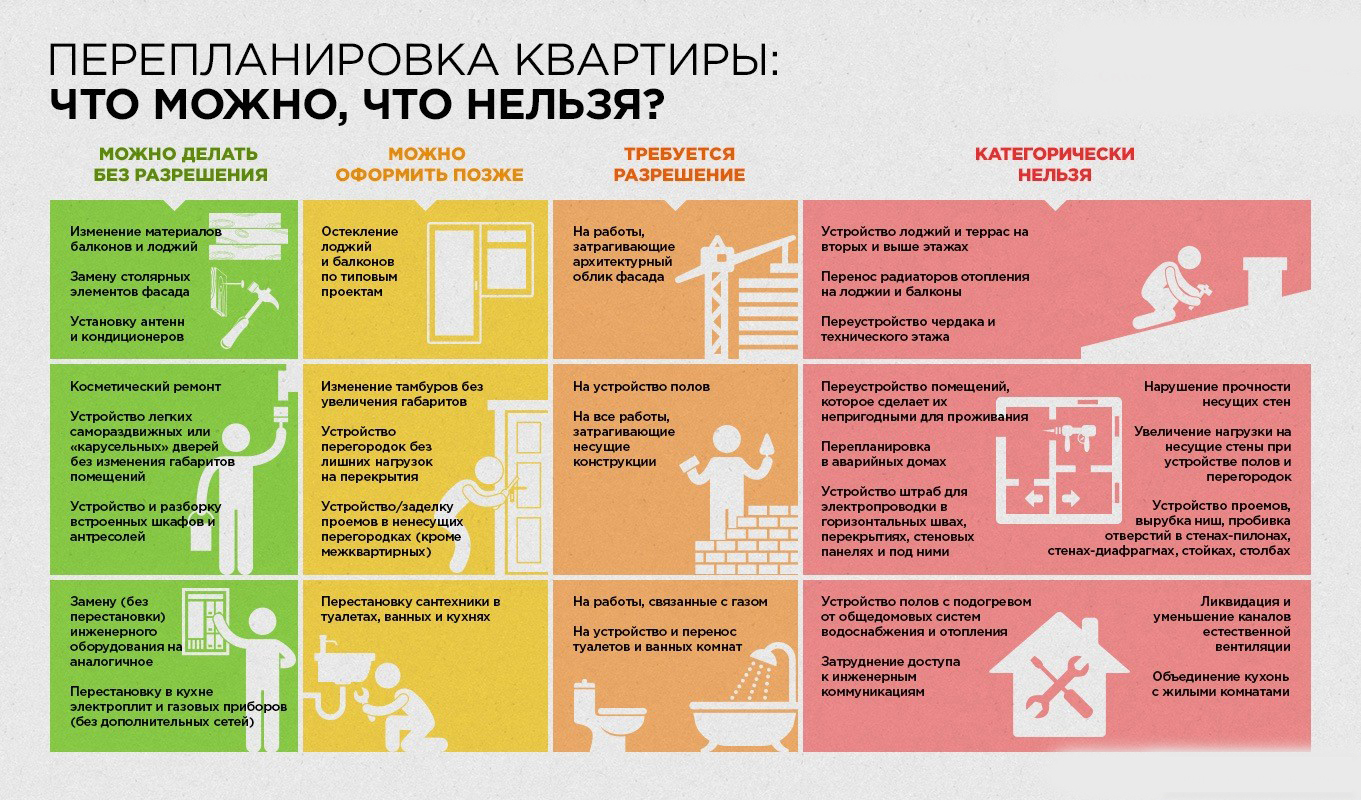
- Any changes to the design of a residential apartment (and the loggia is part of it) should be made only in consultation with the relevant authorities. It does not matter whether it is the demolition of the adjacent wall between the loggia and the room or the external insulation of the parapet. In any case, the BTI specialists should be notified of this accordingly, so that later (for example, when selling an apartment) to avoid unpleasant situations about the mismatch of the design with the technical passport.
- Building codes do not allow the battery or radiator pipes to be carried outside the building wall. Heat losses on the loggia are more than significant, and improper installation or insulation will lead to freezing of radiators and possible accidents.
The way out of this situation is a “warm” floor or an oil radiator.
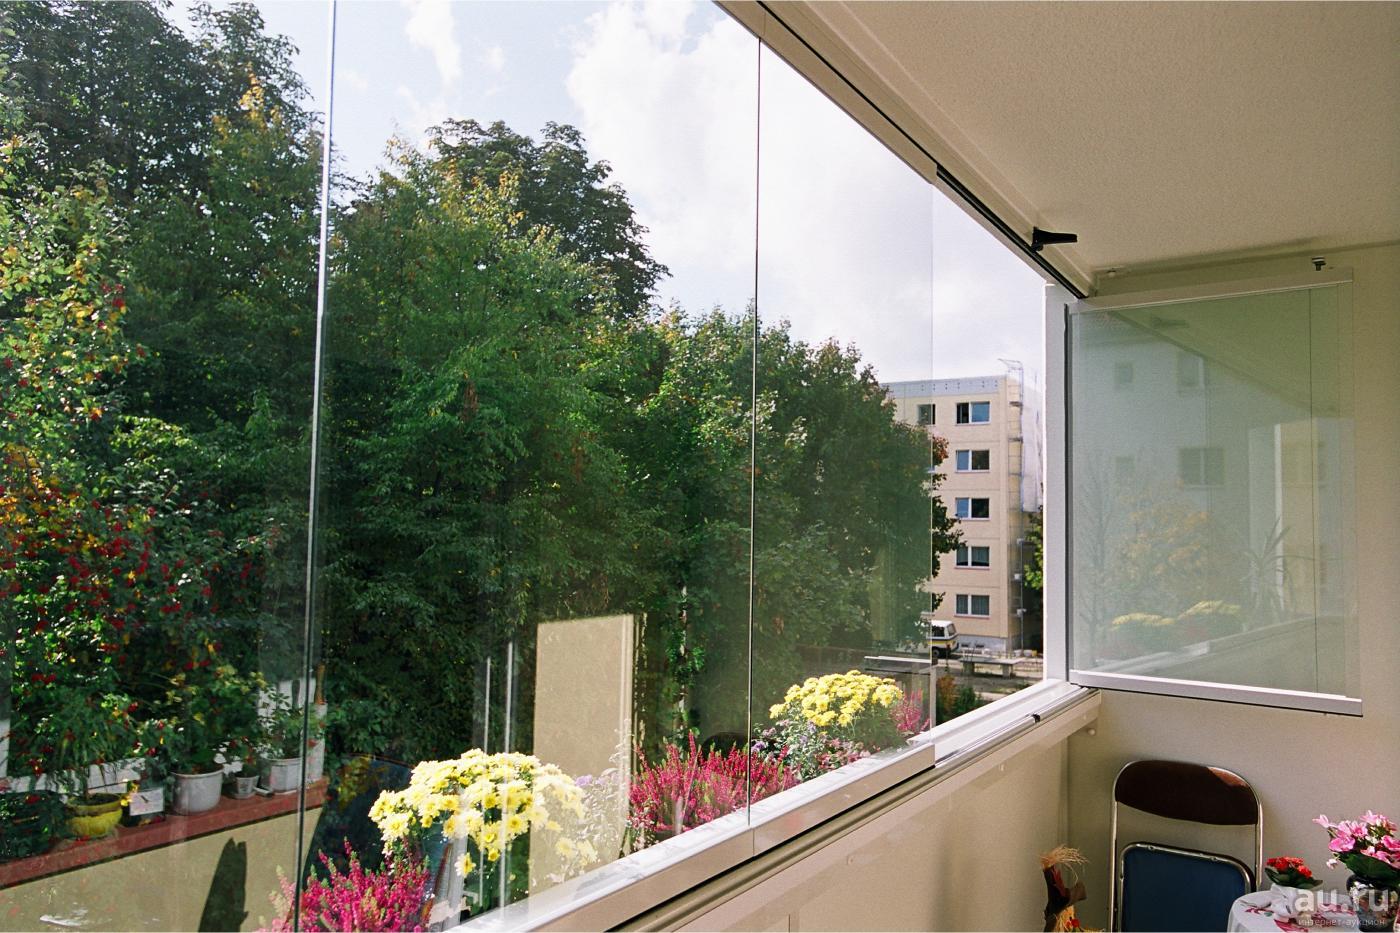
- The use of frameless glazing. From the side of this loggia looks very interesting: a smooth, transparent, solid canvas. If necessary, the sash folded "accordion", without reducing the space of the room. However, this option is not recommended for a warm loggia: single glass and slots will not allow maintaining the optimum temperature inside the room during the cold season.
In addition, this type of glazing is not very practical: it is impossible to fix the mosquito net, the glass is quickly contaminated.
- Sometimes, in order to increase the area of the loggia, the glass frame is taken out of the plane of the wall of the building. Above such a loggia closes a special visor. It accumulates snow in the winter, in the spring icicles form on it, and in the summer it rustles in the pouring rain.
It is very expensive and problematic to reliably insulate the structure outside the facade.

- One layer of insulation. Sometimes the parapet and walls are insulated with foam blocks from 70 to 100 mm thick. The thermal insulation properties of this material are simply wonderful, but to create comfortable temperature conditions it is necessary to use an additional layer of insulation.
- Vapor barrier. If mineral wool is chosen as a heater, then it must be laid with a vapor insulating material. Otherwise, moisture will accumulate on it, and it will simply dampen it.

- Polyurethane foam. Seams with a sealant or foam must be protected from direct sunlight. Otherwise, the protective layer will collapse over time, again revealing the cracks and cracks.

- Use for leveling and warming the floor of a thick layer of sand concrete is one of the most common mistakes. Do not overload the floor slab too much. On top of the screed will lay another layer of glue, and then granite or other coating.
It is more reasonable to choose a heat-insulating material with a very small specific weight (penoplex or mineral wool).
- Warming of the adjacent wall between the loggia and the room. Usually it is not performed due to lack of meaning. The climatic conditions inside the apartment and on the loggias will not significantly change from it, but the costs of money, effort and time for useless work will be rather big.
- Attention to small details. Already at the planning stage, it is possible and necessary to pay attention to such trifles as the location of the handles at the glass unit, the use of mosquito nets, and the construction of a wide window sill.

Another problem faced by the owners of the loggias after improperly performed insulation works is the appearance of condensation on the walls. The effect of the "weeping" wall occurs for several reasons:
- improperly selected and installed insulation;
- the absence of an air gap in the frame method of insulation;
- wrong laid paro-and waterproofing film.
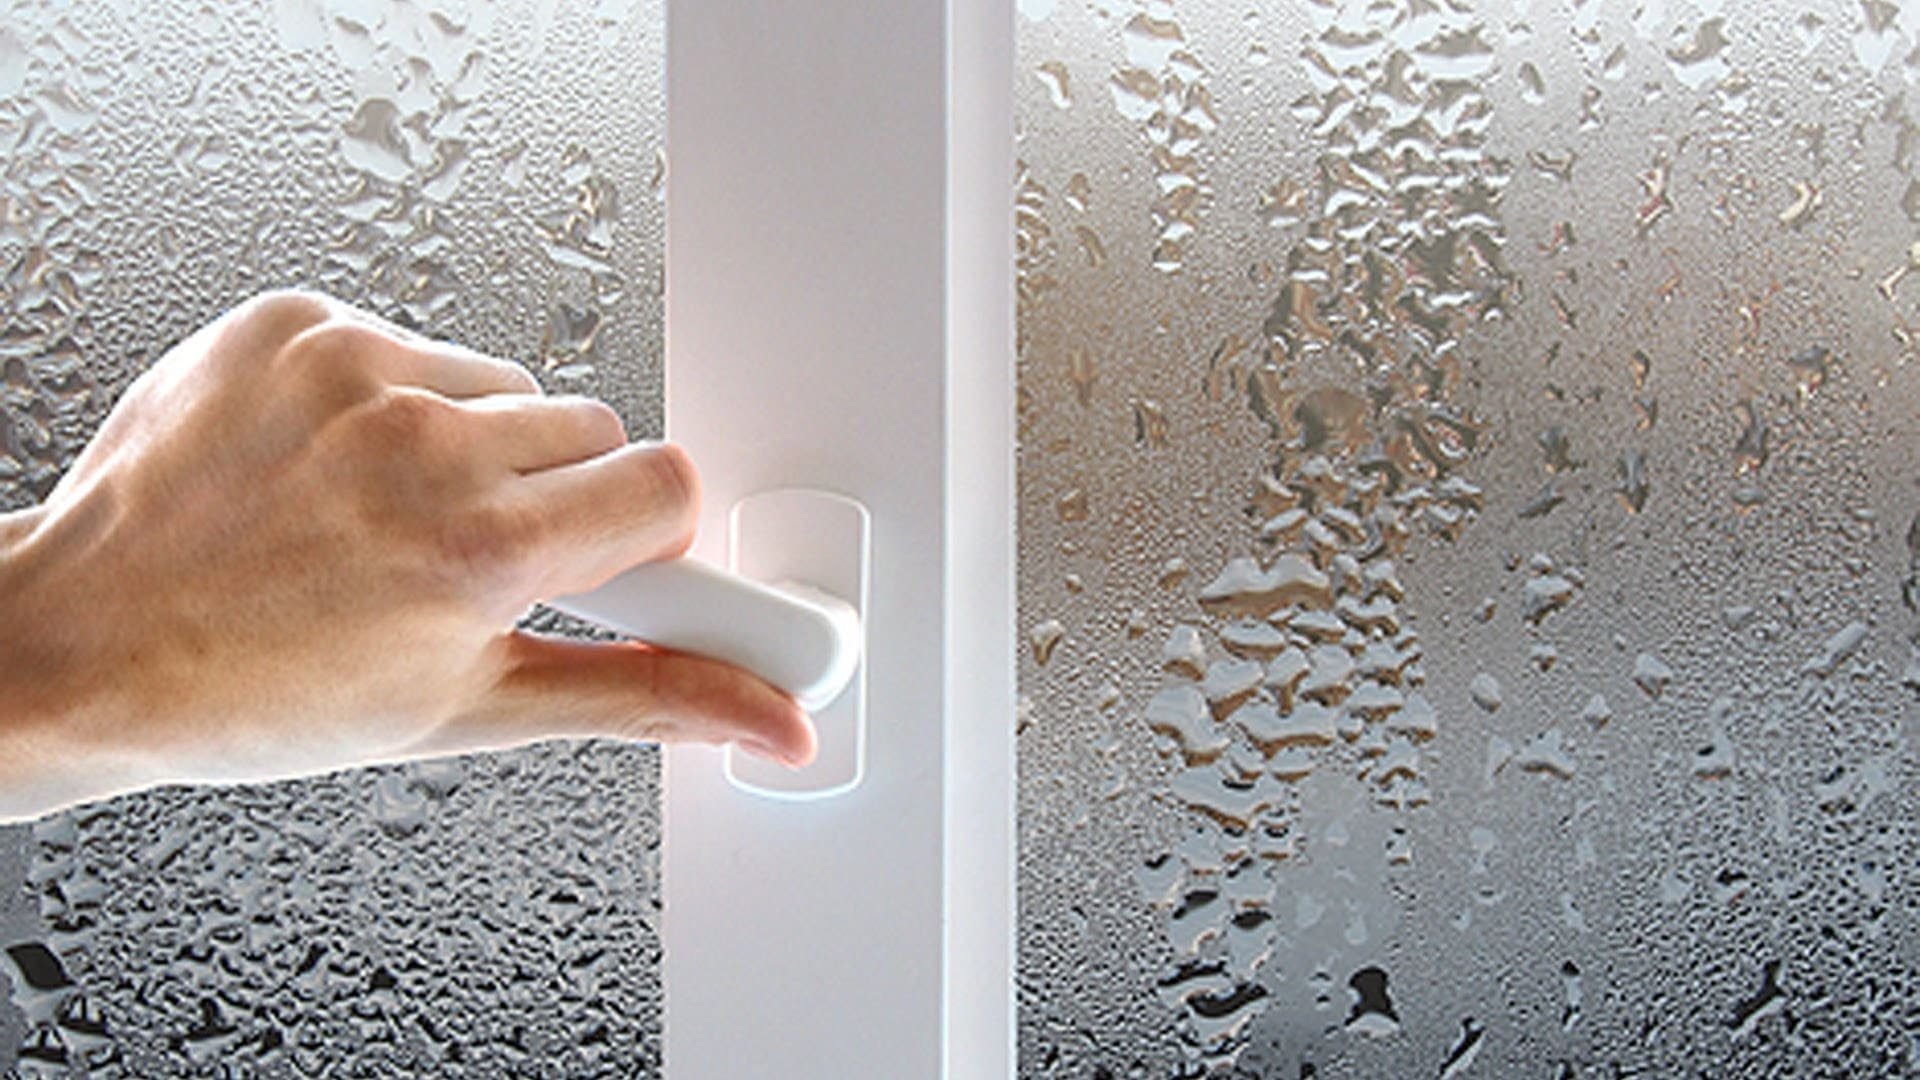
As a result, warm air, leaving the room, condenses on the cold external walls. Moist insulant significantly reduces its insulating properties, begins to rot and become covered with fungus and mold.
Reviews
The owners of apartments and private houses, faced with the work of weatherization of loggias, usually note a positive result of the work. The room becomes comfortable to stay even on the coldest winter days.
In a warm loggia, it is possible to grow flowers and other plants year-round, its space is used as a dining, playing, working area.

That the result was the best, the owners of the warmed loggias advise to foresee the use of "warm" floors and oil radiators, if the loggia will be used as a full-fledged dwelling.
The cost of electricity, of course, will increase significantly, but the end justifies the means.

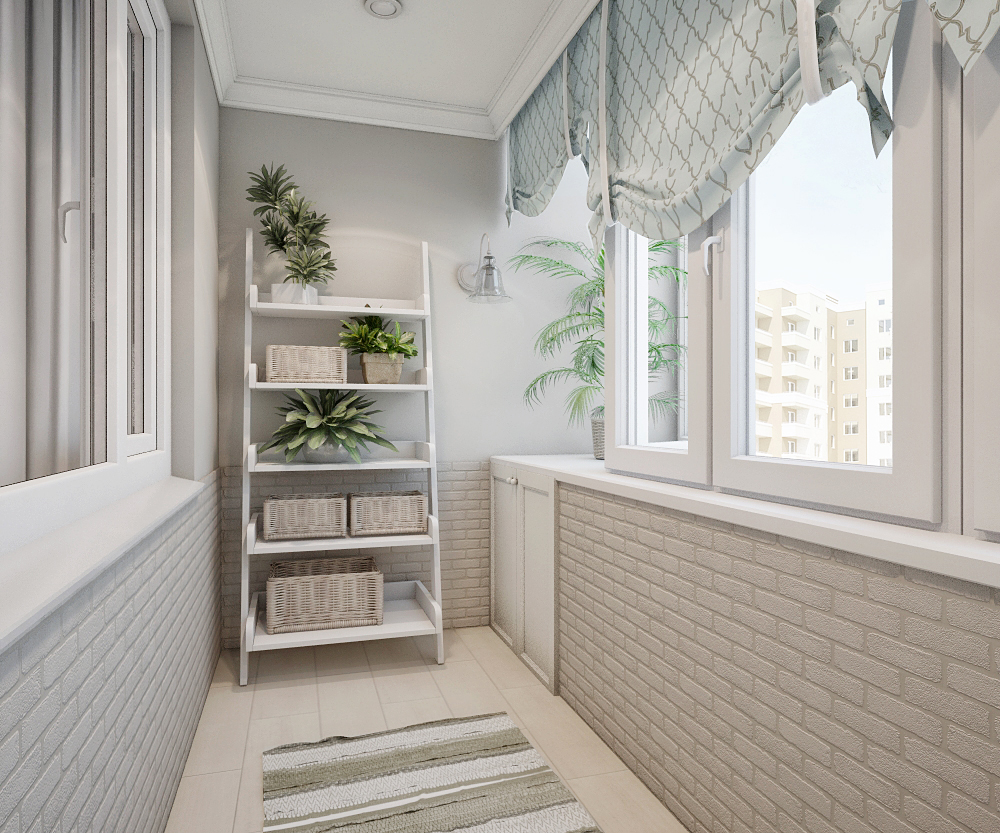
Design examples
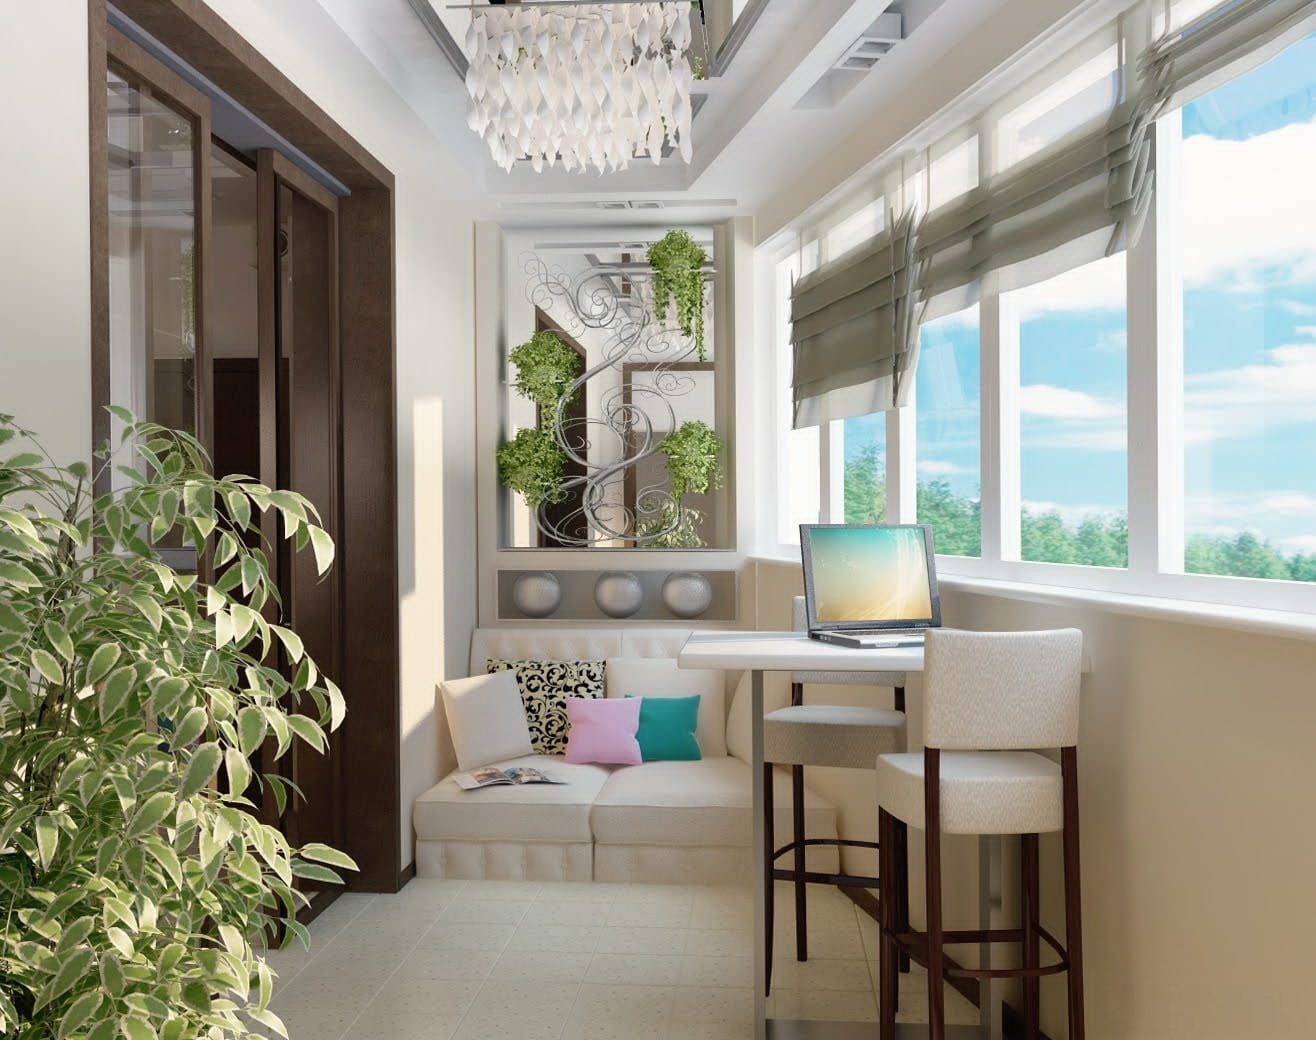
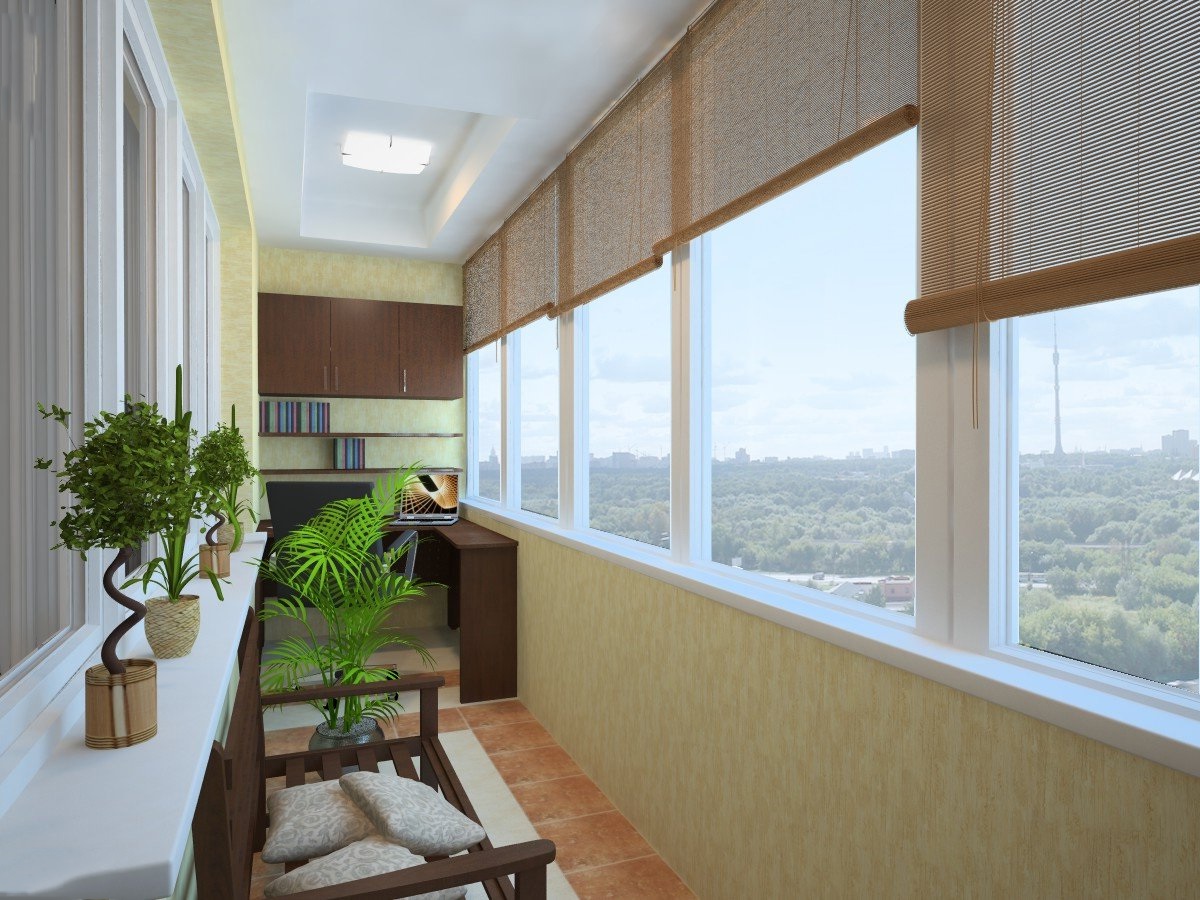
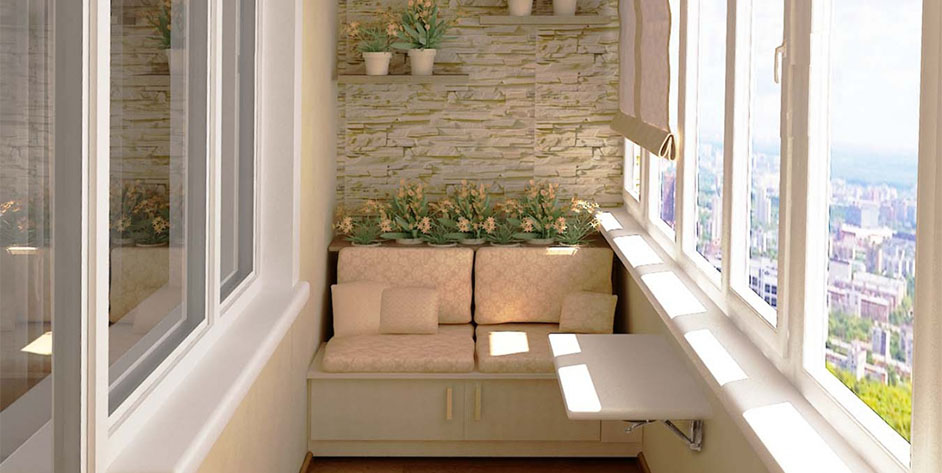
Competently designed interior and high-quality work on weatherization turned the loggia into a cozy corner for relaxation.A small sofa, a hanging table, blooming greenery - it all looks very harmonious. The interior is designed in warm sand tones. Roller blinds allow you to dim the sunlight if necessary.
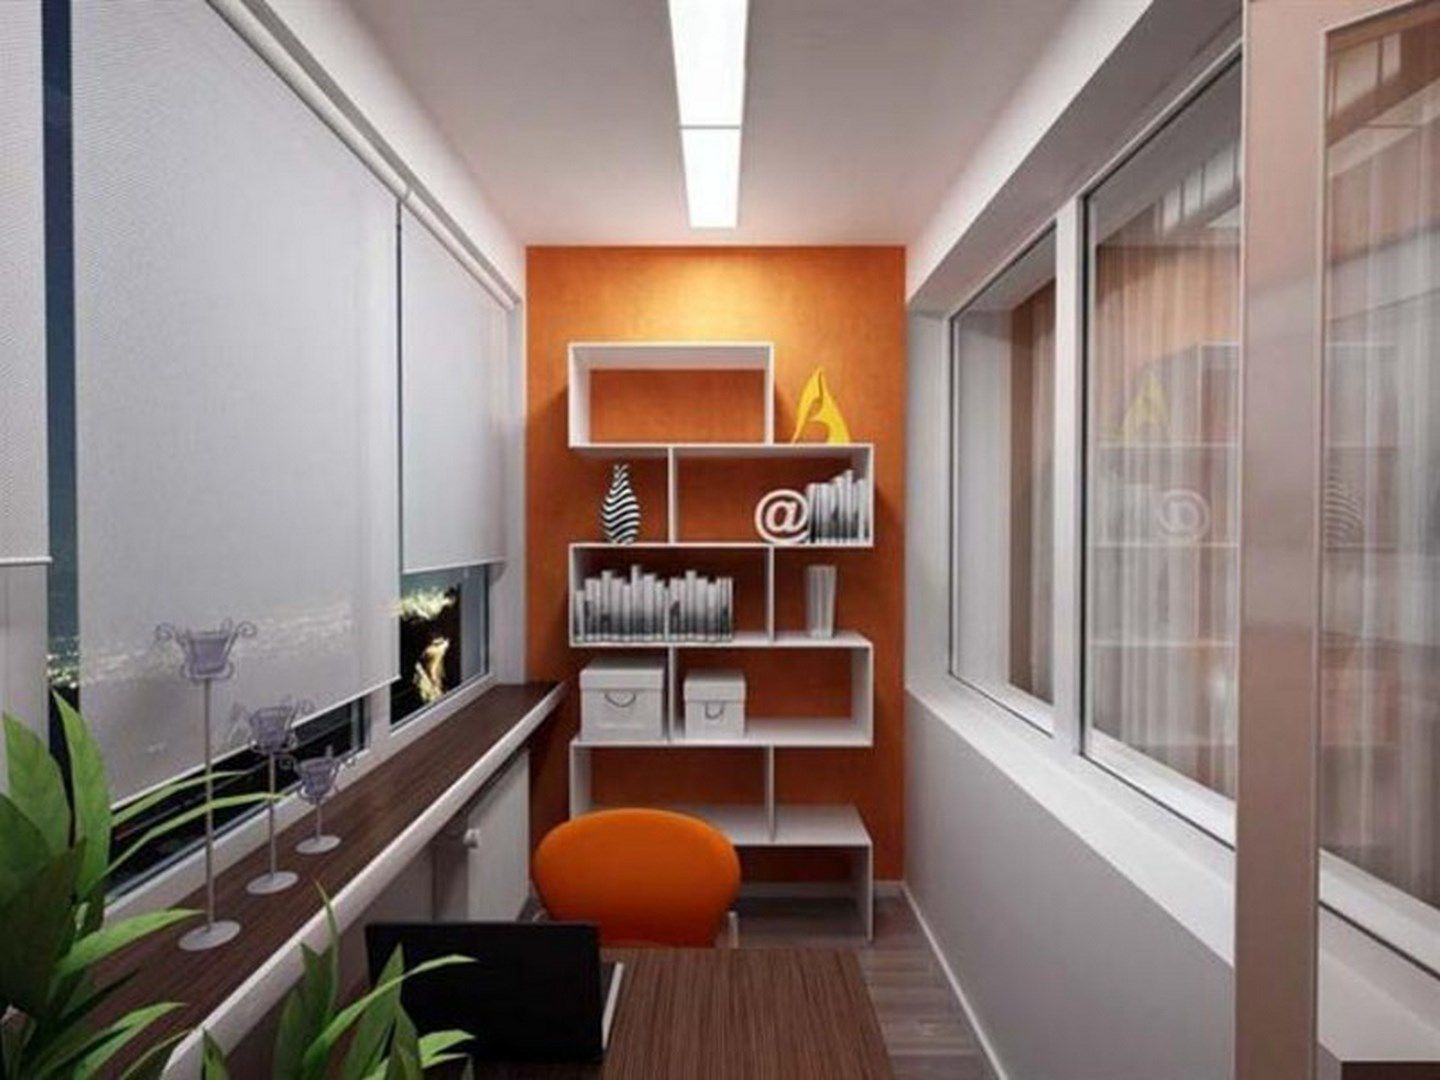
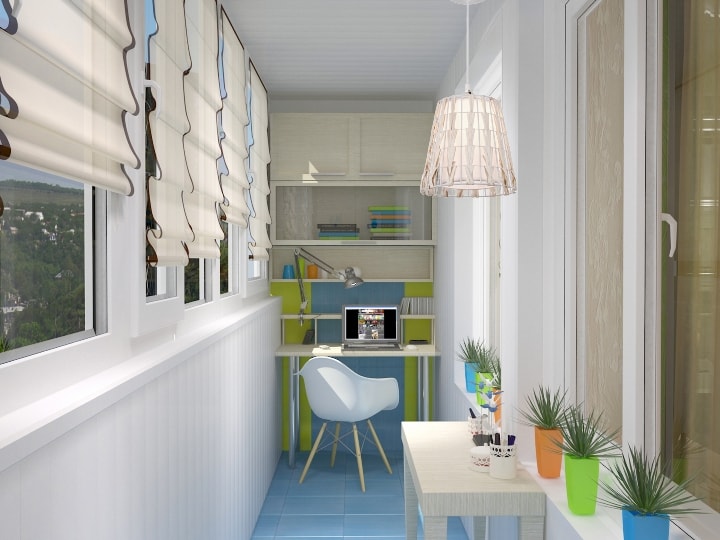
Spacious and bright corner where you can work in silence and tranquility on documents or important projects. Free space loggia thought to the smallest detail. The inner part of the parapet is used under the shelf in the entire wall (for storing books or documents). Luminaire and roller blinds will help adjust the intensity of illumination.
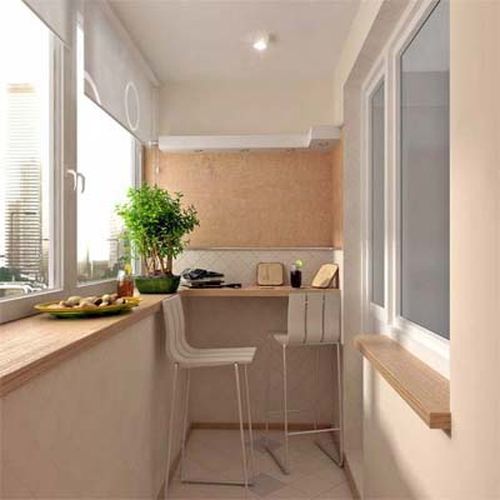
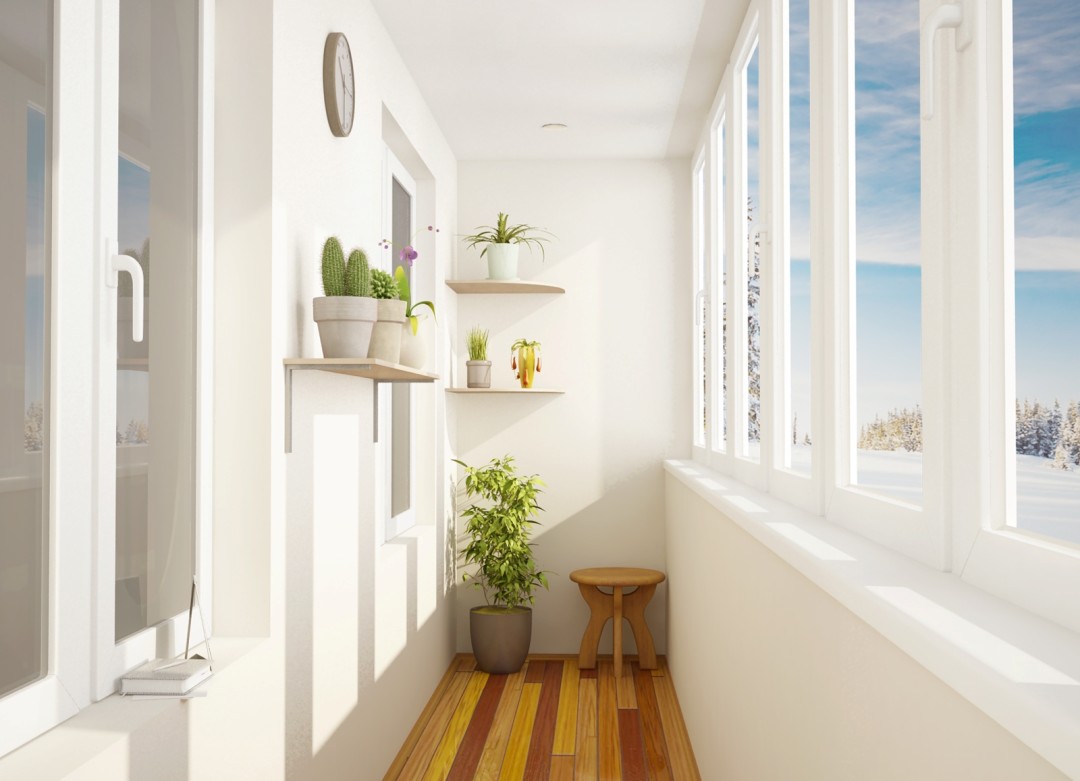
Bright cozy loggia can be used as a dining area. A small table and a pair of chairs will allow you to spend a romantic evening for two or arrange a meeting with your beloved girlfriend. A wide window sill along the parapet perfectly replaces the tabletop.