LED ceiling lights: placement and design options
LED ceiling lighting is an original design solution that makes the ceiling zone unique. In order for this ceiling design to be stylish and appropriate, it is necessary to study the subtleties of its placement and the most profitable design techniques.
Special features
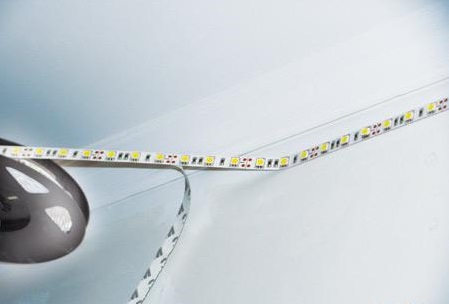
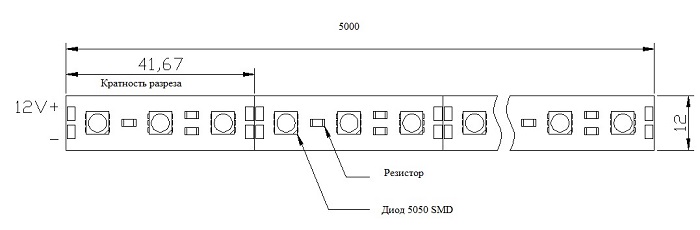
LED strip is a functional lighting device with a mass of diode lamps. The design consists of a base with an adhesive surface and a protective film. Some varieties are attached to the ceiling with plastic clips.At the very base are the auxiliary components, the contact pad and the LEDs. To make the lighting uniform, the light sources are placed at the same distance from each other.

This material is quite flexible, the tape is sold in reels, which exclude the formation of creases, and has cutting lines. It is an auxiliary illumination, although the power of this lighting device often allows you to replace the central lighting. Power consumption of 1 m of the tape is from 4.8 to 25 watts.
The number of LEDs per 1 m can be from 30 to 240 pieces. Its uniqueness lies in its economy: the segment of 10-meter length in terms of power consumption is less than an ordinary incandescent lamp.
Resistors eliminate the possibility of a voltage surge, they limit the current flow. The width of the tape can reach 5 cm. The size of the LEDs is also different, therefore some varieties shine brighter than others. If it is necessary to increase the intensity of the ceiling lighting, sometimes an additional row of diodes is soldered to the tape.
By tightness LED strips are divided into three types:
- not having tightness (for usual rooms);
- with an average degree of protection against moisture (for rooms with high humidity);
- in silicone, resistant to water (for the bathroom).
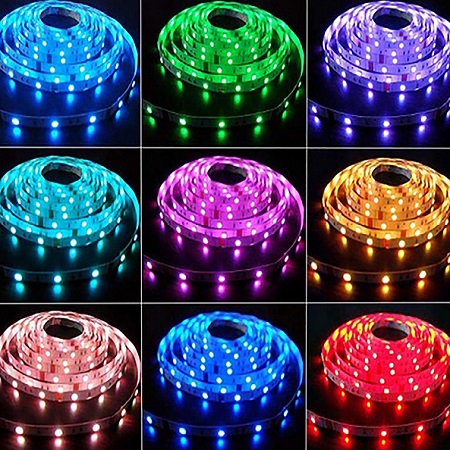
On the modern market, such products are presented in the form of ribbons of classic white color, RGB varieties and one-color backlighting.
Benefits
LED backlight in the form of a ribbon is convenient and different quality.
It is a sought-after ceiling design tool for several reasons:
- is a perfect method of updating the interior composition of the interior of any room;
- sets a unique atmosphere for any room;
- differs in the equal and soft directed luminescence without blinking and noise;
- attached directly to the ceiling;
- significantly saves energy consumption;
- has an attractive design;

- durable - has a service life of about 10 years;
- it is distinguished by the possibility of choosing the color shade for the interior composition;
- due to the flexibility allows you to take any form;
- harmless, does not emit toxic substances into the air during operation;
- fireproof;
- Does not affect TV signals and communications (does not interfere).

Such tape can be decoration of any room of the dwelling.
You can decorate the ceiling with it:
- living room;
- the nursery;
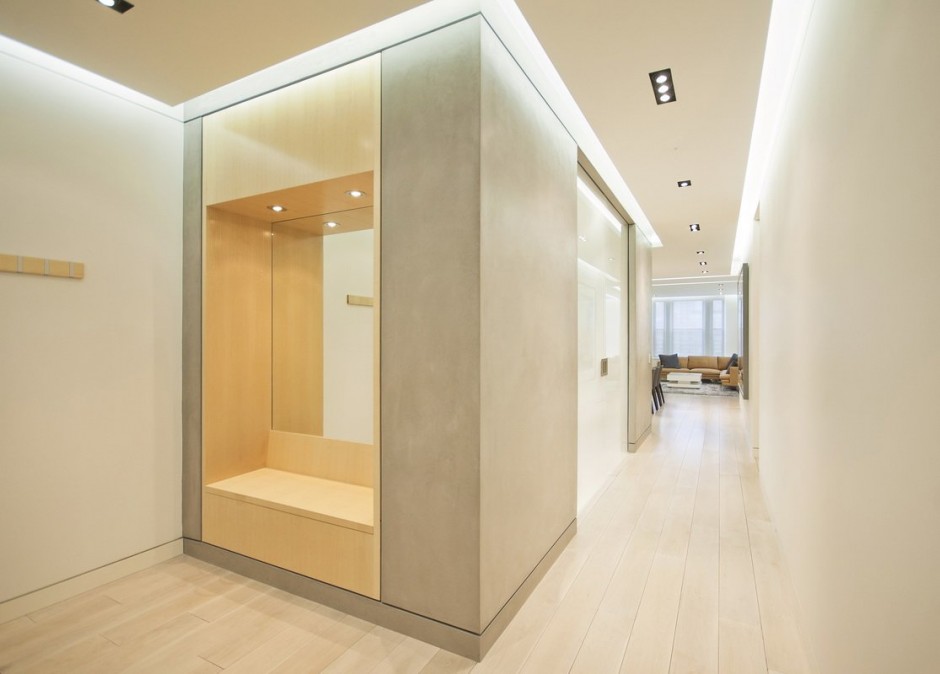
- hallway;
- the corridor;
- bathroom;
- bay area;


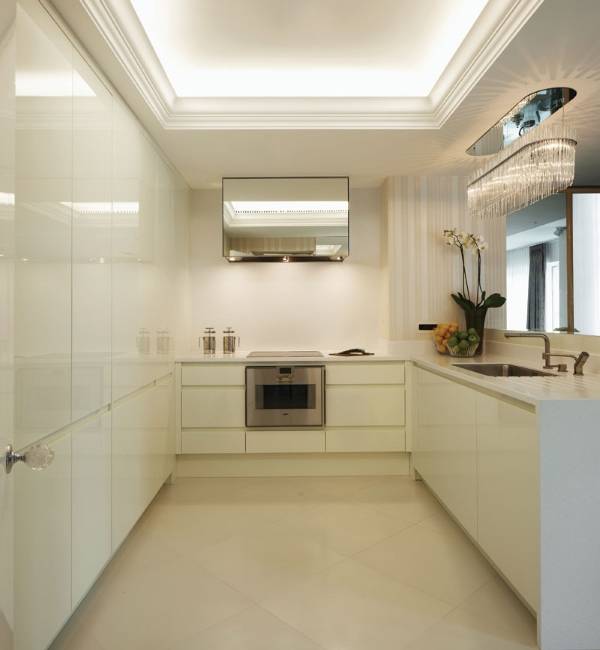
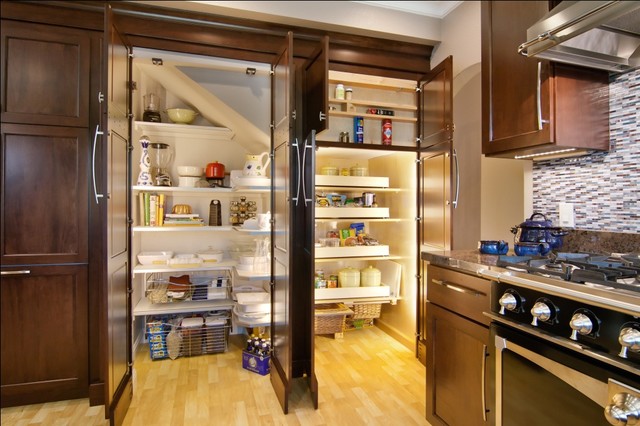
- kitchens;
- office;
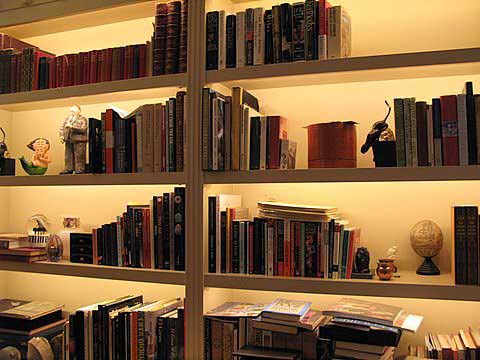
- home library;
- glazed loggia;
- balcony;
- pantry.
Tape LED backlight has an affordable price. It is easy to install, its installation can be done by hand, without involving outside experts.


Criterias of choice
Tape illumination on LEDs has a lot of varieties. Before buying determined with the type of lighting.
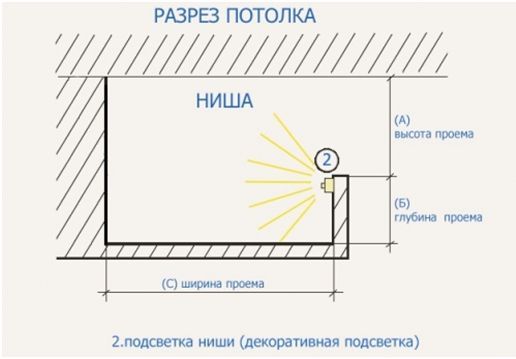
If this tape will perform the function of general lighting, remove all lighting devices from the ceiling. Then on the ceiling they fix several tapes of greater power, placing them around the perimeter, as well as behind the stretch ceiling film (costly method). To emphasize the contours, this self-adhesive backlight is fixed around the perimeter of the niches, creating diffused light and a visual effect of increasing space.


If you need to highlight the shaped protrusion, you can repeat its shape partially, which is especially important for suspended structures. The flexibility of the tape does not limit the curvature of the line.
If the ceiling lighting is planned to be repeated, for example, by highlighting the shape of a mirror or facing a kitchen apron, acquire varieties that are identical in luminescence.To choose the LED strip correctly and not get lost in a wide range of the presented range, you need to decide on the type of mounting, the shade of the glow, the power of the light sources and their quantity. The design idea on which the final effect of the light transmission depends also matters.

Therefore, when buying it is worth paying attention even to the substrate: it is undesirable that it catches the eye. It becomes the color of the main background of the ceiling. It may not only be white. In the market for such products you can find options with a brown, gray and even transparent base.
Glow Tint
Ribbons are not simply divided into monochromatic and colored. In the first case, these are light bulbs that burn only in one shade (for example, white, blue, yellow, orange, green). In addition, these varieties can emit infrared and ultraviolet light. The second ones are a ribbon with built-in light bulbs that can be lit in different colors alternately or simultaneously. Different features of the tapes affect the price: options with the light switching mode are more expensive.
Power and density of accommodation
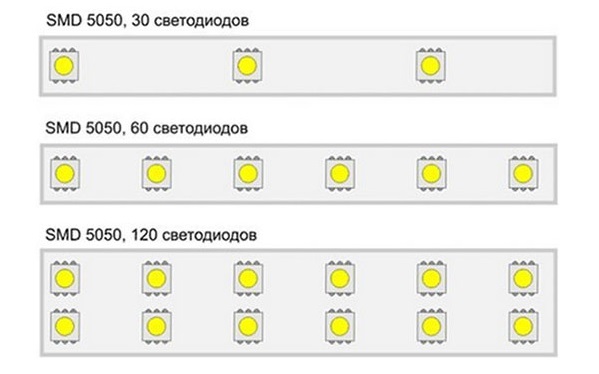
If the main requirement of illumination is the brightness of the light flux, it is necessary to purchase a product with a smaller interval between the diodes. In this case, the power consumption will be greater than that of varieties with sparse light bulbs. If the lighting in the design of the ceiling will have only a decorative function, it is enough to buy for the design of the ceiling zone LED - a system with the number of LEDs per 1 m about 30-60 pieces. For the main illumination, a ribbon with the number of bulbs 120-240 pieces per 1 m length is suitable.
At the same time, the nuance is important: the larger the room, the greater the width of the tape. A narrow version on the high ceiling of a large area will be lost. It is better to decorate the ceiling area with a wide variety with LEDs in 2 rows.
Learning fee
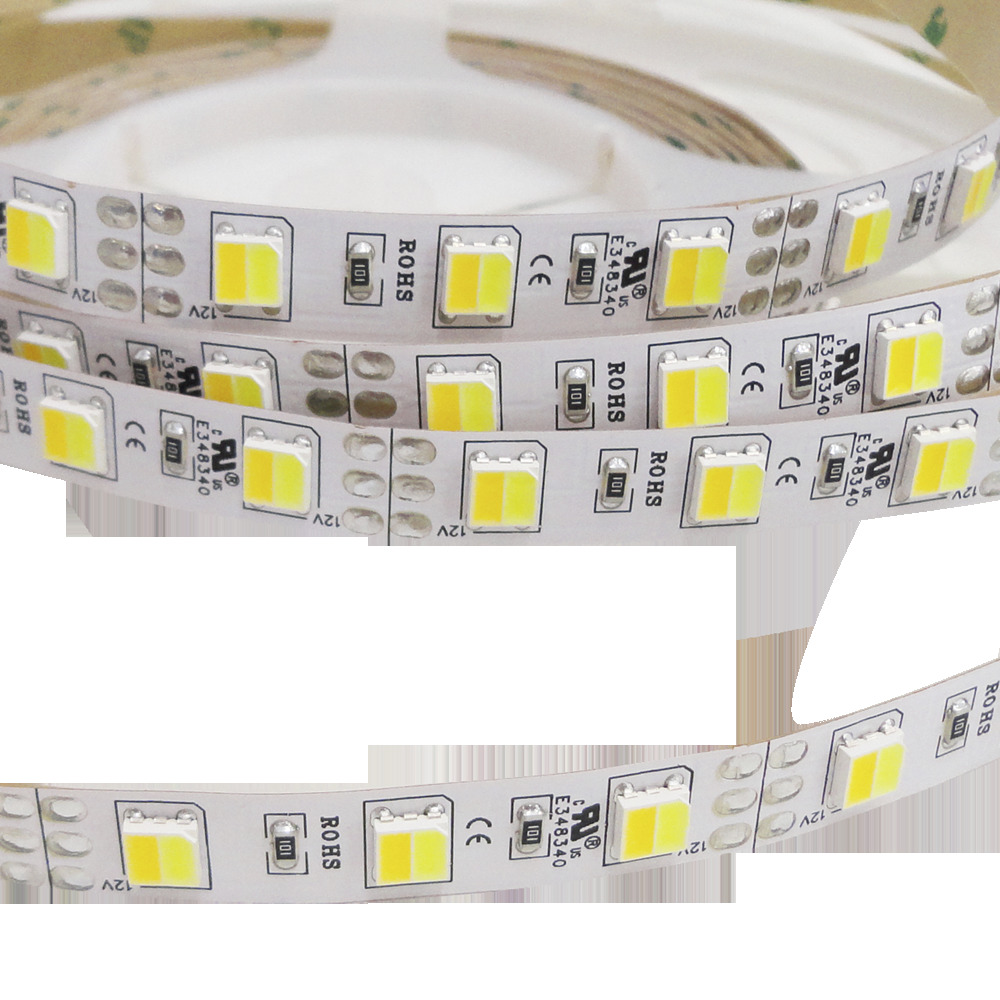
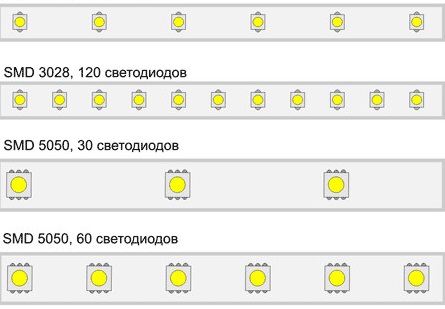
In fact, everything is simple: the abbreviation SMD, indicated on the tape, means "device for mounting on the surface." Next to the letters are 4 digits: this is the length and width of a single LED. Of the options presented, the most relevant options are the parameters 3020 (3 x 2 mm), 3528 (3.5 x 2.8 mm), 5050 (5 x 5 mm). The more diodes and the density of their placement, the brighter they shine.Each type of tape has a different power. For example, SMD 3528 with the number of diodes 60 pieces per 1 m consumes 4.8 W, if the light source is 120, the power is 9.6 W. If they are 240, the consumption is 19.6 watts.
Metric area
The metric area of the tape depends on the perimeter of the glued ceiling plane. Since the LEDs are characterized by the intensity of the glow, it is not bought at random: if the space is small, the excess light will hit the eyes. Simply put, a total volume of 11 watts will replace a 100 watt incandescent bulb.
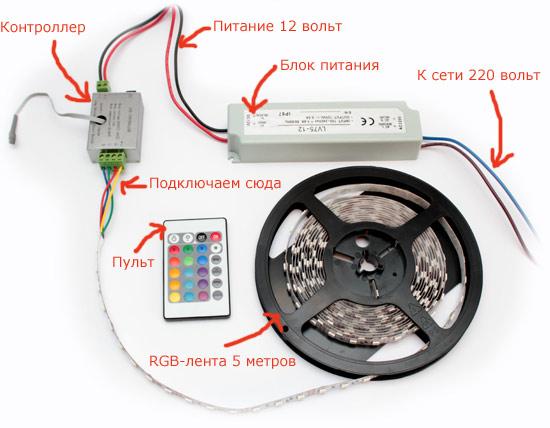
To choose the light level, measure the required metric area of the illuminated area using a tape measure. After that, the resulting figure is multiplied by the power of 1 m tape. This value will allow you to decide on the purchase of a power supply or controller, if for decorating the ceiling you plan to buy a ribbon with colored lights.
As a rule, the length of tape for lighting the ceiling is 5 meters, although today such a product can be bought in a segment of smaller length.
Protection class
Each type of ribbon with LEDs is designed to decorate the ceiling of different types of premises.
Returning to the topic of notation, it is worth considering the marks:
- IP 20 is a label indicating the possibility of using LED strips in dry-type rooms (living rooms, children’s, work rooms, corridors).
- IP 65 is an indicator indicating that the board maintains contact with moisture; it can be used in “wet” zones (places where leakage is possible at the top of neighbors).
- IP 68 - category with insulation.
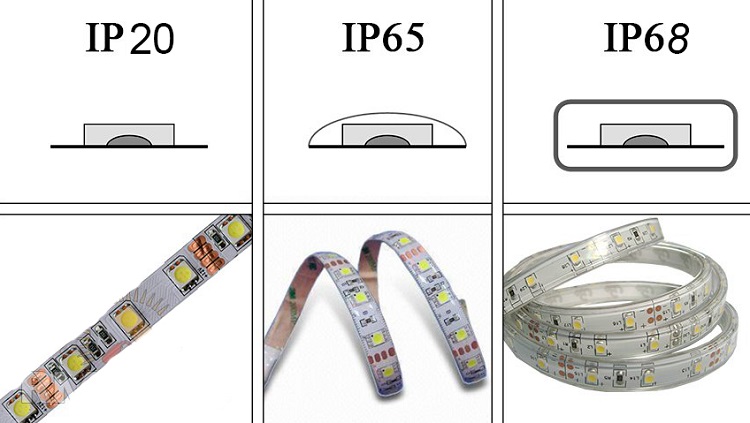
When buying it is worth considering that the varieties with a silicone layer for decorating the ceiling are not suitable, as they hinder the intensity of the light flux, forcing the substrate to heat up, which causes the surface of the ceiling to be heated.
Installation
Install LED lights with your own hands is easy. However, before installing it is worth considering the fact that tapes dissipate a part of energy in the form of heat. Therefore, before you fix and connect the backlight, in some rooms it is necessary to consider insulation. For higher power diodes, this may be an aluminum substrate. If the power of the backlight is small, the lamp is necessary as a decorative lighting, insulation is not necessary.
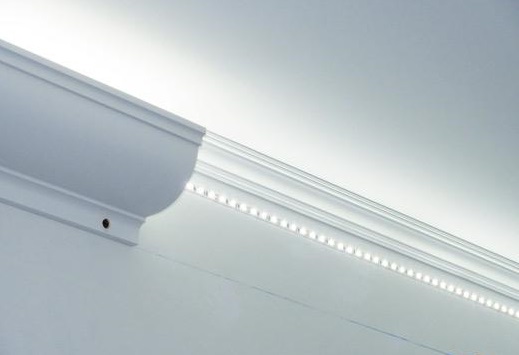
In the plinth
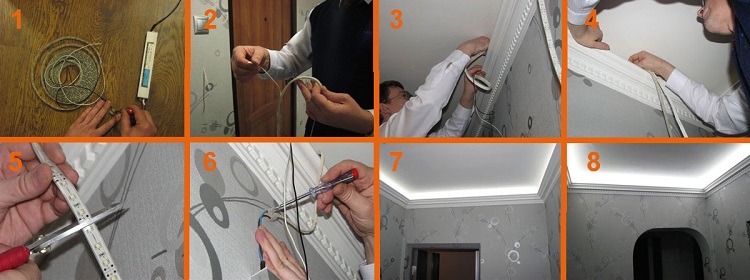
This method is convenient because the backlight can be mounted on the ceiling after the installation of the ceiling covering.The main task is to buy an attractive exterior plinth, while it is important to consider that it was not thin. This may cause the backlight to lose expressiveness. At the beginning of work, the plinth is attached to the ceiling with a reliable adhesive (for example, liquid nails), leaving a channel about 8 - 10 cm from the ceiling. To ensure that the eaves are even, you can mark out using a level.

After setting and drying glue proceed to the installation of the tape. To do this, the surface of the plinth is cleaned, the adhesive layer is removed from the back side of the backlight, and they are mounted on the ceiling or the back side of the baseboard in the gap left. If laying self-adhesive tape seems unreliable, you can glue it in several places with silicone glue or double-sided tape. It remains to connect the power supply, and for multi-colored varieties of RGB box, given the polarity. After checking the voltage in the system, you can connect the tape to the power supply 220V.
In the drywall cornice
You can hide the backlight in a drywall box during the installation of the ceiling. At the time of erection of the system, an open or closed niche is made for installation of the built-in ribbon lighting.The design of the box is made by marking, connecting carrier profiles with CD elements to the walls, forming a niche. In this case, whatever the system (single-level, two-level or multi-level), you must mount it with a gap of 10 cm in order to ensure the passage of light from the LEDs.

Sheets of plasterboard are placed on the frame, leaving a niche for tape lighting. The perimeter of the box is closed by a side (cornice), which will further hide the tape fastening. The seams are masked, primed and painted, then self-adhesive backlighting is mounted directly onto the drywall. Fixation is carried out in such a way that the light of the LEDs is directed upwards. After observing the polarity, the system must be connected to the current conductors.
Design
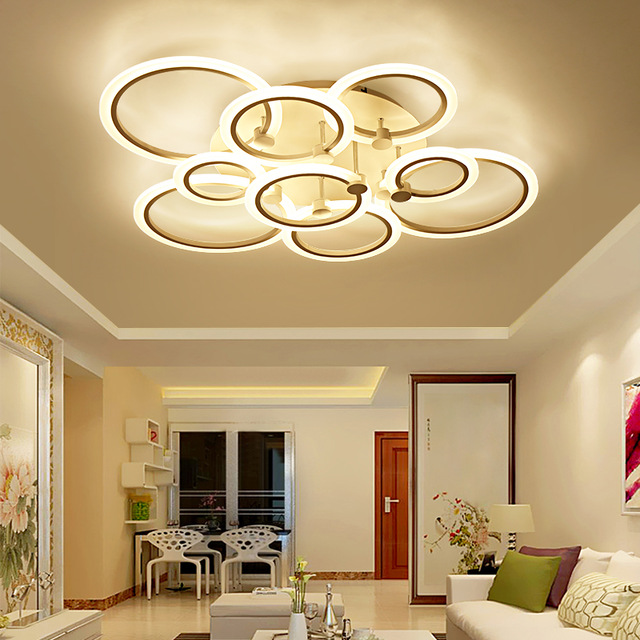
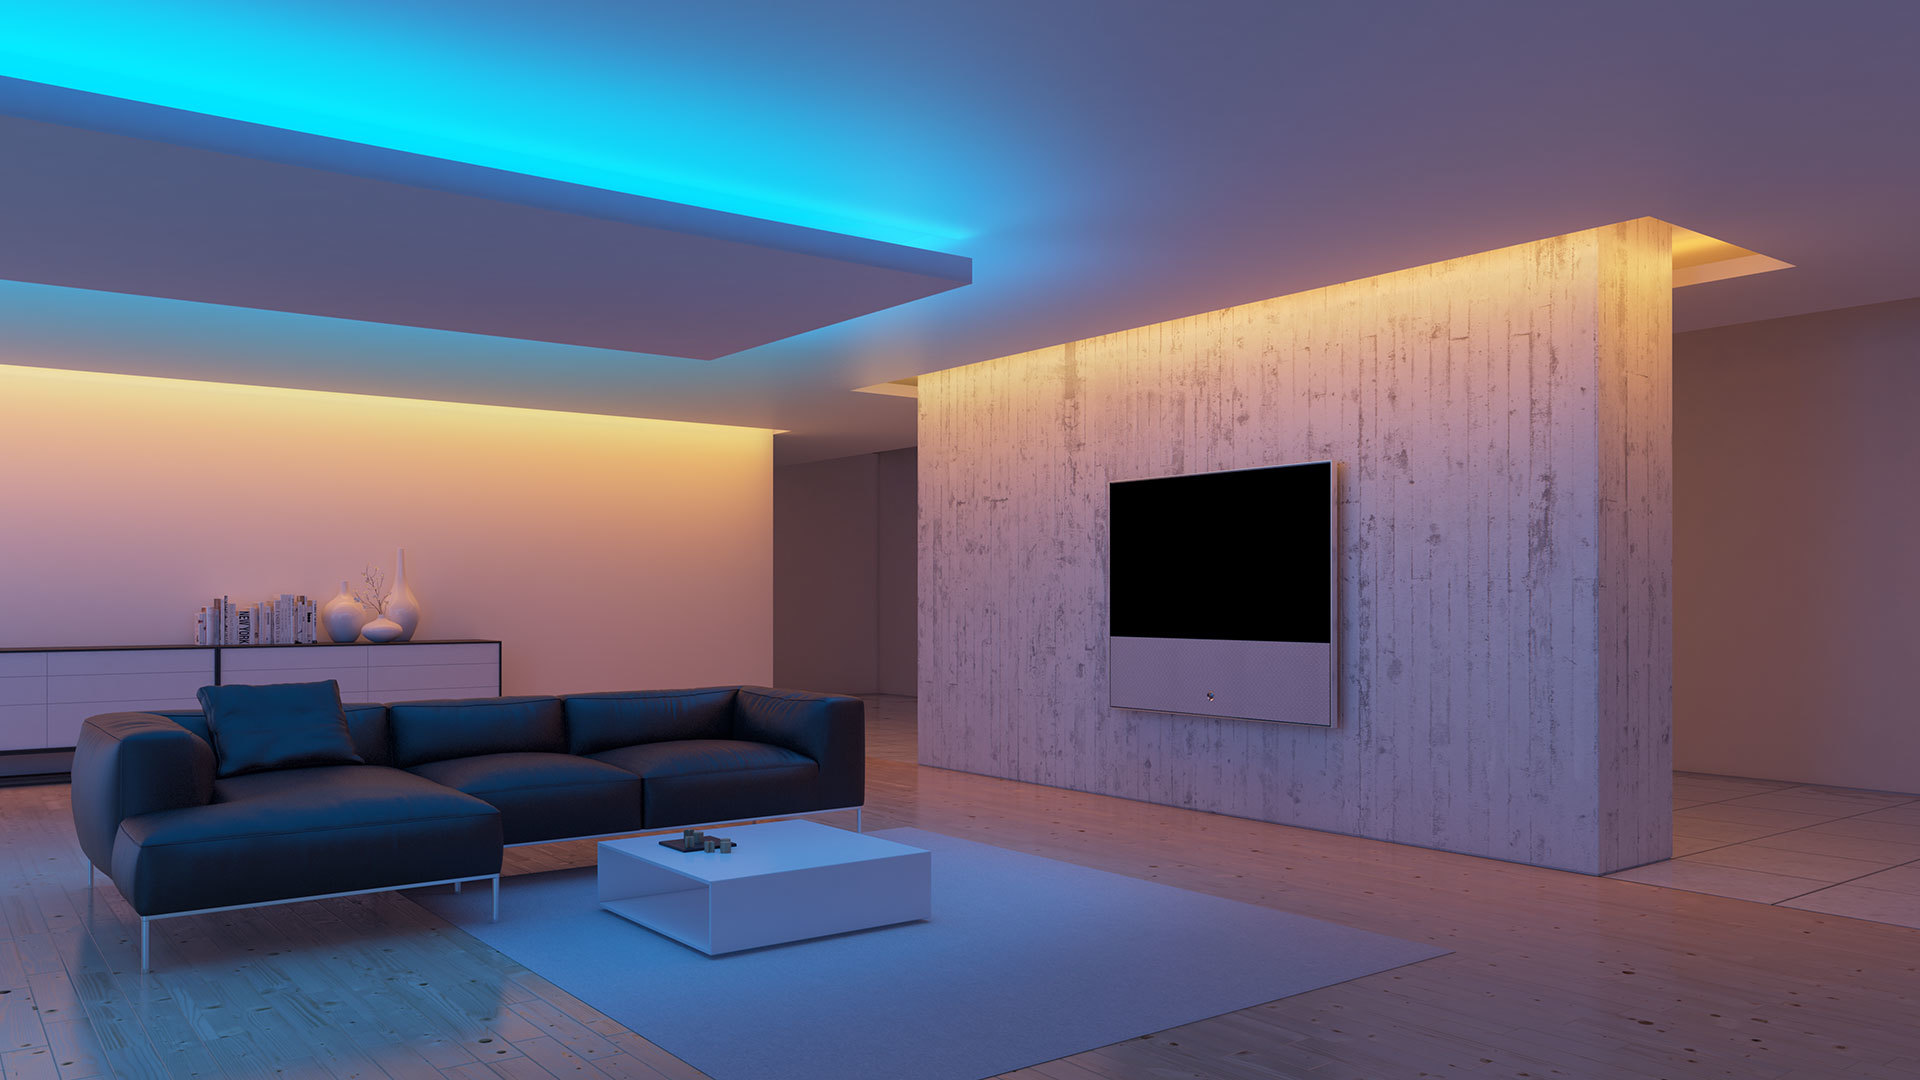
Decorating the ceiling with LED strip varied. It depends on the creative abilities, design features of the ceiling, the presence of projections, patterns and the type of lamps. Light tape can be placed around the perimeter of the ceiling, to be an element of decoration of multi-level structures. There are many variations of its location, in each case it creates an individual effect.
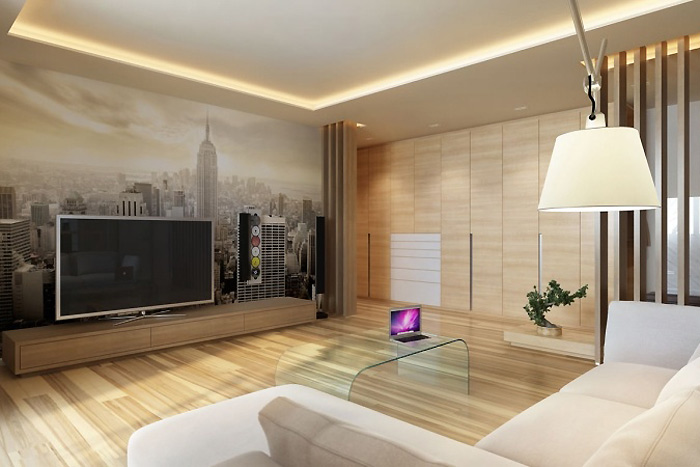
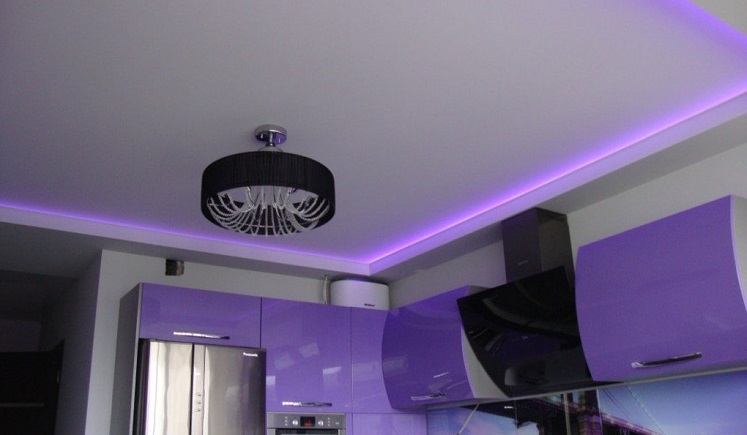
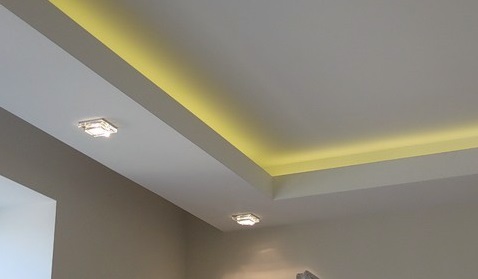
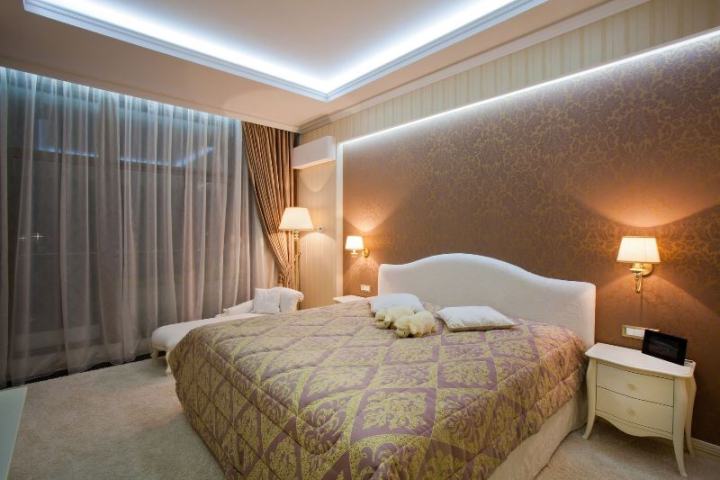
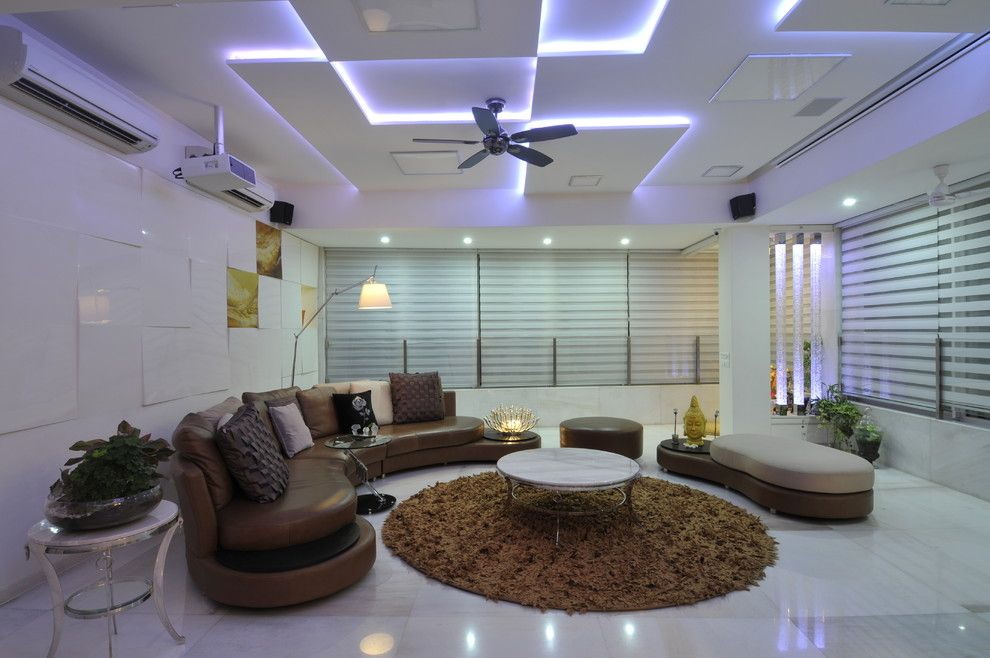
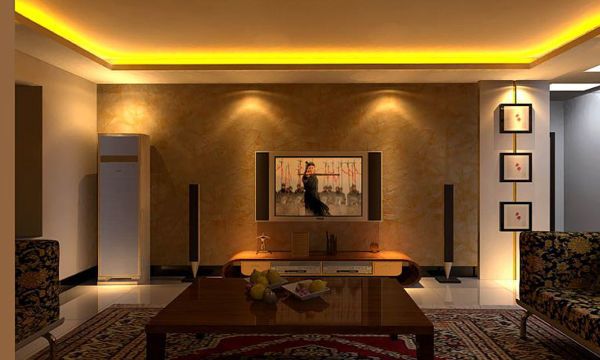
Particularly interesting is the ceiling lighting LED strip, participating in the emphasis on the projections of the structures. For example, a highlight of the second level with a combination of a tape and a central lamp would be beautiful. At the same time, they try to select the backlight in such a way that its shade coincides in temperature with the central light.

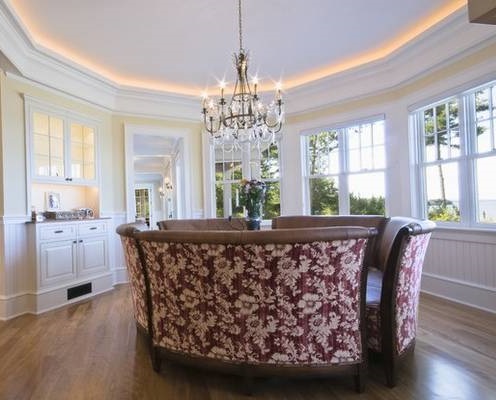
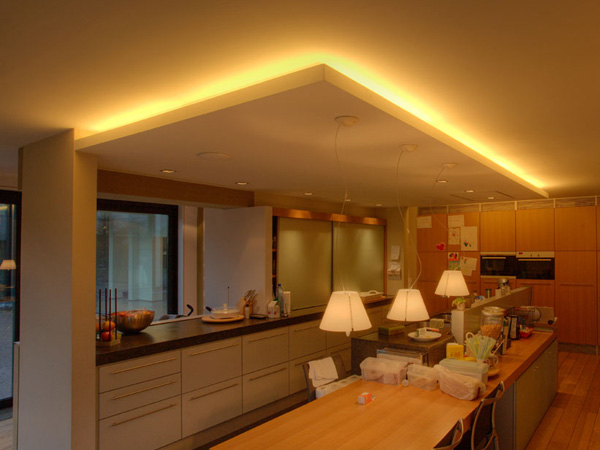
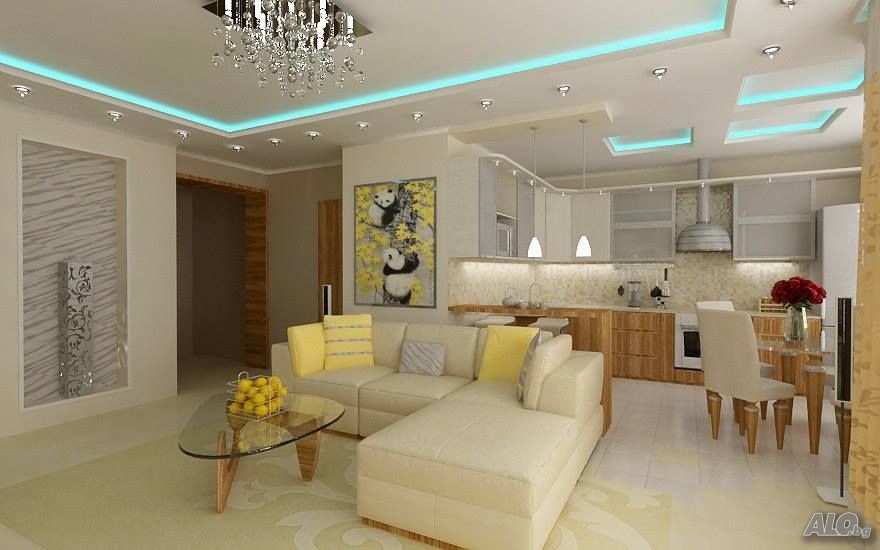
The tape hidden in the niche of the suspended structure will emphasize the desired ceiling zone, due to which you can zone the room. For example, in this way you can allocate a dining area in the living room, combined with the dining room. The same technique can favorably emphasize the guest area, creating a special atmosphere in it due to the color tint.
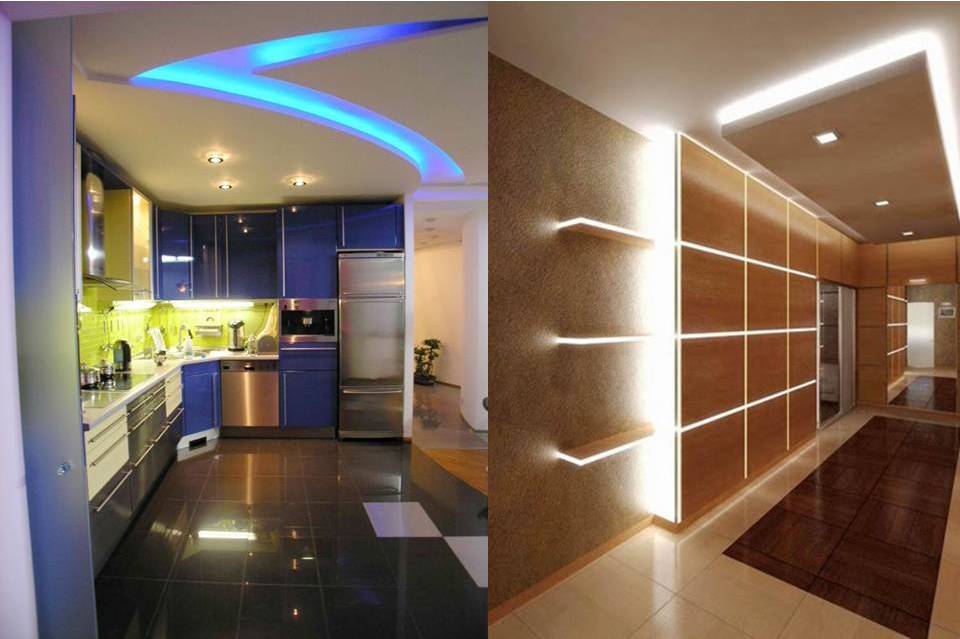
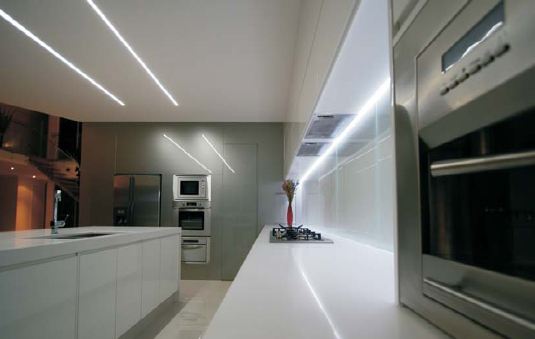
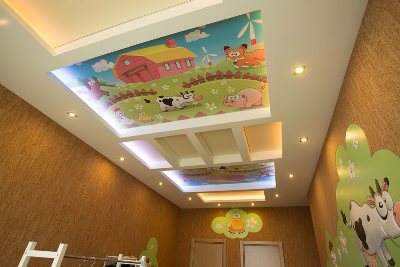
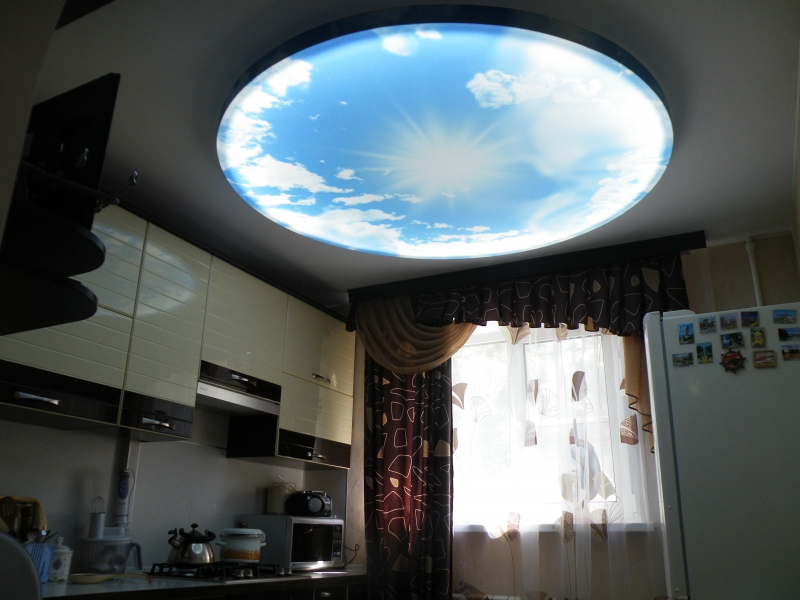
The backlight of the curly lines of a certain part of the ceiling composition looks beautiful. This can be a monochromatic coating or the design of a stretch ceiling with photo printing. Using a diode tape around the perimeter of the picture gives the image a volume and a special effect. Lighting small prints changes their perception, it is a tool to add the desired mood to the interior. Such lighting makes the ceiling visually wider and easier, even if the design consists of several levels.
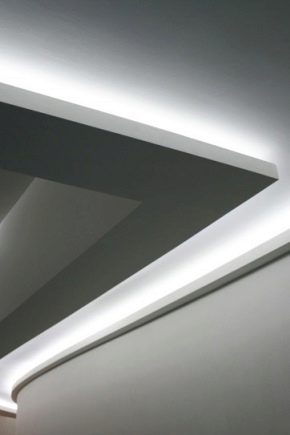
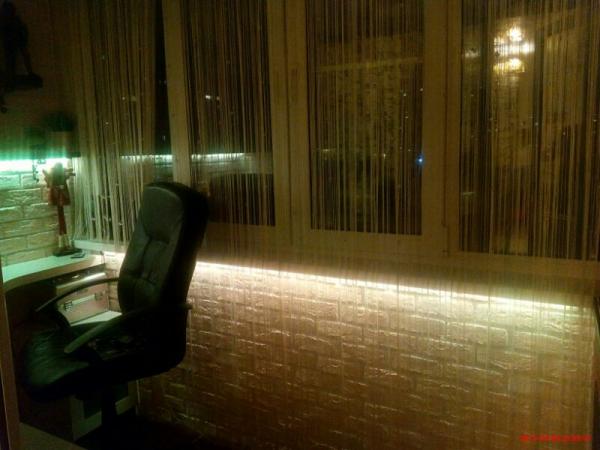
Matters and texture of the ceiling.For example, LED strip lighting is reflected in a glossy canvas, visually adding light to space, which is especially important for rooms with windows facing the north side, and spaces with small window openings. The direction of the diodes upwards creates a soft light, fixing to the side of the niche provides directional flow and the effect of a soaring ceiling.
Installing the tape between the coating material and the base creates the illusion of glow from the inside. Complicated reception is the creation of designer lighting by means of a tape inside the stretch ceiling. Often for such systems use additional threads with a source of luminescence at the ends of the fibers.


Tips and tricks
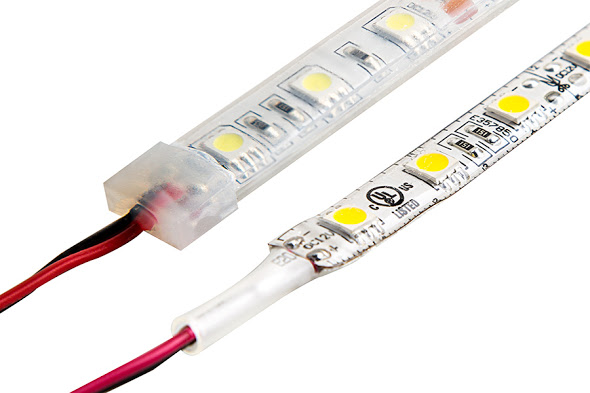
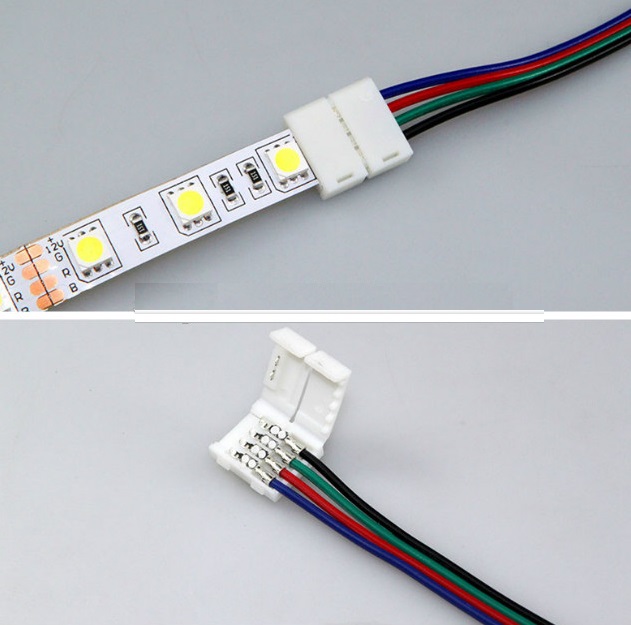
To make the illumination as correct as possible, the places of the cuts must be fixed by means of a connector or a soldering iron. At the same time it is impossible to influence the material for more than 10 seconds. In monochrome varieties, it is necessary to connect the contacts "+" and "-".
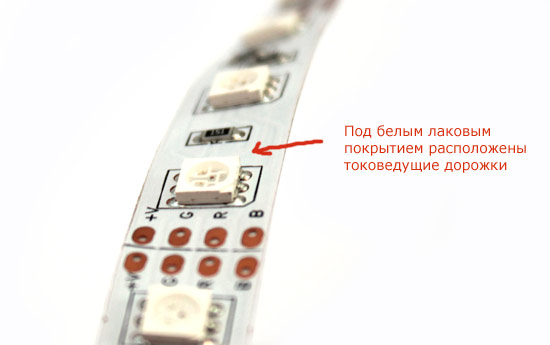
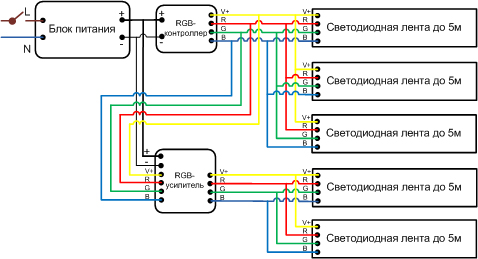
In RGB boards, the contacts are combined, based on color and marking, where:
- R is red;
- G - green;
- B is blue;
- 4 contact = 12 or 24 V.
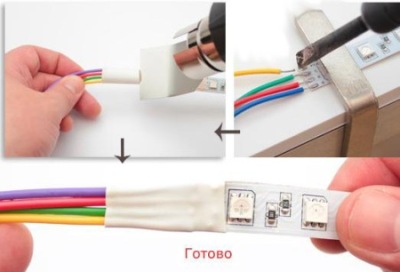
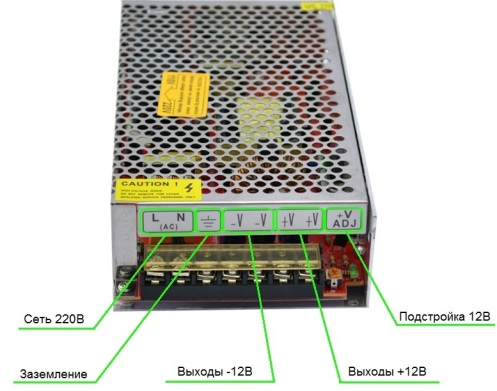
The cord of the transformer is connected to the contacts N and L.If an RGB tape is connected, a controller is added to the system. It is important not to confuse the values of "+" and "-", this can lead to tape breakage. When making a connection, consider the fact that the transformer is designed for a maximum of the total backlight length up to 15 m. If the perimeter of the diode backlight is larger, an additional power supply must be added to the system.
In order not to suffer further from negative perception of color, the tape must be chosen correctly. Do not buy a single-color model of the backlight. Consider the effect of shade: red color provokes anxiety and aggression, blue calms at first, but with a constant glow, it provokes despondency day after day, then depression.
Yellow light with daily lighting of space creates a depressing atmosphere. Violet is good for temporary lighting in the room of young households, but it is contraindicated for elderly family members. Therefore, when buying, for practical reasons, it is worth choosing between white light under daylight and varieties with a change of color. This will allow to vary the hues of the light flux by mood, without getting used to them.

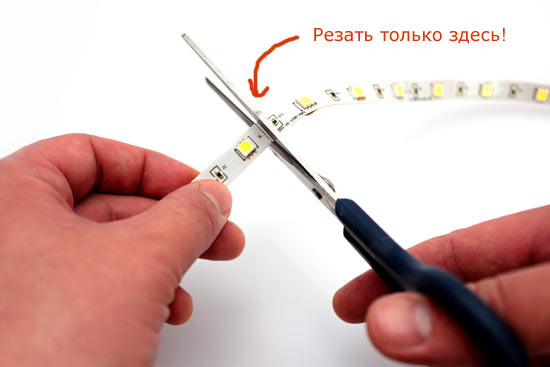
Do not forget to clean the surface before gluing the LED strip. So she will keep her safer and longer. Even if initially the surface, for example, the eaves, seems to be clean, it is worth wiping it, eliminating dust that can cause peeling of the sticky layer. Cut the tape can only be in places marked for cutting.
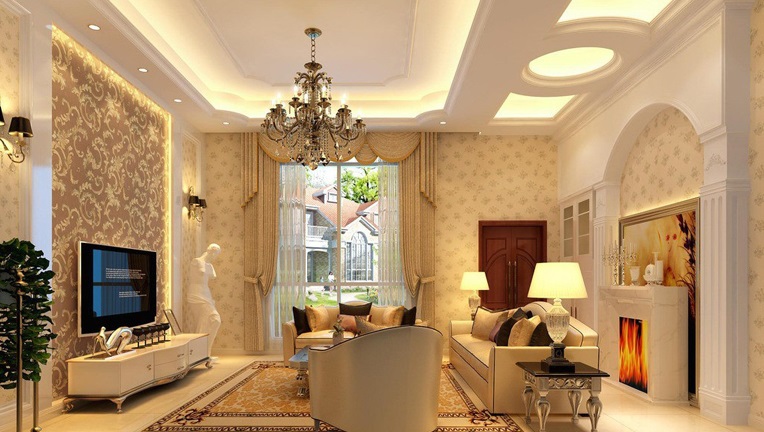
Beautiful examples in the interior
To select your option for lighting the ceiling with LED tape, you can refer to examples of beautiful design from the photo gallery.
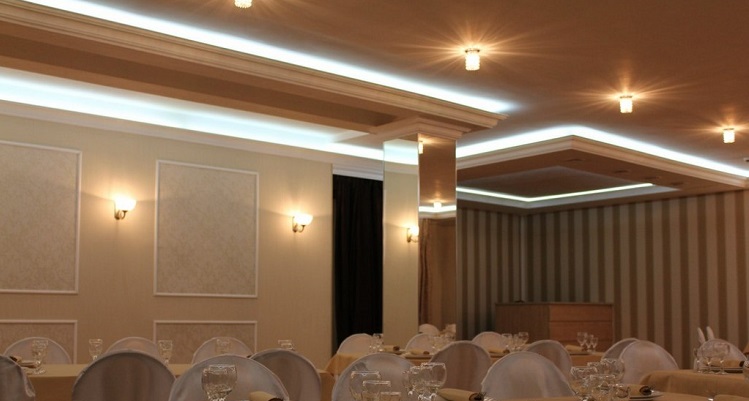
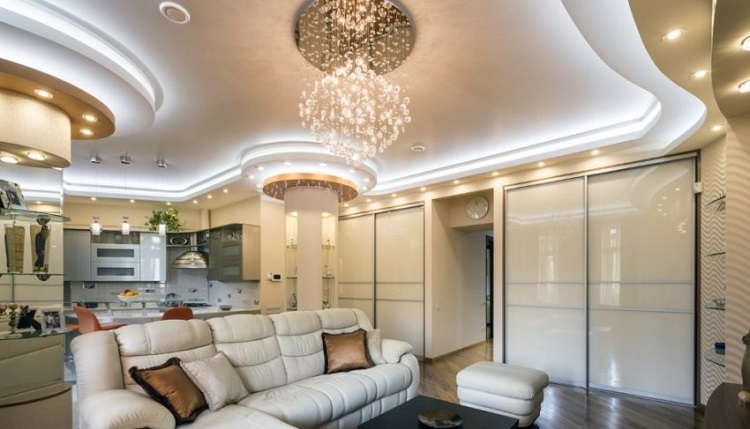
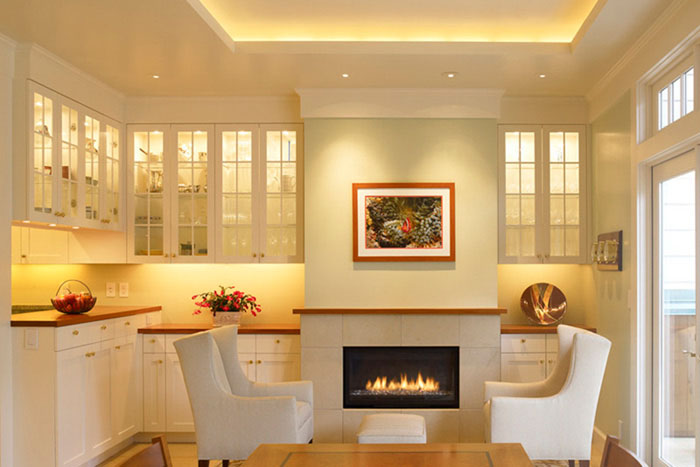
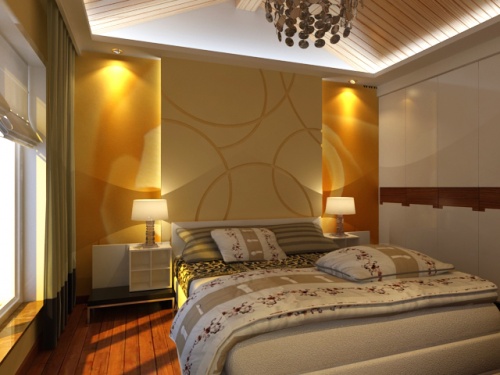
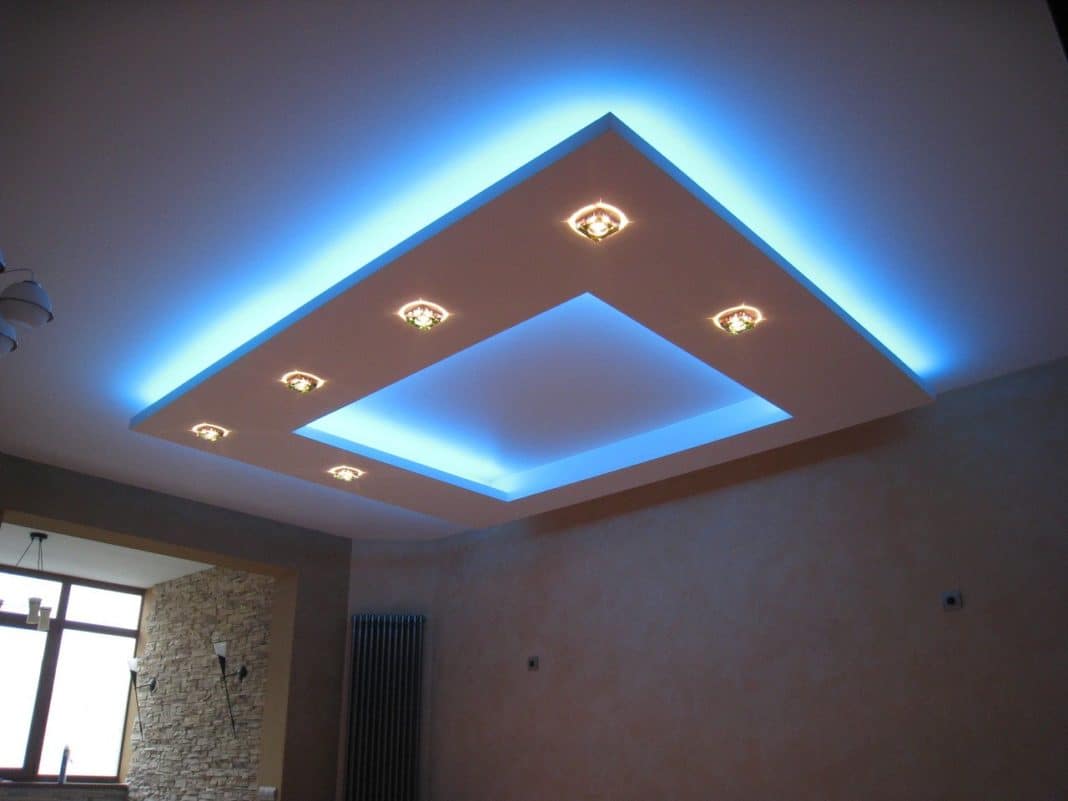
- A classic example of accenting a ceiling ledge with a tape illumination combined with spotlights.
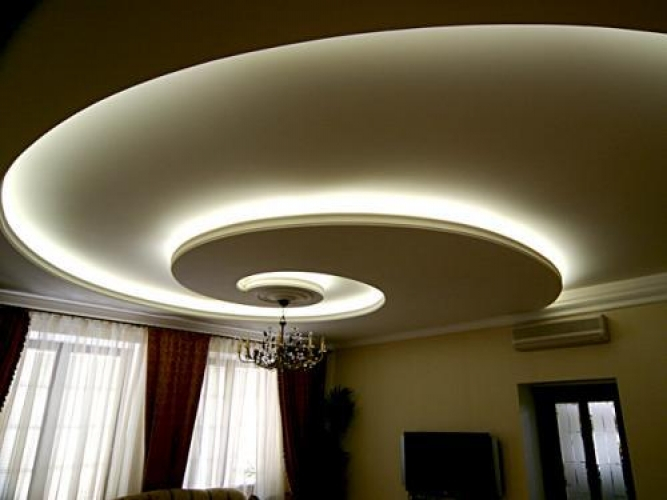
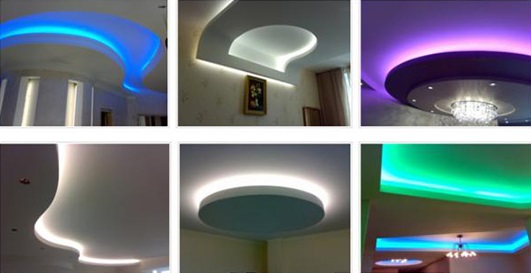
- Flexible ribbons favorably emphasize the curly lines of the two-level ceiling, accentuating the guest space of the living room.
- The selection of a complex design of a dining area with a table-rack looks unusual, while it is not without harmony.

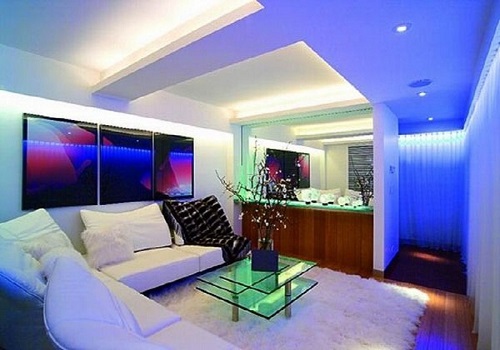
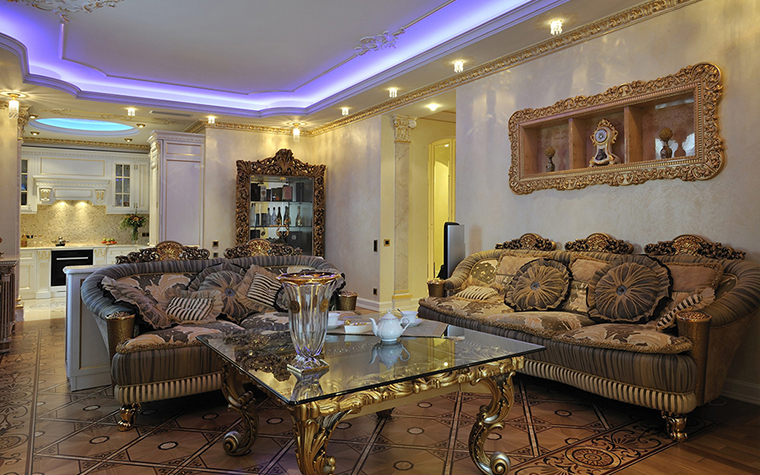
- Receiving a combination of LED lighting and spotlights due to different shades allows you to create a fancy ceiling composition.
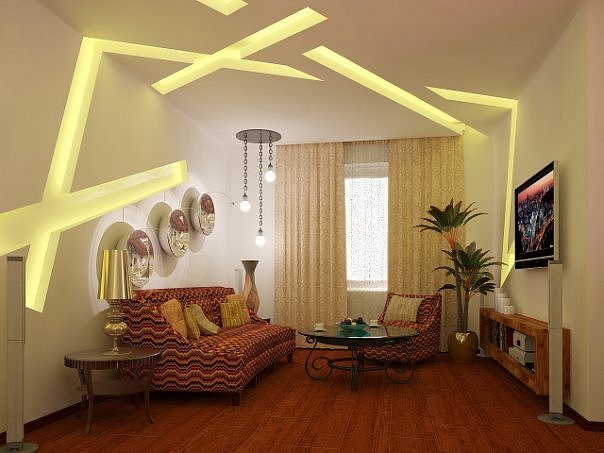
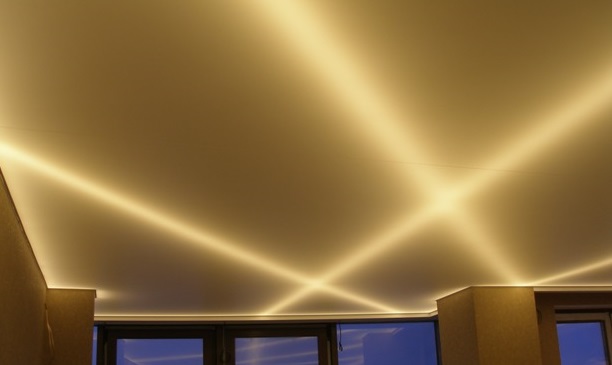
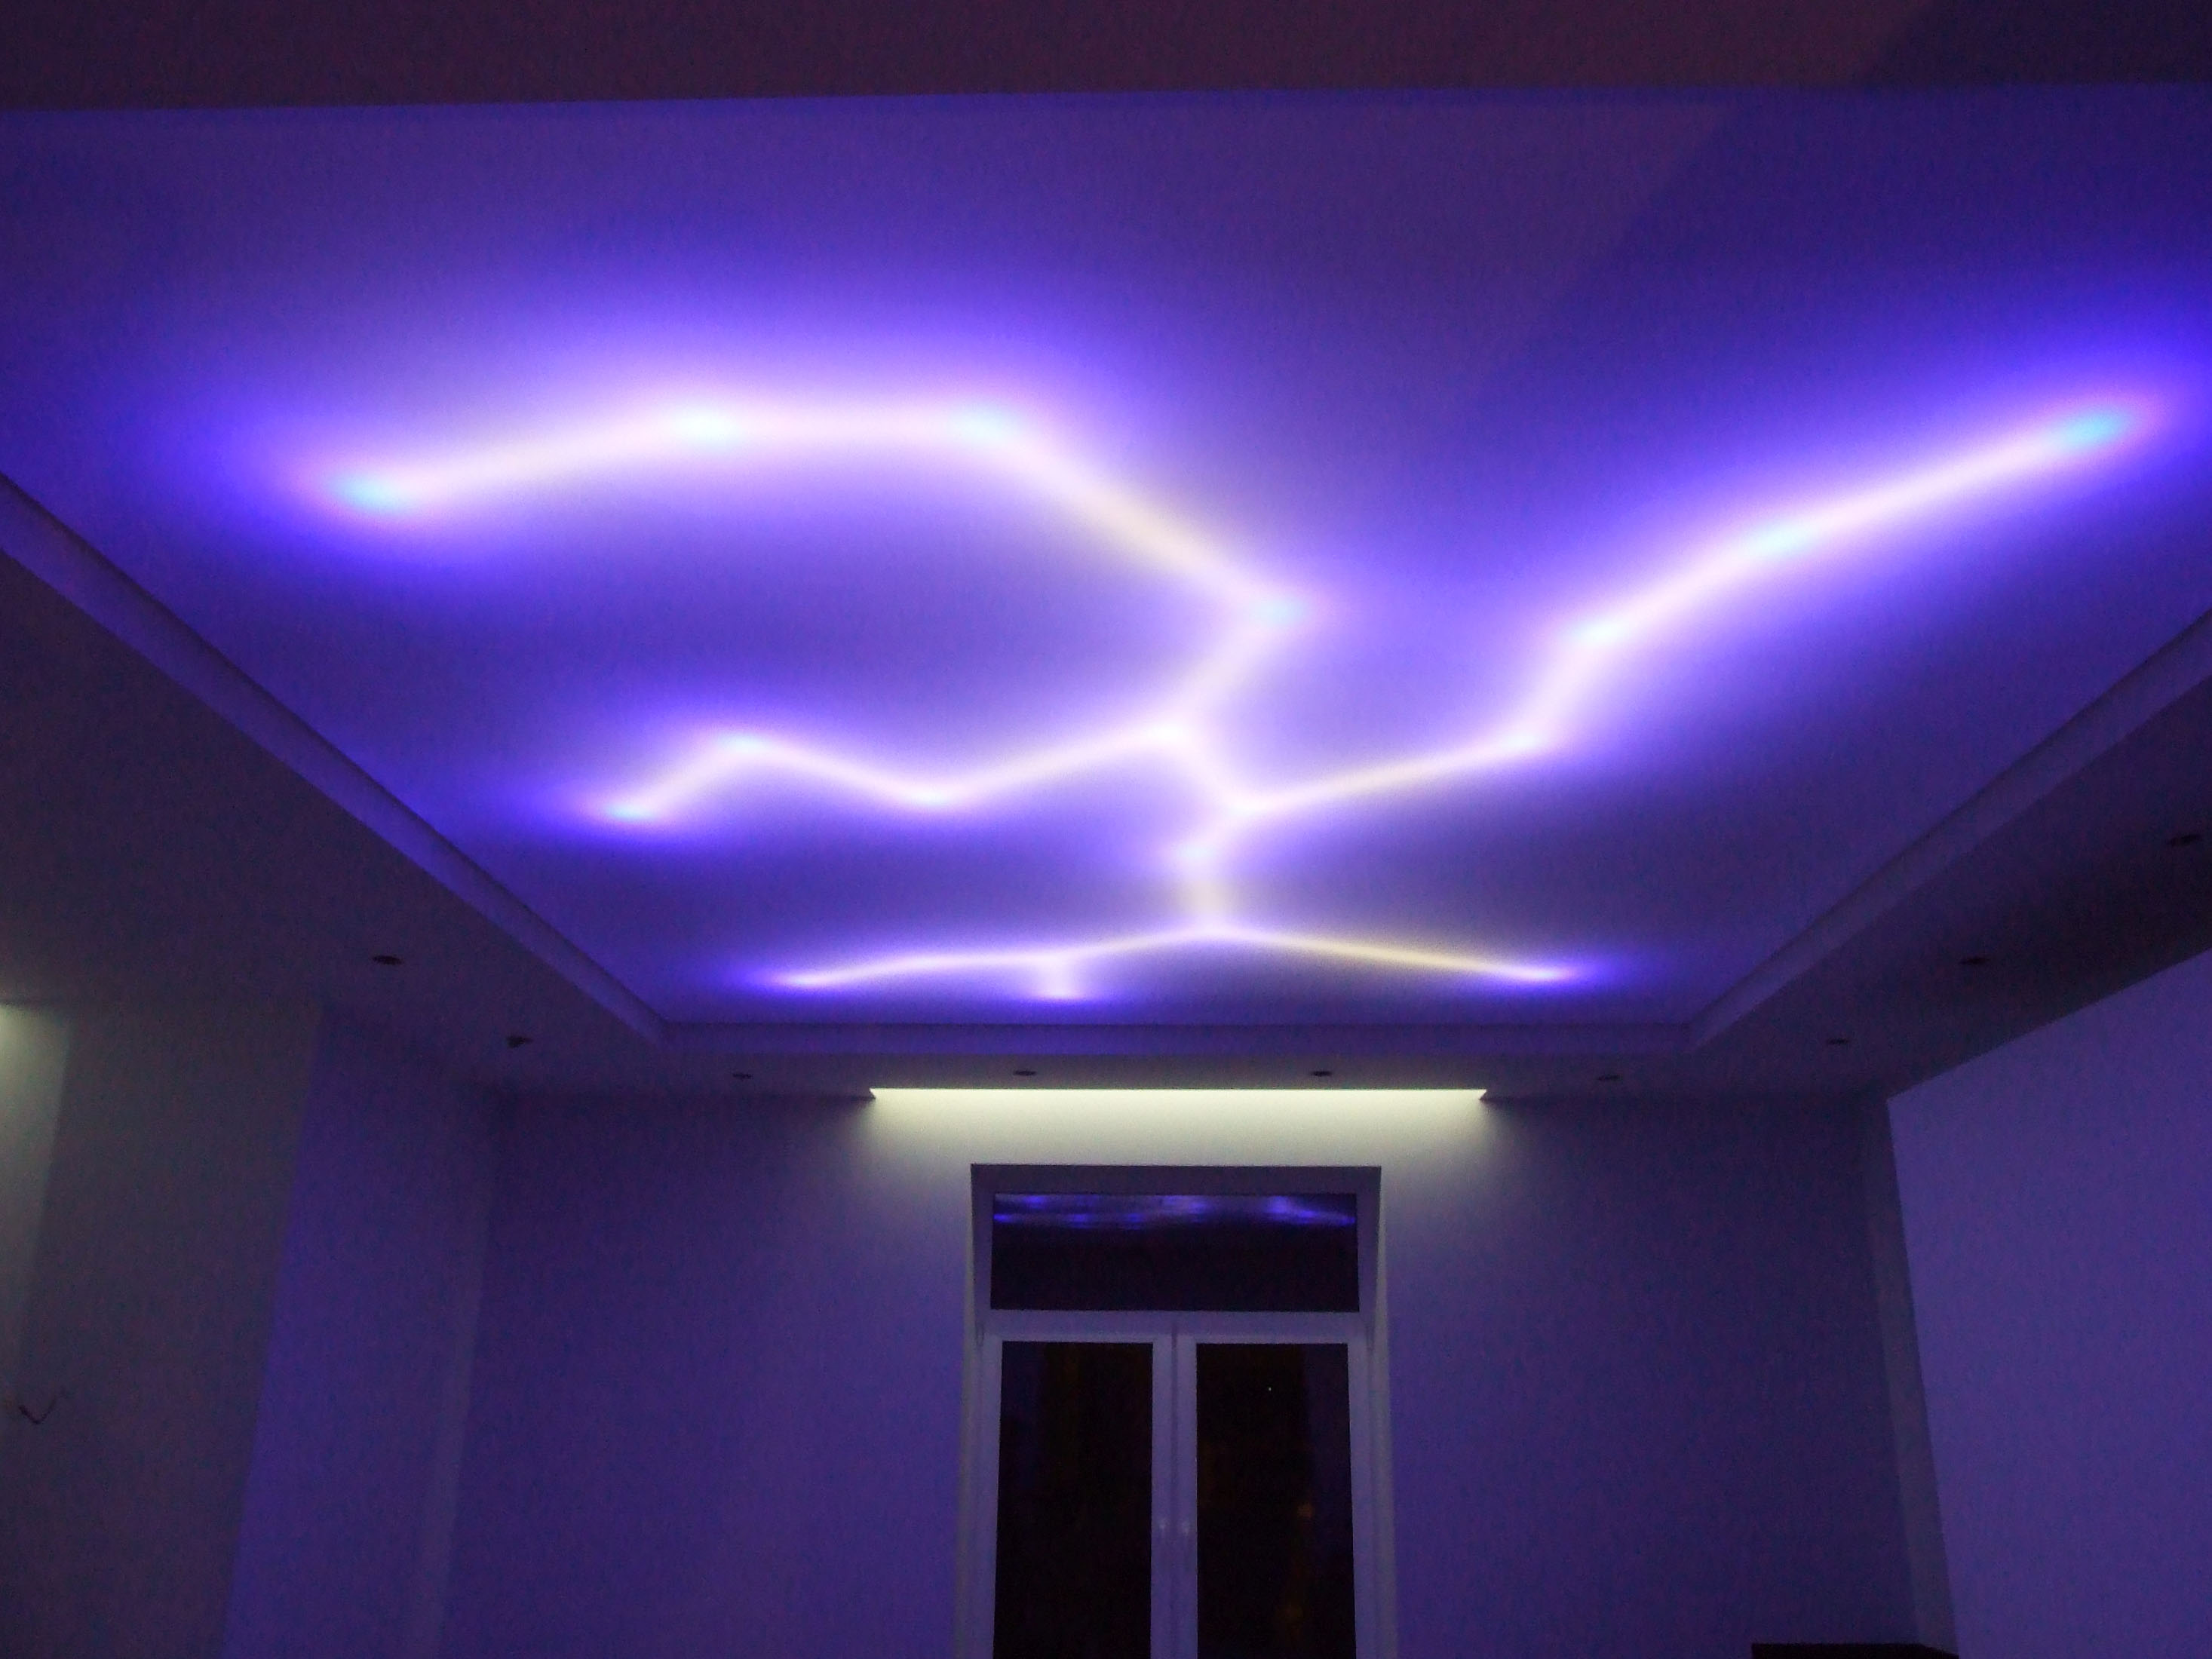
- An unusual version of the built-in ribbon lights with the effect of lightning on the ceiling looks impressive.
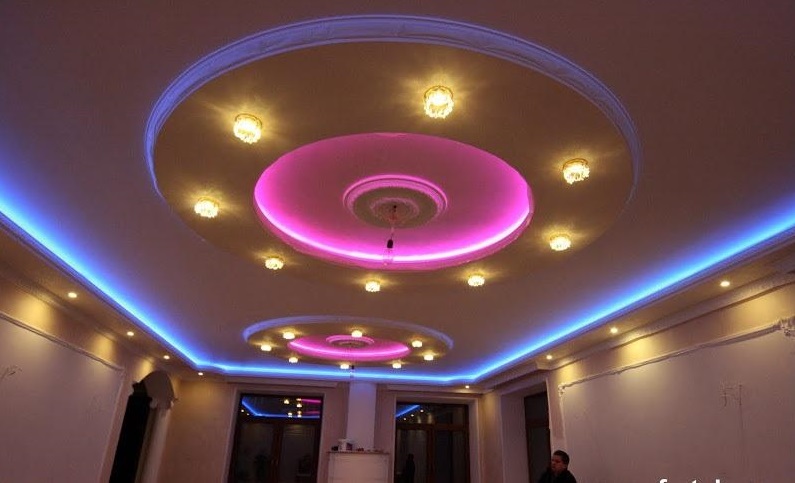
- Emphasizing a multi-level ceiling space with a backlight of different colors creates a unique effect.
- Selection of a small fragment of the stretch ceiling with tape lighting creates the illusion of realism of the image.
In this video you will find a master class on the installation of LED tape, and useful tips that will help you avoid common mistakes.


